Caching for ML Model Deployments
In a previous blog post we introduced the decorator pattern for ML model deployments and then showed how to use the pattern to build extensions to a normal model deployment. For example, in this blog post we added data enrichment to a deployed model. This extension was added without having to modify the machine learning model code at all, we were able to do it by using the decorator pattern. In this blog post we’ll add caching functionality to a model in the same way.
This blog post was written in a Jupyter notebook, some of the code and commands found in it reflects this.
Introduction
In a software system, a cache is a data store that is used to temporarily store computation results or frequently-accessed data. When accessing the results of a computation from a cache, we are able to avoid paying the cost of recomputing the result. When accessing a frequently accessed piece of data we are able to avoid paying the cost of accessing the data from a slower data store. This type of caching is used when accessing data from a slower data store than the cache. When a cache hit occurs, the data being sought is found and returned to the caller. When a “miss” occurs, the data is not found and must be recomputed or accessed from the slower data store by the caller. A data cache is generally built using storage that has low latency, which means that it is more expensive to run.
Machine learning model deployments can benefit from caching because making predictions with a model can be a CPU-intensive process, especially for large and complex models. Predictions that take a long time to make can be cached and returned later when the same prediction is requested. This type of caching is also known as memoization. Another reason that a prediction can take a long time to create is if data enrichment is needed. Data enrichment is the process of adding fields to a model's input from a data store before a prediction is made, this process can add latency to the prediction and can benefit from caching.
In order to enable prediction caching possible from ML models, we need to make sure that the model produces deterministic predictions. Determinism is a property of algorithms that says that the algorithm will always return the same output for the same input. If the model for which we want to cache predictions returns a different prediction for the same inputs, then we wouldn’t be able to cache the predictions at all since we wouldn’t be able to guarantee that the model would return the same prediction that we had cached.
In this blog post, we’ll show how to create a simple decorator that is able to cache predictions for an ML model that is deployed to a production system. We'll also show how to deploy the decorator along with the model to a RESTful service.
All of the code is available in this github repository.
Software Architecture
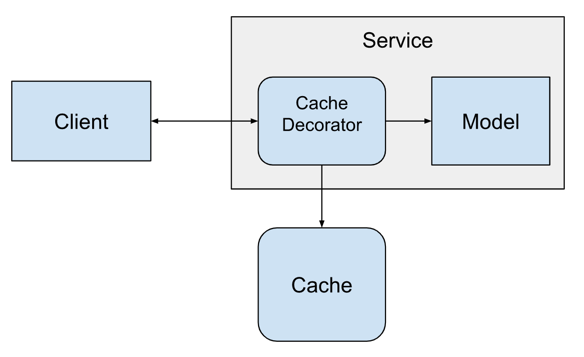
For caching predictions, we’ll be using Redis. Redis is a data structure store that allows users to save and modify data structures in a remote service. This allows many clients to safely access the same data from a centralized service. Redis supports many different data structures, but we’ll be using the key-value store functionality to save our predictions.
Installing the Model
To make this blog post a little shorter we won't train a completely new model. Instead we'll install a model that we've built in a previous blog post. The code for the model is in this github repository.
To install the model, we can use the pip command and point it at the github repo of the model.
from IPython.display import clear_output
from IPython.display import Markdown as md

!pip install -e git+https://github.com/schmidtbri/regression-model#egg=insurance_charges_model

clear_output()
To make a prediction with the model, we'll import the model's class.
from insurance_charges_model.prediction.model import InsuranceChargesModel
Now we can instantiate the model:
model = InsuranceChargesModel()

clear_output()
To make a prediction, we'll need to use the model's input schema class.
from insurance_charges_model.prediction.schemas import InsuranceChargesModelInput, \
    SexEnum, RegionEnum

model_input = InsuranceChargesModelInput(
    age=42,
    sex=SexEnum.female,
    bmi=24.0,
    children=2,
    smoker=False,
    region=RegionEnum.northwest)
The model's input schema is called InsuranceChargesModelInput and it encompasses all of the features required by the model to make a prediction.
Now we can make a prediction with the model by calling the predict() method with an instance of the InsuranceChargesModelInput class.
prediction = model.predict(model_input)

prediction
InsuranceChargesModelOutput(charges=8640.78)
The model predicts that the charges will be $8640.78.
We can view input schema of the model as a JSON schema document by calling the .schema() method on the class.
model.input_schema.schema()
{'title': 'InsuranceChargesModelInput',
 'description': "Schema for input of the model's predict method.",
 'type': 'object',
 'properties': {'age': {'title': 'Age',
   'description': 'Age of primary beneficiary in years.',
   'minimum': 18,
   'maximum': 65,
   'type': 'integer'},
  'sex': {'title': 'Sex',
   'description': 'Gender of beneficiary.',
   'allOf': [{'$ref': '#/definitions/SexEnum'}]},
  'bmi': {'title': 'Body Mass Index',
   'description': 'Body mass index of beneficiary.',
   'minimum': 15.0,
   'maximum': 50.0,
   'type': 'number'},
  'children': {'title': 'Children',
   'description': 'Number of children covered by health insurance.',
   'minimum': 0,
   'maximum': 5,
   'type': 'integer'},
  'smoker': {'title': 'Smoker',
   'description': 'Whether beneficiary is a smoker.',
   'type': 'boolean'},
  'region': {'title': 'Region',
   'description': 'Region where beneficiary lives.',
   'allOf': [{'$ref': '#/definitions/RegionEnum'}]}},
 'definitions': {'SexEnum': {'title': 'SexEnum',
   'description': "Enumeration for the value of the 'sex' input of the model.",
   'enum': ['male', 'female'],
   'type': 'string'},
  'RegionEnum': {'title': 'RegionEnum',
   'description': "Enumeration for the value of the 'region' input of the model.",
   'enum': ['southwest', 'southeast', 'northwest', 'northeast'],
   'type': 'string'}}}
Profiling the Model
In order to get an idea of how much time it takes for our model to make a prediction, we'll profile it by making predictions with random data. To do this, we'll use the Faker package. We can install it with this command:
!pip install Faker

clear_output()
We'll create a function that can generate a random sample that meets the model's input schema:
from faker import Faker

faker = Faker()

def generate_record() -> InsuranceChargesModelInput:
    record = {
        "age": faker.random_int(min=18, max=65),
        "sex": faker.random_choices(elements=("male", "female"), length=1)[0],
        "bmi": faker.random_int(min=15000, max=50000)/1000.0,
        "children": faker.random_int(min=0, max=5),
        "smoker": faker.boolean(),
        "region": faker.random_choices(elements=("southwest", "southeast", "northwest", "northeast"), length=1)[0]
    }
    return InsuranceChargesModelInput(**record)
The function returns an instance of the InsuranceChargesModelInput class, which is the type required by the model's predict() method. We'll use this function to profile the predict() method of the model.
It's really hard to see a performance difference with one sample, so we'll perform a test with many random samples to see the difference. To start, we'll generate 1000 samples and save them:
samples = []

for _ in range(1000):
    samples.append(generate_record())
By using the timeit module from the standard library, we can measure how much time it takes to call the model's predict method with a random sample. We'll make 1000 predictions.
import timeit

total_seconds = timeit.timeit("[model.predict(sample) for sample in samples]",
                              number=1, globals=globals())

seconds_per_sample = total_seconds / len(samples)
milliseconds_per_sample = seconds_per_sample * 1000.0
The model took 32.997 seconds to perform 1000 predictions, therefore it took 0.033 seconds to make a single prediction. The model takes about 32.997 milliseconds to make a prediction.
Hashing Model Inputs
Before we can build a caching decorator, we'll need to understand a little bit about hashing and how to use it for caching. A hashing operation is an operation takes in data of arbritrary size as input and returns data of a fixed size. A "hash" value refers to the fixed-size data that is returned from a hashing operation. Hashing has many uses in computer science, in this application we'll us hashing to uniquely identify some inputs that are provided to the ML model that we are decorating.
Hashing is already built into the Python standard library through the hash() function, but it is only supported on certain types of objects. We can try it out using an instance of the model's input schema:
model_input = InsuranceChargesModelInput(
    age=42,
    sex=SexEnum.female,
    bmi=24.0,
    children=2,
    smoker=False,
    region=RegionEnum.northwest)

model_input_dict = model_input.dict()
frozen_dict = frozenset(model_input_dict.keys()), frozenset(model_input_dict.values())

hash(frozen_dict)
-4360805119606244359
To try out hashing, we converted an instance of the model's input schema into a dictionary, and then converted the keys and values of the dictionary into frozensets. We then used the frozensets with the hash() function to create an integer value. The integer is the hashed value that we need to uniquely identify the inputs to the model.
To see how hashing works, we'll create a separate input instance for the model that has the exact same values and hash it:
model_input = InsuranceChargesModelInput(
    age=42,
    sex=SexEnum.female,
    bmi=24.0,
    children=2,
    smoker=False,
    region=RegionEnum.northwest)

model_input_dict = model_input.dict()
frozen_dict = frozenset(model_input_dict.keys()), frozenset(model_input_dict.values())

hash(frozen_dict)
-4360805119606244359
The hashed values are exactly the same, as we expected. The hashes value should be different if any of the values in the model input change:
model_input = InsuranceChargesModelInput(
    age=42,
    sex=SexEnum.female,
    bmi=24.2,
    children=2,
    smoker=False,
    region=RegionEnum.northwest)

model_input_dict = model_input.dict()
frozen_dict = frozenset(model_input_dict.keys()), frozenset(model_input_dict.values())

hash(frozen_dict)
-7065881474845529459
The "bmi" field changed from 24.0 to 24.2, so we got a completely different hashed value.
Hashing is a quick and easy way to identify inputs which will allow us to store the predictions of the model in the cache and retrieve them later.
Creating the Redis Cache Decorator
We'll be using Redis to hold the cached predictions of the model. To access the Redis instance, we'll use the redis python package, which we'll install with this command:
!pip install redis

clear_output()
Now we can implement the decorator class:
import os
from typing import List, Optional
from ml_base.decorator import MLModelDecorator
import redis
import json


class RedisCachingDecorator(MLModelDecorator):
    """Decorator for caching around an MLModel instance."""

    def __init__(self, host: str, port: int, database: int, prefix: Optional[str] = None,
                 hashing_fields: Optional[List[str]] = None) -> None:

        super().__init__(host=host, port=port, database=database, prefix=prefix,
                         hashing_fields=hashing_fields)

        self.__dict__["_redis_client"] = redis.Redis(host=host, port=port, db=database)

    def predict(self, data):
        if self._configuration["prefix"] is not None:
            prefix = "{}/{}/{}/".format(self._configuration["prefix"],
                                        self._model.qualified_name,
                                        self._model.version)
        else:
            prefix = "{}/{}/".format(self._model.qualified_name,
                                     self._model.version)

        # select hashing fields from input
        if self._configuration["hashing_fields"] is not None:
            data_dict = {key: data.dict()[key] for key in self._configuration["hashing_fields"]}
        else:
            data_dict = data.dict()

        # creating a key for the prediction inputs provided
        frozen_data = frozenset(data_dict.keys()), frozenset(data_dict.values())
        key = prefix + str(hash(frozen_data))

        # check if the prediction is in the cache
        prediction = self.__dict__["_redis_client"].get(key)

        # if the prediction is present in the cache, then deserialize it and return the prediction
        if prediction is not None:
            prediction = json.loads(prediction)
            prediction = self._model.output_schema(**prediction)
            return prediction
        # if the prediction is not present in the cache, then make a prediction, save it to the cache, and return the prediction
        else:
            prediction = self._model.predict(data)
            serialized_prediction = json.dumps(prediction.dict())
            self.__dict__["_redis_client"].set(key, serialized_prediction)
            return prediction
The caching decorator works very simply, when it receives inputs for the model it:
- creates a key for the model input using hashing
- checks if the key is present in the cache
- if the key is present:
- retrieves the prediction for that key
- deserializes the contents of the cache into the output type of the model
- returns the prediction to the caller
- if the key is not present:
- makes a prediction with the model it is decorating
- serializes the prediction to a JSON string
- saves the prediction to the cache with the key created
- returns the prediction to the caller
The key created for each cache entry is made up of the model's qualified name, the model version and an optional prefix. The prefix is used to differentiate the predictions that are cached in a more flexible way. The caching decorator uses JSON as a serialization format to store information in the cache.
Using the Redis Cache Decorator
In order to try out the decorator, we'll need to run a local Redis instance. We can start one using Docker with this command:
!docker run -d -p 6379:6379 --name local-redis redis/redis-stack-server:latest
836c0d557926df641a2e657bcf0d935ec7b1e361b4de5dab6a9abad9371262ea
To test out the decorator we first need to instantiate the model object that we want to use with the decorator.
model = InsuranceChargesModel()
Next, we’ll instantiate the decorator with the connection parameters for the Redis docker container.
caching_decorator = RedisCachingDecorator(host="localhost",
                                          port=6379,
                                          database=0,
                                          prefix="prefix")
We can add the model instance to the decorator after it’s been instantiated like this:
decorated_model = caching_decorator.set_model(model)
We can see the decorator and the model objects by printing the reference to the decorator:
decorated_model
RedisCachingDecorator(InsuranceChargesModel)
The decorator object is printing out it's own type along with the type of the model that it is decorating.
Now we’ll try to use the decorator and the model together by making a few predictions.
model_input = InsuranceChargesModelInput(
    age=46,
    sex=SexEnum.female,
    bmi=24.0,
    children=2,
    smoker=False,
    region=RegionEnum.northwest)

prediction = decorated_model.predict(model_input)

prediction
InsuranceChargesModelOutput(charges=9612.64)
The first time we make a prediction with a given input, we'll get the prediction made by the model and the decorator will store the prediction in the cache.
We can view the key in the redis database to see how it is stored.
!docker exec local-redis redis-cli SCAN 0
0
prefix/insurance_charges_model/0.1.0/5926980192354242260
There is a single key in the redis database. We'll access they contents of the key like this:
!docker exec local-redis redis-cli GET prefix/insurance_charges_model/0.1.0/5926980192354242260
{"charges": 9612.64}
The prediction is stored in the key as a JSON string.
We'll try the same prediction again:
model_input = InsuranceChargesModelInput(
    age=46,
    sex=SexEnum.female,
    bmi=24.0,
    children=2,
    smoker=False,
    region=RegionEnum.northwest)

prediction = decorated_model.predict(model_input)

prediction
InsuranceChargesModelOutput(charges=9612.64)
This time the prediction was not made by the model, it was found in the Redis cache and returned by the decorator instead of being made again.
Next, we'll use the 1000 samples we generated above to make predictions with the decorated model:
decorated_total_seconds = timeit.timeit("[decorated_model.predict(sample) for sample in samples]",
                                        number=1, globals=globals())

decorated_seconds_per_sample = decorated_total_seconds / len(samples)
decorated_milliseconds_per_sample = decorated_seconds_per_sample * 1000.0
The decorated model took 36.419 seconds to perform 1000 predictions the first time that it saw the prediction inputs, therefore it took 0.0364 seconds to make a single prediction. The decorated model takes about 36.419 milliseconds to make a prediction.
We'll run the same samples through again:
decorated_total_seconds = timeit.timeit("[decorated_model.predict(sample) for sample in samples]",
                                        number=1, globals=globals())

decorated_seconds_per_sample = decorated_total_seconds / len(samples)
decorated_milliseconds_per_sample = decorated_seconds_per_sample * 1000.0
The decorated model took 0.88 seconds to perform 1000 predictions the second time that it saw the prediction inputs, therefore it took 0.0009 seconds to make a single prediction. The decorated model takes about 0.88 milliseconds to access a single prediction and return it.
It took less time because the cached predictions were returned more quickly because we requested the same predictions from the model.
We can get the amount of memory used by the cache by accessing the keys and summing up the number of bytes.
r = redis.StrictRedis(host='localhost', port=6379, db=0)

decorated_number_of_bytes = 0
decorated_total_entries = 0
for key in r.scan_iter("prefix*"):
    decorated_number_of_bytes += len(r.get(key))
    decorated_total_entries = decorated_total_entries + 1

decorated_average_number_of_bytes = decorated_number_of_bytes / decorated_total_entries
The keys in the cache take up a total of 20624 bytes. The average number of bytes per cache entry is 20.6.
We'll clear the redis database to make sure the contents don't intefere with the next things we want to try.
!docker exec local-redis redis-cli FLUSHDB
OK
Selecting Fields For Hashing
In certain situations, not all of the fields in the model's input should be used to create a hash. This may be because not all of the model's input fields are actually used for making a prediction. Some fields may be used for logging or debugging and do not actually affect the prediction created by the model. If changing the value of a field does not affect the value of the prediction created by the model, it should not be used to create the hashed key for the cache.
The caching decorator supports selecting specific fields from the input to create the cache key. The option is called "hashing_fields" and is provided to the decorator instance like this:
caching_decorator = RedisCachingDecorator(host="localhost",
                                          port=6379,
                                          database=0,
                                          prefix="prefix",
                                          hashing_fields=["age", "sex", "bmi", "children", "smoker"])

decorated_model = caching_decorator.set_model(model)
The decorator now uses all of the input fields except for the "region" field to create the key.
To try out the functionality, we'll create a prediction with the decorated model. The prediction will get saved in the cache.
model_input = InsuranceChargesModelInput(
    age=52,
    sex=SexEnum.female,
    bmi=24.0,
    children=3,
    smoker=False,
    region=RegionEnum.northwest)

prediction = decorated_model.predict(model_input)

prediction
InsuranceChargesModelOutput(charges=15219.19)
We'll now make the same prediction, but this time the prediction will come from the cache because it was saved there previously.
model_input = InsuranceChargesModelInput(
    age=52,
    sex=SexEnum.female,
    bmi=24.0,
    children=3,
    smoker=False,
    region=RegionEnum.northwest)

prediction = decorated_model.predict(model_input)

prediction
InsuranceChargesModelOutput(charges=15219.19)
We'll make the prediction one more time, but this time we'll change the value of the "region" field.
model_input = InsuranceChargesModelInput(
    age=52,
    sex=SexEnum.female,
    bmi=24.0,
    children=3,
    smoker=False,
    region=RegionEnum.southeast)

prediction = decorated_model.predict(model_input)

prediction
InsuranceChargesModelOutput(charges=15219.19)
The predicted value should have changed because the region changed. It didn't change because we accessed the prediction from the cache instead of creating a new one. This happened because we ignored the value of the "region" field when creating the hashed key in the cache.
!docker exec local-redis redis-cli FLUSHDB
OK
Improving the Performance of the Decorator
When a prediction is stored in the cache, it is currently serialized using the JSON format. This format is simple and easy to understand, but it is not the most efficient format for serialization in terms of the size of the data and the time it takes to do the serialization.
To try to improve the efficiency of the caching decorator we'll add options for other serialization formats and also try to use compression. Another way to reduce the memory usage of the cache is to reduce the precision of the numbers given to the model. These approaches will be fully explained below.
We'll be using MessagePack to do serialization and Snappy for compression, so we need to install the packages:
!pip install msgpack
!pip install python-snappy

clear_output()
We'll recreate the RedisCachingDecorator class with the code needed to support the new features we want to work with.
import msgpack
import snappy


class RedisCachingDecorator(MLModelDecorator):
    """Decorator for caching around an MLModel instance."""

    def __init__(self, host: str, port: int, database: int, prefix: Optional[str] = None,
                 hashing_fields: Optional[List[str]] = None, serder: str = "JSON",
                 use_compression: bool = False,
                 reduced_precision: bool = False,
                 number_of_places: Optional[int] = None
                ) -> None:

        if serder not in ["JSON", "MessagePack"]:
            raise ValueError("Serder option not supported.")

        if reduced_precision is True and number_of_places is None:
            raise ValueError("number_of_places must be provided when reduced_precision is True.")

        if number_of_places is None and reduced_precision is True:
            raise ValueError("reduced_precision must be True when number_of_places is provided.")

        super().__init__(host=host, port=port, database=database, prefix=prefix,
                         hashing_fields=hashing_fields, serder=serder,
                         use_compression=use_compression,
                         reduced_precision=reduced_precision,
                         number_of_places=number_of_places)

        self.__dict__["_redis_client"] = redis.Redis(host=host, port=port, db=database)

    def predict(self, data):
        if self._configuration["prefix"] is not None:
            prefix = "{}/{}/{}/".format(self._configuration["prefix"],
                                        self._model.qualified_name,
                                        self._model.version)
        else:
            prefix = "{}/{}/".format(self._model.qualified_name,
                                     self._model.version)

        # reducing the precision of the numerical fields, if it is enabled
        if self._configuration["reduced_precision"] is True:
                for field_name, field_attributes in self._model.input_schema.schema()["properties"].items():
                    if "type" in field_attributes.keys() and field_attributes["type"] == "number":
                        field_value = getattr(data, field_name)
                        setattr(data, field_name, round(field_value, self._configuration["number_of_places"]))

        # select hashing fields from input
        if self._configuration["hashing_fields"] is not None:
            data_dict = {key: data.dict()[key] for key in self._configuration["hashing_fields"]}
        else:
            data_dict = data.dict()

        # creating a key for the prediction inputs provided
        frozen_data = frozenset(data_dict.keys()), frozenset(data_dict.values())
        key = prefix + str(hash(frozen_data))

        # check if the prediction is in the cache
        prediction = self.__dict__["_redis_client"].get(key)

        # if the prediction is present in the cache
        if prediction is not None:

            # optionally decompressing the bytes
            if self._configuration["use_compression"]:
                decompressed_prediction = snappy.decompress(prediction)
            else:
                decompressed_prediction = prediction

            # deserializing to bytes
            if self._configuration["serder"] == "JSON":
                deserialized_prediction = json.loads(decompressed_prediction.decode())
            elif self._configuration["serder"] == "MessagePack":
                deserialized_prediction = msgpack.loads(decompressed_prediction)
            else:
                raise ValueError("Serder option not supported.")

            # creating the output instance
            prediction = self._model.output_schema(**deserialized_prediction)

            return prediction

        # if the prediction is not present in the cache
        else:
            # making a prediction with the model
            prediction = self._model.predict(data)

            # serializing to bytes
            if self._configuration["serder"] == "JSON":
                serialized_prediction = str.encode(json.dumps(prediction.dict()))
            elif self._configuration["serder"] == "MessagePack":
                serialized_prediction = msgpack.dumps(prediction.dict())
            else:
                raise ValueError("Serder option not supported.")

            # optionally compressing the bytes
            if self._configuration["use_compression"]:
                serialized_prediction = snappy.compress(serialized_prediction)

            # saving the prediction to the cache
            self.__dict__["_redis_client"].set(key, serialized_prediction)

            return prediction
The new implementation above includes options to enable MessagePack for serialization/deserialization, snappy for compression, and the ability to reduce the precision of numerical fields in the model input. We'll try out each option individually.
MessagePack Serialization
MessagePack is a binary serialization format designed for small, efficient and flexible serialization.
To enable MessagePack, we'll instantiate the decorator setting the "serder" option to "MessagePack". We'll use a prefix to separate the cache entries that use MessagePack from the other cache entries.
msgpack_caching_decorator = RedisCachingDecorator(host="localhost",
                                                  port=6379,
                                                  database=0,
                                                  prefix="msgpack",
                                                  serder="MessagePack")

mspgpack_decorated_model = msgpack_caching_decorator.set_model(model)
The first time we make a prediction, the model will be used and the prediction will get serialized to MessagePack and saved to the cache.
model_input = InsuranceChargesModelInput(
    age=55,
    sex=SexEnum.female,
    bmi=25.0,
    children=4,
    smoker=False,
    region=RegionEnum.northwest)

prediction = mspgpack_decorated_model.predict(model_input)

prediction
InsuranceChargesModelOutput(charges=15113.29)
The second time we make a prediction, the cache entry will be used instead.
model_input = InsuranceChargesModelInput(
    age=55,
    sex=SexEnum.female,
    bmi=25.0,
    children=4,
    smoker=False,
    region=RegionEnum.northwest)

prediction = mspgpack_decorated_model.predict(model_input)

prediction
InsuranceChargesModelOutput(charges=15113.29)
The MessagePack format works, now we'll do some testing to see if it improves the serialization/deserialization performance.
As before, we'll make the predictions on the samples to fill in the cache with predictions. We'll be using the 1000 samples generated above to keep the comparison fair.
msgpack_total_seconds = timeit.timeit("[mspgpack_decorated_model.predict(sample) for sample in samples]",
                                      number=1, globals=globals())

msgpack_seconds_per_sample = msgpack_total_seconds / len(samples)
msgpack_milliseconds_per_sample = msgpack_seconds_per_sample * 1000.0
The decorated model that uses MessagePack took 35.627 seconds to perform 1000 predictions the first time that it saw the prediction inputs. The decorated model takes about 35.627 milliseconds to make a single prediction.
Most of the time for this step is taken up by the model's prediction algorithm, this is the reason why its a similar amount of time as the JSON serder we used before.
Now we can try the same predictions again. This time, they'll be accessed from the cache and returned more quickly.
msgpack_total_seconds = timeit.timeit("[mspgpack_decorated_model.predict(sample) for sample in samples]",
                                      number=1, globals=globals())

msgpack_seconds_per_sample = msgpack_total_seconds / len(samples)
msgpack_milliseconds_per_sample = msgpack_seconds_per_sample * 1000.0
The model that uses MessagePack took 0.955 seconds to perform 1000 predictions the second time that it saw the prediction inputs. The decorated model takes about 0.955 milliseconds to access a single prediction and return it.
The MessagePack serder performs at around the same speed as the JSON serder. The test we did with JSON above took about 0.88 ms for each sample, the MessagePack serder took 0.955 ms per sample.
We can see how much space the cache entries is taking up by querying each key and summing up the number of bytes:
msgpack_number_of_bytes = 0
msgpack_total_entries = 0
for key in r.scan_iter("msgpack*"):
    msgpack_number_of_bytes += len(r.get(key))
    msgpack_total_entries = msgpack_total_entries + 1

msgpack_average_number_of_bytes = msgpack_number_of_bytes / msgpack_total_entries
The keys in the original JSON cache took up a total of 20624 bytes. The keys in the MessagePack cache take up a total of 18018 bytes and the average number of bytes per MessagePack cache entry is 18.0.
By using MessagePack serialization we were able to use less memory in the cache.
!docker exec local-redis redis-cli FLUSHDB
OK
Snappy Compression
Snappy is a compression algorithm built by Google that targets high compression ratios and high compressions speed. We can try to reduce the memory used by the cache by compressing the cache entries with the Snappy algorithm. This approach was inspired by another blog post.
Enabling compression on the decorator is very simple, we'll just set the "use_compression" parameter to "True" when instantiating the caching decorator. In this example we'll use JSON serialization combined with compression.
compressing_caching_decorator = RedisCachingDecorator(host="localhost",
                                                      port=6379,
                                                      database=0,
                                                      prefix="json+compression",
                                                      serder="JSON",
                                                      use_compression=True)

compressing_decorated_model = compressing_caching_decorator.set_model(model)
The first time we make a prediction, the model will be used and the prediction will get serialized to JSON, then compressed, and saved to the cache.
model_input = InsuranceChargesModelInput(
    age=53,
    sex=SexEnum.female,
    bmi=25.0,
    children=4,
    smoker=False,
    region=RegionEnum.northwest)

prediction = compressing_decorated_model.predict(model_input)

prediction
InsuranceChargesModelOutput(charges=15207.01)
The second time we make a prediction, the compressed cache entry will be used instead.
model_input = InsuranceChargesModelInput(
    age=53,
    sex=SexEnum.female,
    bmi=25.0,
    children=4,
    smoker=False,
    region=RegionEnum.northwest)

prediction = compressing_decorated_model.predict(model_input)

prediction
InsuranceChargesModelOutput(charges=15207.01)
The compression works, now we'll do some testing to see if it improves the serialization/deserialization performance.
compressed_total_seconds = timeit.timeit("[compressing_decorated_model.predict(sample) for sample in samples]",
                                         number=1, globals=globals())

compressed_seconds_per_sample = compressed_total_seconds / len(samples)
compressed_milliseconds_per_sample = compressed_seconds_per_sample * 1000.0
The decorator that does compression took around 35.224 ms to make a prediction and add it to the cache the first time that it sees the prediction inputs.
Most of the time for this step is taken up by the model's prediction algorithm.
Now we can try the same predictions again.
compressed_total_seconds = timeit.timeit("[compressing_decorated_model.predict(sample) for sample in samples]",
                                         number=1, globals=globals())

compressed_seconds_per_sample = compressed_total_seconds / len(samples)
compressed_milliseconds_per_sample = compressed_seconds_per_sample * 1000.0
The decorator that uses compressed JSON took 0.906 ms to make a prediction the second time that it saw the prediction inputs.
The serder that uses JSON serialization and compression performs around the same as the JSON serder. The test we did with uncompressed JSON above took about 0.88 ms for each sample.
We can see how much space the cache entries is taking up by querying each key and summing up the number of bytes:
compressed_number_of_bytes = 0
compressed_total_entries = 0
for key in r.scan_iter("json+compression*"):
    compressed_number_of_bytes += len(r.get(key))
    compressed_total_entries = compressed_total_entries + 1

compressed_average_number_of_bytes = compressed_number_of_bytes / compressed_total_entries
The keys in the original JSON cache took up a total of 20624 bytes. The keys in the MessagePack cache take up a total of 18018 bytes. The keys in the compressed JSON cache take up a total of 22627 bytes, and the average number of bytes per cache entry is 22.6.
The keys that were serialized with JSON and compressed were a few bytes bigger than the keys serialized and not compressed. It seems that compression is not saving memory in the cache, this is probably due to the small size of the entries and the fact that information was not repeated inside of the serialized data structures.
!docker exec local-redis redis-cli FLUSHDB
OK
Reducing the Precision of the Inputs
We can also try to limit the size of the cache by reducing the number of possible inputs to the hashing function. We'll demonstrate this with a few examples.
We'll start by hashing a single sample of the input of the model:
model_input = InsuranceChargesModelInput(
    age=42,
    sex=SexEnum.female,
    bmi=24.12345,
    children=2,
    smoker=False,
    region=RegionEnum.northwest)

model_input_dict = model_input.dict()
frozen_dict = frozenset(model_input_dict.keys()), frozenset(model_input_dict.values())
hash(frozen_dict)
-2801283067008197552
Next, we'll hash a very similar model input:
model_input = InsuranceChargesModelInput(
    age=42,
    sex=SexEnum.female,
    bmi=24.12346,
    children=2,
    smoker=False,
    region=RegionEnum.northwest)

model_input_dict = model_input.dict()
frozen_dict = frozenset(model_input_dict.keys()), frozenset(model_input_dict.values())
hash(frozen_dict)
5034586836711654789
The hash value produced is the second time is completely different even though the "bmi" field only changed by 0.00001. This means that these two predictions will have two different cache entries even though they are very lilely to produce exactly the same prediction. Just to make sure, we'll make the predictions using these inputs:
model_input = InsuranceChargesModelInput(
    age=42,
    sex=SexEnum.female,
    bmi=24.12345,
    children=2,
    smoker=False,
    region=RegionEnum.northwest)

prediction = model.predict(model_input)

prediction
InsuranceChargesModelOutput(charges=8640.78)
Let's try the prediction and hash with a different value for the "bmi" field:
model_input = InsuranceChargesModelInput(
    age=42,
    sex=SexEnum.female,
    bmi=24.12346,
    children=2,
    smoker=False,
    region=RegionEnum.northwest)

prediction = model.predict(model_input)

prediction
InsuranceChargesModelOutput(charges=8640.78)
The prediction came out to be the same for both values of "bmi". However, the hashed value of the input was completely different. These predictions would be saved separately from each other in the cache, event though they are exactly the same. We can cut down on the number of entries in the cache by reducing the precision of floating point numbers so that these predictions can be cached one time instead of many. By rounding down the number we'll be reducing the number of cache entries that will be placed in the cache but also affecting the accuracy of the model's predictions.
The caching decorator supports this feature, we'll just enable it by adding the "reduced_precision" and "number_of_places" options to the configuration:
low_precision_caching_decorator = RedisCachingDecorator(host="localhost",
                                                        port=6379,
                                                        database=0,
                                                        prefix="low_precision",
                                                        reduced_precision=True,
                                                        number_of_places=0)

low_precision_decorated_model = low_precision_caching_decorator.set_model(model)
The first time we make a prediction, the model will be used and the prediction input will get the precision of the "bmi" field reduced to one decimal place, then the prediction will get serialized to JSON, and saved to the cache.
model_input = InsuranceChargesModelInput(
    age=42,
    sex=SexEnum.female,
    bmi=24.12345,
    children=2,
    smoker=False,
    region=RegionEnum.northwest)

prediction = low_precision_decorated_model.predict(model_input)

prediction
InsuranceChargesModelOutput(charges=8640.78)
The second time the prediction is requested, the precision of the "bmi" field is reduced again in the same way, making the prediction input the same as before even though the values for the "bmi" field are not exactly the same. This will create the same hashed value which will retrieve the prediction from the cache and return it to the user.
model_input = InsuranceChargesModelInput(
    age=42,
    sex=SexEnum.female,
    bmi=24.4321,
    children=2,
    smoker=False,
    region=RegionEnum.northwest)

prediction = low_precision_decorated_model.predict(model_input)

prediction
InsuranceChargesModelOutput(charges=8640.78)
The predictions are the same even though the inputs were different. We can view the keys in the cache like this:
!docker exec local-redis redis-cli SCAN 0
0
low_precision/insurance_charges_model/0.1.0/-4360805119606244359
There's only one entry in the cache, which means that first prediction was used and no new entry was made for the second set of inputs.
Although this is not always an ideal way to save memory, there are some model deployments that can benefit from this approach. All that is needed is to analyze how much precision the model needs from its numerical inputs. It rarely makes sense to store predictions with an unlimited precision in their numerical inputs in the cache.
!docker exec local-redis redis-cli FLUSHDB
OK
Adding the Decorator to a Deployed Model
Now that we have a working decorator, we can use it inside of a service alongside the model. To do this, we'll use the rest_model_service package to quickly create a RESTful service. You can learn more about this package in this blog post.
!pip install rest_model_service

clear_output()
To create a service for our model, all that is needed is that we add a YAML configuration file to the project. The configuration file looks like this:
service_title: Insurance Charges Model Service
models:
  - qualified_name: insurance_charges_model
    class_path: insurance_charges_model.prediction.model.InsuranceChargesModel
    create_endpoint: true
    decorators:
      - class_path: ml_model_caching.redis.RedisCachingDecorator
        configuration:
          host: "localhost"
          port: 6379
          database: 0
The service_title field is the name of the service as it will appear in the documentation. The models field is an array that contains the details of the models we would like to deploy in the service. The class_path points at the MLModel class that implement's the model's prediction logic, in this case we'll be using the same model as in the examples above. The decorators field contains the details of the decorators that we want to attach to the model instance. We want to use the RedisCachingDecorator decorator class with the configuration we've used for local testing.
To run the service locally, execute these commands:
export PYTHONPATH=./
export REST_CONFIG=./configuration/rest_configuration.yaml
uvicorn rest_model_service.main:app --reload
The service should come up and can be accessed in a web browser at http://127.0.0.1:8000. When you access that URL using a web browser you will be redirected to the documentation page that is generated by the FastAPI package.
We can try out the service with this command:
!curl -X 'POST' \
  'http://127.0.0.1:8000/api/models/insurance_charges_model/prediction' \
  -H 'accept: application/json' \
  -H 'Content-Type: application/json' \
  -d "{ \
        \"age\": 65, \
        \"sex\": \"male\", \
        \"bmi\": 50, \
        \"children\": 5, \
        \"smoker\": true, \
        \"region\": \"southwest\" \
    }"
{"charges":46277.67}
We can check the Redis instance to make sure that the cache is being used:
!docker exec local-redis redis-cli SCAN 0
0
insurance_charges_model/0.1.0/-3948524794153351987
By using the MLModel base class provided by the ml_base package and the REST service framework provided by the rest_model_service package we're able to quickly stand up a service to host the model. The decorator that we want to test can also be added to the model through configuration, including all of its parameters.
!docker exec local-redis redis-cli FLUSHDB
OK
Deploying the Caching Decorator
Now that we have a working model and model service, we'll need to deploy it somewhere. We'll start by deploying the service locally using Docker. Once we have the service and Redis working locally, we'll deploy everything to a local Minikube instance.
Creating a Docker Image
Let's create a docker image and run it locally. The docker image is generated using instructions in the Dockerfile:
FROM python:3.9-slim

ARG BUILD_DATE

LABEL org.opencontainers.image.title="Caching for ML Models"
LABEL org.opencontainers.image.description="Caching for machine learning models."
LABEL org.opencontainers.image.created=$BUILD_DATE
LABEL org.opencontainers.image.authors="6666331+schmidtbri@users.noreply.github.com"
LABEL org.opencontainers.image.source="https://github.com/schmidtbri/caching-for-ml-models"
LABEL org.opencontainers.image.version="0.1.0"
LABEL org.opencontainers.image.licenses="MIT License"
LABEL org.opencontainers.image.base.name="python:3.9-slim"

WORKDIR ./service

# installing git because we need to install the model package from the github repository
RUN apt-get update
RUN apt-get --assume-yes install git

COPY ./ml_model_caching ./ml_model_caching
COPY ./configuration ./configuration
COPY ./LICENSE ./LICENSE
COPY ./service_requirements.txt ./service_requirements.txt

RUN pip install -r service_requirements.txt

CMD ["uvicorn", "rest_model_service.main:app", "--host", "0.0.0.0", "--port", "8000"]
The Dockerfile is used by this command to create a docker image:
!docker build -t insurance_charges_model_service:latest ../

clear_output()
To make sure everything worked as expected, we'll look through the docker images in our system:
!docker image ls | grep insurance_charges_model_service
insurance_charges_model_service latest 2c8c19151e65 32 hours ago 1.26GB
Next, we'll start the image to see if everything is working as expected. To do this we'll create a local docker network and connect the redis container and the model service container to it.
!docker network create local-network
1d8ad0b59ad831f1c6205cea3e799ee31f40109006b9a02d39db8207a7e3f339
We'll connect the running redis container that we were working with to the network.
!docker network connect local-network local-redis
Now we can start the service docker image connected to the same network as the redis container.
!docker run -d \
    -p 8000:8000 \
    --net local-network \
    -e REST_CONFIG=./configuration/local_rest_config.yaml \
    --name insurance_charges_model_service \
    insurance_charges_model_service:latest
83db77417dfa5cd33c3d7fabea8349df8b3932ef0cd2544a94b7d4958eed93bc
Notice that we're using a different configuration file that has a different hostname for the redis instance. The redis container is not accesible from localhost inside of the network so we needed to have the hostname "local-redis" in the configuration.
The service should be accessible on port 8000 of localhost, so we'll try to make a prediction using the curl command running inside of a container connected to the network:
!docker run -it --rm \
    --net local-network \
    curlimages/curl \
    curl -X 'POST' \
    'http://insurance_charges_model_service:8000/api/models/insurance_charges_model/prediction' \
    -H 'accept: application/json' \
    -H 'Content-Type: application/json' \
    -d "{ \
        \"age\": 65, \
        \"sex\": \"male\", \
        \"bmi\": 50, \
        \"children\": 5, \
        \"smoker\": true, \
        \"region\": \"southwest\" \
    }"
{"charges":46277.67}
The model predicted that the insurance charges would be $46277.67 and also saved the prediction to the Redis cache. We can view the cache entries in Redis with this command:
!docker exec local-redis redis-cli SCAN 0
0
insurance_charges_model/0.1.0/7732985413081947687
The key in the cache has this value:
!docker exec local-redis redis-cli GET insurance_charges_model/0.1.0/7732985413081947687
{"charges": 46277.67}
Since we didn't use MessagePack or Snappy compression the value is easily read as a plain JSON string.
Now that we're done with the local redis instance we'll stop and remove the docker container.
!docker kill local-redis
!docker rm local-redis

!docker kill insurance_charges_model_service
!docker rm insurance_charges_model_service

!docker network rm local-network
local-redis
local-redis
insurance_charges_model_service
insurance_charges_model_service
local-network
Deploying the Solution
To show the system in action, we’ll deploy the service and the Redis instance to a Kubernetes cluster. A local cluster can be easily started by using minikube. Installation instructions can be found here.
Creating the Kubernetes Cluster
To start the minikube cluster execute this command:
!minikube start
😄 minikube v1.26.1 on Darwin 12.5
✨ Using the virtualbox driver based on existing profile
👍 Starting control plane node minikube in cluster minikube
🔄 Restarting existing virtualbox VM for "minikube" ...
🐳 Preparing Kubernetes v1.24.3 on Docker 20.10.17 ...[K[K[K[K[K[K[K[K[K[K[K[K[K[K[K[K[K[K[K[K[K[K[K[K[K[K[K[K[K[K[K[K[K[K[K[K[K[K[K[K[K[K[K[K[K[K[K[K[K[K[K[K[K[K[K[K[K[K[K[K[K[K[K[K[K[K[K[K[K[K[K[K[K[K[K[K[K[K[K[K[K[K[K[K[K[K[K[K[K[K[K[K[K[K[K[K[K[K[K[K[K[K[K[K[K[K[K[K[K[K[K[K[K[K[K[K[K[K[K[K[K[K[K[K[K[K[K[K[K[K[K[K[K[K[K[K[K[K[K[K[K[K[K[K[K[K[K[K[K[K[K[K[K[K[K[K[K[K[K[K[K[K[K[K[K[K[K[K[K[K[K[K[K[K[K[K[K[K[K[K[K[K[K[K[K[K[K[K[K[K[K[K[K[K[K[K[K[K[K[K[K[K[K[K[K[K[K[K[K[K[K[K[K[K[K[K[K[K[K[K[K[K[K[K[K[K[K[K[K[K[K[K[K[K[K[K[K[K[K[K[K[K[K[K[K[K[K[K[K[K[K[K[K[K[K[K[K[K[K[K[K[K[K[K[K[K[K[K[K[K[K[K[K[K[K[K[K[K[K[K[K[K[K[K
🔎 Verifying Kubernetes components...
▪ Using image gcr.io/k8s-minikube/storage-provisioner:v5
▪ Using image kubernetesui/dashboard:v2.6.0
▪ Using image kubernetesui/metrics-scraper:v1.0.8
🌟 Enabled addons: default-storageclass, storage-provisioner, dashboard
🏄 Done! kubectl is now configured to use "minikube" cluster and "default" namespace by default
Let's view all of the pods running in the minikube cluster to make sure we can connect.
!kubectl get pods -A
NAMESPACE              NAME                                         READY   STATUS    RESTARTS      AGE
kube-system            coredns-6d4b75cb6d-wrrwr                     1/1     Running   7 (9h ago)    2d10h
kube-system            etcd-minikube                                1/1     Running   7 (9h ago)    2d10h
kube-system            kube-apiserver-minikube                      0/1     Running   7 (9h ago)    2d10h
kube-system            kube-controller-manager-minikube             0/1     Running   6 (9h ago)    2d10h
kube-system            kube-proxy-5n4t9                             1/1     Running   7 (9h ago)    2d10h
kube-system            kube-scheduler-minikube                      1/1     Running   6 (9h ago)    2d10h
kube-system            storage-provisioner                          1/1     Running   12 (9h ago)   2d10h
kubernetes-dashboard   dashboard-metrics-scraper-78dbd9dbf5-d4zv8   1/1     Running   4 (9h ago)    2d10h
kubernetes-dashboard   kubernetes-dashboard-5fd5574d9f-7mjlt        1/1     Running   5 (9h ago)    2d10h
Creating a Kubernetes Namespace
Now that we have a cluster and are connected to it, we'll create a namespace to hold the resources for our model deployment. The resource definition is in the kubernetes/namespace.yaml file. To apply the manifest to the cluster, execute this command:
!kubectl create -f ../kubernetes/namespace.yaml
namespace/model-services created
To take a look at the namespaces, execute this command:
!kubectl get namespace
NAME                   STATUS   AGE
default                Active   2d10h
kube-node-lease        Active   2d10h
kube-public            Active   2d10h
kube-system            Active   2d10h
kubernetes-dashboard   Active   2d10h
model-services         Active   2s
The new namespace should appear in the listing along with other namespaces created by default by the system. To use the new namespace for the rest of the operations, execute this command:
!kubectl config set-context --current --namespace=model-services
Context "minikube" modified.
Creating the Redis Service
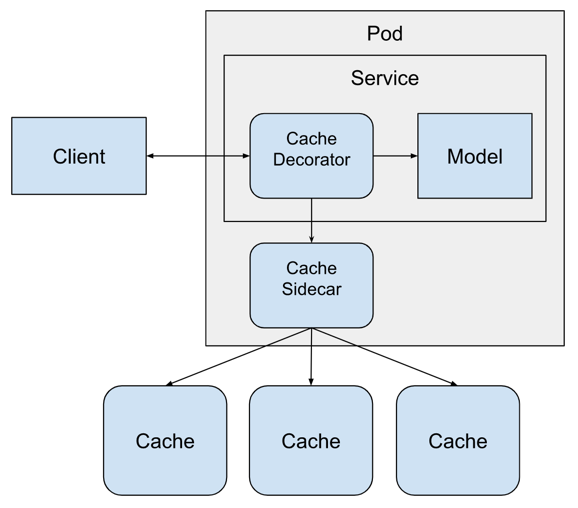
Before we can deploy the model service we need to create the Redis service that will hold the cached predictions. For this service we will create a StatefulSet that manages two instances of the Redis service. We will use both instances from the decorator running in the model service.
A StatefulSet is similar to a Deployment because it deploys Pods that are based on an identical specification. However, a StatefulSet will maintain an identity for each Pod and each one will be able to keep internal state. This is important because the Redis service is saving the cache for us, which is stateful.
Using Redis in this manner is an example of sharding. Sharding is the process of splitting up data that is too big to fit into a single computer into multiple computers. By using sharding we can make our data layer distributed, which can make it more easily to scale in the future.
A more detailed diagram of our software architecture looks like this:
The Redis service is defined in the kubernetes/redis_service.yaml file. We can create it with this command:
!kubectl create -f ../kubernetes/redis_service.yaml
service/redis-service created
statefulset.apps/redis-st created
We can view the pods associated with this service:
!kubectl get pods | grep redis
redis-st-0   1/1     Running             0          4s
redis-st-1   0/1     ContainerCreating   0          1s
We wanted to create two instances of Redis in the StatefulSet, because the pods are part of a Stateful set their names end with a number and we will be able to reach individual pod from the model service.
The .yaml file also created a Service for the StatefulSet pods which makes them accesible through DNS. We can view the service with this command:
!kubectl get services
NAME            TYPE        CLUSTER-IP   EXTERNAL-IP   PORT(S)    AGE
redis-service   ClusterIP   None         <none>        6379/TCP   7s
Creating a Model Deployment and Service
The model service now has a Redis instance to access, so we'll be creating the model service resources. These are:
- Deployment: a declarative way to manage a set of pods, the model service pods are managed through the Deployment.
- Service: a way to expose a set of pods in a Deployment, the model services is made available to the outside world through the Service, the service type is LoadBalancer which means that a load balancer will be created for the service.
The model service pod requires an extra container running inside of it to enable easy access to the Redis service. Because we sharded the Redis service into two instances, the caching decorator would need to be aware of both instances of Redis in order to access the right one for each cache entry. We can avoid this by adding an ambassador service to the model service pod. An ambassador takes care of interactions between the application and any outside services. In this case, the ambassador container will take care of routing the cache request to the right Redis instance. We'll use Twemproxy to act as the ambassador between the model service and the Redis instances.
The YAML for the ambassador container is defined in the Deployment resource of the model service and it looks like this:
...
- name: ambassador
    image: malexer/twemproxy
    env:
      - name: REDIS_SERVERS
        value: redis-st-0.redis-service.model-services.svc.cluster.local:6379:1,redis-st-1.redis-service.model-services.svc.cluster.local:6379:1
    ports:
      - containerPort: 6380
...
Notice that the ambassador is listening on localhost port 6380. We'll need to set this correctly in the caching decorator's configuration.
To start the model service, first we'll need to send the docker image from the local docker daemon to the minikube image cache:
!minikube image load insurance_charges_model_service:latest
We can view the images in the minikube cache like this:
!minikube cache list
insurance_charges_model_service:latest
The model service with the ambassador are created within the Kubernetes cluster with this command:
!kubectl apply -f ../kubernetes/model_service.yaml
deployment.apps/insurance-charges-model-deployment created
service/insurance-charges-model-service created
The deployment and service for the model service were created together. You can see the new service with this command:
!kubectl get services | grep insurance-charges-model-service
insurance-charges-model-service NodePort 10.107.94.124 <none> 80:32440/TCP 3s
Minikube exposes the service on a local port, we can get a link to the endpoint with this command:
!minikube service insurance-charges-model-service --url -n model-services
http://192.168.59.100:32440
To make a prediction, we'll hit the service with a request:
!time curl -X 'POST' \
  'http://192.168.59.100:32440/api/models/insurance_charges_model/prediction' \
  -H 'accept: application/json' \
  -H 'Content-Type: application/json' \
  -d "{ \
        \"age\": 65, \
        \"sex\": \"male\", \
        \"bmi\": 22, \
        \"children\": 5, \
        \"smoker\": true, \
        \"region\": \"southwest\" \
    }"
{"charges":25390.95}curl -X 'POST' -H 'accept: application/json' -H -d 0.01s user 0.01s system 8% cpu 0.158 total
The service and decorator are working! The prediction request took 0.158 seconds. We'll try the same prediction one more time to see if it takes less time.
!time curl -X 'POST' \
  'http://192.168.59.100:32440/api/models/insurance_charges_model/prediction' \
  -H 'accept: application/json' \
  -H 'Content-Type: application/json' \
  -d "{ \
        \"age\": 65, \
        \"sex\": \"male\", \
        \"bmi\": 22, \
        \"children\": 5, \
        \"smoker\": true, \
        \"region\": \"southwest\" \
    }"
{"charges":25390.95}curl -X 'POST' -H 'accept: application/json' -H -d 0.01s user 0.01s system 55% cpu 0.022 total
The second time we made the prediction it took 0.022 seconds, which is faster than the first time we made the prediction. This tells us that the caching is working as expected.
We can review the contents of the Redis caches by executing the Redis CLI in the pods:
!kubectl exec --stdin --tty redis-st-1 -- redis-cli SCAN 0
1) "0"
2) 1) "insurance_charges_model/0.1.0/-4784352684431719157"
!kubectl exec --stdin --tty redis-st-1 -- redis-cli GET insurance_charges_model/0.1.0/-4784352684431719157
"{\"charges\": 25390.95}"
Notice that the cache entry was found in the second instance of Redis in the StatefulSet.
Adding a Prediction ID
The model has a single decorator working on it within the model service but we can add any number of decorators to add functionality. In a previous blog post we created a decorator that added a unique prediction id to every prediction returned by the model. We can add this decorator to the service by simply changing the configuration:
...
decorators:
  - class_path: data_enrichment.prediction_id.PredictionIDDecorator
  - class_path: ml_model_caching.redis.RedisCachingDecorator
    configuration:
      host: "localhost"
      port: 6380
      database: 0
      hashing_fields:
        - age
        - sex
        - bmi
        - children
        - smoker
        - region
...
The PredictionIDDecorator decorator adds a unique identifier field to the prediction input data structure before the prediction request is passed to the caching decorator. We'll need to remove this field from the list of hashing fields because it should not be used to create the cached prediction, if we left the prediction_id field in the hashing fields then every single prediction request would be unique and we would not benefit from the cache.
This configuration is in the ./configuration/kubernetes_rest_config2.yaml file. We'll change the configuration file being used and recreate the Deployment again:
!kubectl apply -f ../kubernetes/model_service.yaml
deployment.apps/insurance-charges-model-deployment configured
service/insurance-charges-model-service unchanged
We'll try the service one more time:
!curl -X 'POST' \
  'http://192.168.59.100:32440/api/models/insurance_charges_model/prediction' \
  -H 'accept: application/json' \
  -H 'Content-Type: application/json' \
  -d "{ \
        \"age\": 65, \
        \"sex\": \"male\", \
        \"bmi\": 22, \
        \"children\": 5, \
        \"smoker\": true, \
        \"region\": \"southwest\" \
    }"
{"charges":25390.95,"prediction_id":"1aed2c71-9451-4cba-8d42-640d4b9695d8"}
The service returned a unique identifier field called "prediction_id" along with the prediction. This field was generated by the decorator we added through configuration. A full explanation of how the prediction ID decorator works can be found in the previous blog post.
This shows how easy and powerful it is to combine decorator with models in order to do more complex operations.
Deleting the Resources
Now that we're done with the service we need to destroy the resources. To delete the Redis deploymet, we'll delete the kubernetes resources:
!kubectl delete -f ../kubernetes/redis_service.yaml
service "redis-service" deleted
statefulset.apps "redis-st" deleted
To delete the model service, we'll execute this command:
!kubectl delete -f ../kubernetes/model_service.yaml
deployment.apps "insurance-charges-model-deployment" deleted
service "insurance-charges-model-service" deleted
To delete the namespace:
!kubectl delete -f ../kubernetes/namespace.yaml
namespace "model-services" deleted
Lastly, to stop the kubernetes cluster, execute these commands:
!minikube stop
✋  Stopping node "minikube"  ...
🛑  1 node stopped.
Closing
In this blog post, we showed how to build a decorator class that is able to cache predictions made by a machine learning model. Caching is a simple way to speed up predictions that we know can be reused and are requested often from a model.
The cache decorator classes can be applied to any model that uses the MLModel base class without having to modify the model class at all. The caching functionality is contained completely in the RedisCacheDecorator class. The same thing is true for the RESTful model service, the cache functionality did not need to be added to the service because we separated the concerns of the service and the cache decorator. We were able to add caching to the deployed model by modifying the configuration. By using decorators we’re able to create software components that can be reused in many different contexts. For example, if we chose to deploy the cache decorator in a gRPC service we should be able to do so as long as we instantiate and manage the decorator instance correctly.
Combining the caching decorator with other decorators that require I/O like data enrichment is very easy because of the way that decorators can be "stacked" together. We showed how to do this in this blog post by adding a decorator that adds unique identifier to each prediction.