Data Enrichment for ML Model Deployments
In the previous blog post we introduced the decorator pattern for ML model deployments and then showed how to use the pattern to build extensions for machine learning models. The extensions that we showed in the previous post were added without having to modify the machine learning model code at all, we were able to do it by creating a decorator class that wrapped the model. In this blog post we’ll use decorators to add data enrichment capabilities to an ML model.
Introduction
Machine learning models need data to make predictions. When deploying a model to a production setting, this data is not necessarily available from the client system that is requesting the prediction. When this happens, some other source is needed for the data that is required by the model but not provided by the client system. The process of accessing the data and joining it to the client's prediction request is called data enrichment. In all cases, the model itself should not need to be modified in order to do data enrichment, the process should be transparent to the model. In this blog post, we'll show a method for doing data enrichment that does not require the model itself to be modified.
Data enrichment is often done because the client system does not have access to the data that the model needs to make a prediction. In this case, the client must provide a field that the model can use to find the data that it needs to make a prediction, we'll call this the "index field". For example, in order to load customer details that need to be used to make a prediction, we need to get a customer id field that uniquely identifies the customer record. Once the data is loaded from a data source, the model can be called to make a prediction using the fields that it expects.
Other times, the client system is simply not the right place to manage the data that the model needs for predictions because of it's complexity. In this case, we would like to prevent the client system from having to manage data that really does not fall within it's responsabilities. In order to allow the client system to use the model without having to manage the extra data, we can add data enrichment capabilities to the model deployment.
Data enrichment simplifies the work of the client system because a client system can simply provide a way to find the correct data to the deployed ML model. The model deployment is then responsible for going and fetching the correct record, joining it to the data provided by the client system, and making a prediction. Data enrichment also prevents the client system from having to manage the data needed by the model, which keeps the two systems from becoming too coupled.
One more benefit of doing data enrichment is that the model can evolve by using new fields for predictions without affecting the client system at all. By having the model access the data that it needs to make a prediction, the model can access new data and the client system is not responsible for providing or managing the new fields. This allows the deployed model to evolve more easily.
In this blog post, we’ll show how to create a simple decorator that is able to access a database in order to do data enrichment for an ML model that is deployed to a production system. We'll also show how to deploy the decorator along with the model to a RESTful service, and how to create the necessary database to hold the data.
All of the code is available in this github repository.
Software Architecture
The decorator that we will be building requires an outside database in order to access data to do data enrichment. The software architecture will be a little more complicated because we’ll have to deploy a service for the model as well as a database for the data.
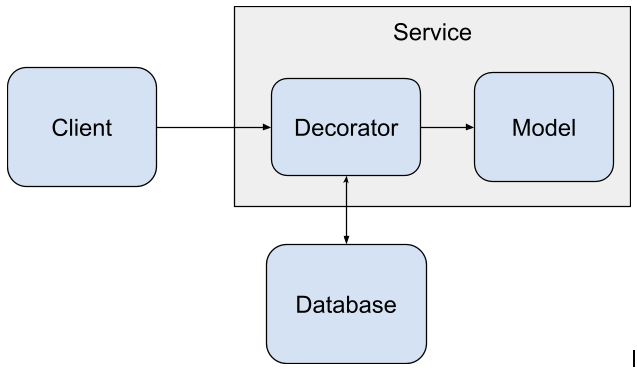
The client system accesses the model by reaching out to the model service which hosts both the model and the decorator that we will be building in this blog post. The decorator is the software component that does the data enrichment needed by the model. The decorator reaches out to the database to access data needed by the model, provides the data to the model to make a prediction, and then returns the prediction to the client system.
To store the data that we want to use for enrichment, we’ll use a PostgreSQL database.
Installing a Model
To make this blog post a little shorter we won't train a completely new model. Instead we'll install a model that we've built in a previous blog post. The code for the model is in this github repository.
To install the model, we can use the pip command and point it at the github repo of the model.
from IPython.display import clear_output

!pip install -e git+https://github.com/schmidtbri/regression-model#egg=insurance_charges_model

clear_output()
To make a prediction with the model, we'll import the model's class.
from insurance_charges_model.prediction.model import InsuranceChargesModel

clear_output()
Now we can instantiate the model:
model = InsuranceChargesModel()
To make a prediction, we'll need to use the model's input schema class.
from insurance_charges_model.prediction.schemas import InsuranceChargesModelInput, \
    SexEnum, RegionEnum

model_input = InsuranceChargesModelInput(
    age=42,
    sex=SexEnum.female,
    bmi=24.0,
    children=2,
    smoker=False,
    region=RegionEnum.northwest)
The model's input schema is called InsuranceChargesModelInput and it encompasses all of the features required by the model to make a prediction.
Now we can make a prediction with the model by calling the predict() method with an instance of the InsuranceChargesModelInput class.
prediction = model.predict(model_input)

prediction
InsuranceChargesModelOutput(charges=8640.78)
The model predicts that the charges will be $8640.78.
When deploying the model we’ll pretend that the age, sex, bmi, children, smoker, and region fields are not available from the client system that is calling the model. Because of this, we’ll need to add it to the model input by loading the data from the database.
We can view input schema of the model as a JSON schema document by calling the .schema() method on the instance.
model.input_schema.schema()
{'title': 'InsuranceChargesModelInput',
 'description': "Schema for input of the model's predict method.",
 'type': 'object',
 'properties': {'age': {'title': 'Age',
   'description': 'Age of primary beneficiary in years.',
   'minimum': 18,
   'maximum': 65,
   'type': 'integer'},
  'sex': {'title': 'Sex',
   'description': 'Gender of beneficiary.',
   'allOf': [{'$ref': '#/definitions/SexEnum'}]},
  'bmi': {'title': 'Body Mass Index',
   'description': 'Body mass index of beneficiary.',
   'minimum': 15.0,
   'maximum': 50.0,
   'type': 'number'},
  'children': {'title': 'Children',
   'description': 'Number of children covered by health insurance.',
   'minimum': 0,
   'maximum': 5,
   'type': 'integer'},
  'smoker': {'title': 'Smoker',
   'description': 'Whether beneficiary is a smoker.',
   'type': 'boolean'},
  'region': {'title': 'Region',
   'description': 'Region where beneficiary lives.',
   'allOf': [{'$ref': '#/definitions/RegionEnum'}]}},
 'definitions': {'SexEnum': {'title': 'SexEnum',
   'description': "Enumeration for the value of the 'sex' input of the model.",
   'enum': ['male', 'female'],
   'type': 'string'},
  'RegionEnum': {'title': 'RegionEnum',
   'description': "Enumeration for the value of the 'region' input of the model.",
   'enum': ['southwest', 'southeast', 'northwest', 'northeast'],
   'type': 'string'}}}
Creating the Data Enrichment Decorator
A decorator needs to inherit from the MLModelDecorator base class, which requires a specific set of methods and properties be implemented. The decorator that can access PostgreSQL looks like this:
import os
from typing import List
from pydantic import BaseModel, create_model
import psycopg2
from ml_base.decorator import MLModelDecorator
from ml_base.ml_model import MLModelSchemaValidationException


class PostgreSQLEnrichmentDecorator(MLModelDecorator):
    """Decorator to do data enrichment using a PostgreSQL database."""

    def __init__(self, host: str, port: str, username: str, password: str, database: str,
                 table: str, index_field_name: str, index_field_type: str,
                 enrichment_fields: List[str]) -> None:
        # if password has ${}, then replace with environment variable
        if password[0:2] == "${" and password[-1] == "}":
            password = os.environ[password[2:-1]]
        super().__init__(host=host, port=port, username=username, password=password,
                         database=database, table=table, index_field_name=index_field_name,
                         index_field_type=index_field_type, enrichment_fields=enrichment_fields)
        self.__dict__["_connection"] = None

    @property
    def input_schema(self) -> BaseModel:
        # converting the index field type from a string to a class
        try:
            index_field_type = __builtins__[self._configuration["index_field_type"]]
        except TypeError as e:
            index_field_type = __builtins__.__dict__[self._configuration["index_field_type"]]

        input_schema = self._model.input_schema

        # adding index field to schema because it is required in order to retrieve
        # the right record in the database
        fields = {
            self._configuration["index_field_name"]: (index_field_type, ...)
        }
        for field_name, schema in input_schema.__fields__.items():
            # remove enrichment_fields from schema because they'll be added from the
            # database and don't need to be provided by the client
            if field_name not in self._configuration["enrichment_fields"]:
                if schema.required:
                    fields[field_name] = (schema.type_, ...)
                else:
                    fields[field_name] = (schema.type_, schema.default)

        new_input_schema = create_model(
            input_schema.__name__,
            **fields
        )
        return new_input_schema

    def predict(self, data):
        # create a connection to the database, if it doesn't exist already
        if self.__dict__["_connection"] is None:
            self.__dict__["_connection"] = psycopg2.connect(
                host=self._configuration["host"],
                port=self._configuration["port"],
                database=self._configuration["database"],
                user=self._configuration["username"],
                password=self._configuration["password"])
        cursor = self.__dict__["_connection"].cursor()

        # build a SELECT statement using the index_field and the enrichment_fields
        enrichment_fields = ", ".join(self._configuration["enrichment_fields"])
        sql_statement = "SELECT {} FROM {} WHERE {} = %s;".format(
            enrichment_fields,
            self._configuration["table"],
            self._configuration["index_field_name"])

        # executing the SELECT statement
        cursor.execute(sql_statement,
                       (getattr(data, self._configuration["index_field_name"]), ))
        records = cursor.fetchall()
        cursor.close()

        if len(records) == 0:
            raise ValueError("Could not find a record for data enrichment.")
        elif len(records) == 1:
            record = records[0]
        else:
            raise ValueError("Query returned more than one record.")

        # creating an instance of the model's input schema using the fields that
        # came back from the database and fields that are provided by calling code
        input_schema = self.input_schema
        enriched_data = {}
        for field_name in self._model.input_schema.__fields__.keys():
            if field_name == self._configuration["index_field_name"]:
                pass
            elif field_name in self._configuration["enrichment_fields"]:
                field_index = self._configuration["enrichment_fields"].index(field_name)
                enriched_data[field_name] = record[field_index]
            elif field_name in data.dict().keys():
                enriched_data[field_name] = getattr(data, field_name)
            else:
                raise ValueError("Could not find value for field '{}'.".format(field_name))

        # making a prediction with the model, using the enriched fields
        try:
            enriched_data = self._model.input_schema(**enriched_data)
        except ValueError as e:
            raise MLModelSchemaValidationException(str(e))
        prediction = self._model.predict(data=enriched_data)

        return prediction

    def __del__(self):
        try:
            if self.__dict__["_connection"] is not None:
                self.__dict__["_connection"].close()
        except KeyError:
            pass
The code is quite long, it is mainly made up of two methods: the input_schema method and the predict method. The input_schema method modifies the model's input schema according to the requirements of the data enrichment we want to do. The predict method is responsible for retrieving the data needed by the model and joining it to the data already provided by the client system.
The __init__() method accepts configuration that is used to customize the way that the decorator finds data in the database. The decorator accepts these parameters:
- host: hostname for connecting to the database server
- port: port for connecting to the database server
- username: username for accessing the database
- password: password for accessing the database
- table: name of the table in the database where data used for enrichment is found
- index_field_name: name of the field used for selecting a record
- index_field_type: type of the index field
- enrichment_fields: names of the fields that will be added to the data sent to the model to make a prediction
The configuration is saved by passing it up to the super class using the super().__init__() method. The configuration values can then be accessed inside of the decorator instance in the self._configuration attribute, which is a dictionary.
When the decorator is applied to a model, it modifies the input_schema of the model. It removes the enrichment_fields from the input schema because these fields are going to be added from the database. This means that the client does not need to provide values for them anymore. It also adds the index_field to the input schema because the decorator needs to use this field to access the correct record in the database table. The index_field is added as a required field in the model’s input_schema because the decorator always needs it.
When a prediction request is made to the decorator, it uses the value in the index_field to access the record in the database table. If the decorator finds the record in the table, it selects the enrichment fields and creates a new input object for the model and sends it to the model. If the record is not found, the decorator raises an exception. The index_field is actually not sent to the model at all, it is used purely to access the data needed by the model in the database. If more than one record is returned from the database, an exception is raised.
The SQL statement is built dynamically based on the fields required by the model and the index field selected through configuration. For example, if we wanted to do enrichment with all of the input fields of the InsuranceChargesModel, the SELECT statement would look like this:
SELECT age, sex, bmi, children, smoker, region
FROM clients
WHERE ssn = '123-45-6789'
In this case we would be accessing a client record by using their social security number as the index field.
Decorating the Model
To test out the decorator we’ll first instantiate the model object that we want to use with the decorator.
model = InsuranceChargesModel()
Next, we’ll instantiate the decorator with the parameters.
decorator = PostgreSQLEnrichmentDecorator(
    host="",
    port="",
    username="",
    password="",
    database="",
    table="",
    index_field_name="ssn",
    index_field_type="str",
    enrichment_fields=["age", "sex", "bmi", "children", "smoker", "region"])
We won't fill in the database details because we don't have a database to connect to yet. However, we can still see how the model's input and output schemas change because of the decorator. In this example, we'll use a client's social security number to uniquely identify records in the datbase table.
We can add the model instance to the decorator after it’s been instantiated like this:
decorated_model = decorator.set_model(model)
We can see the decorator and the model objects by printing the reference to the decorator:
decorated_model
PostgreSQLEnrichmentDecorator(InsuranceChargesModel)
The decorator object is printing out it's own type along with the type of the model that it is decorating.
Now we’ll try to use the decorator and the model together by doing a few things. First, we’ll look at the model input schema:
decorated_model.input_schema.schema()
{'title': 'InsuranceChargesModelInput',
 'type': 'object',
 'properties': {'ssn': {'title': 'Ssn', 'type': 'string'}},
 'required': ['ssn']}
As we can see, the input schema is not the same as what the model exposed, all of the model’s input fields are now removed because they are being provided by the decorator by accessing the database. The user of the model is not expected to provide a value for those fields. However, there is a new field in the schema, the “ssn” field. This field is used by the decorator to select the correct record in the database.
We can also use a few fields from the database and require the client to provide the rest. To do this we'll instantiate the decorator with a few, but not all, of the fields required by the model as enrichment fields.
decorator = PostgreSQLEnrichmentDecorator(
    host="",
    port="",
    username="",
    password="",
    database="",
    table="",
    index_field_name="ssn",
    index_field_type="str",
    enrichment_fields=["age", "sex", "smoker", "region"])

decorated_model = decorator.set_model(model)

decorated_model.input_schema.schema()
{'title': 'InsuranceChargesModelInput',
 'type': 'object',
 'properties': {'ssn': {'title': 'Ssn', 'type': 'string'},
  'bmi': {'title': 'Bmi', 'minimum': 15.0, 'maximum': 50.0, 'type': 'number'},
  'children': {'title': 'Children',
   'minimum': 0,
   'maximum': 5,
   'type': 'integer'}},
 'required': ['ssn']}
The model's input schema now requires the fields that are not listed as enrichment fields to be provided by the client. The "ssn" field is still added because the decorator needs it in order to retrieve the enrichment fields from the database.
Next, we’ll look at the decorated model’s output schema:
output_schema = decorated_model.output_schema.schema()

output_schema
{'title': 'InsuranceChargesModelOutput',
 'description': "Schema for output of the model's predict method.",
 'type': 'object',
 'properties': {'charges': {'title': 'Charges',
   'description': 'Individual medical costs billed by health insurance to customer in US dollars.',
   'type': 'number'}}}
The output schema has not changed at all, the decorator does not modify the prediction or the schema of the prediction returned by the model.
Creating a Database
Now that we have a model and a decorator that can add data to the input of the model, we need to create a database table to pull data from. To do this we’ll first start a PostgreSQL instance in a local docker image.
!docker run --name postgres \
    -p 5432:5432 \
    -e POSTGRES_USER=data_enrichment_user \
    -e POSTGRES_PASSWORD=data_enrichment_password \
    -e POSTGRES_DB=data_enrichment \
    -d postgres
695889c4c39617d44b158d7307d431180b1358e62ad07bdf26347a85f725468e
We can connect to the database by starting a client within the same container and executing a SQL statement.
!docker run -it --rm \
    --network="host" postgres \
    psql postgresql://data_enrichment_user:data_enrichment_password@127.0.0.1:5432/data_enrichment \
    -c "SELECT current_database();"
 current_database
------------------
 data_enrichment
(1 row)
The current database within the server is called "data_enrichment" and it was created when the docker image started.
Next we'll execute a SQL statement that creates a table within the database.
!docker run -it --rm \
    --network="host" postgres \
    psql postgresql://data_enrichment_user:data_enrichment_password@127.0.0.1:5432/data_enrichment \
    -c "CREATE TABLE clients ( \
    ssn         varchar(11) PRIMARY KEY, \
    first_name  varchar(30) NOT NULL, \
    last_name   varchar(30) NOT NULL, \
    age         integer     NOT NULL, \
    sex         varchar(6)  NOT NULL, \
    bmi         integer     NOT NULL, \
    children    integer     NOT NULL, \
    smoker      boolean     NOT NULL, \
    region      varchar(10) NOT NULL \
);"
CREATE TABLE
The table has been created, we can see the table schema looks like this:
!docker run -it --rm \
    --network host postgres \
    psql postgresql://data_enrichment_user:data_enrichment_password@127.0.0.1:5432/data_enrichment \
    -c "\d clients"
                       Table "public.clients"
   Column   |         Type          | Collation | Nullable | Default
------------+-----------------------+-----------+----------+---------
 ssn        | character varying(11) |           | not null |
 first_name | character varying(30) |           | not null |
 last_name  | character varying(30) |           | not null |
 age        | integer               |           | not null |
 sex        | character varying(6)  |           | not null |
 bmi        | integer               |           | not null |
 children   | integer               |           | not null |
 smoker     | boolean               |           | not null |
 region     | character varying(10) |           | not null |
Indexes:
    "clients_pkey" PRIMARY KEY, btree (ssn)
The table has columns for all of the fields that the model requires to make a prediction plus two columns for the first and last name. It also has an index field called “ssn” because we’ll be referencing each record using a fake Social Security number. The ssn field is the unique identifier for each record and is a good way to correlate data from different systems.
Then we’ll run a some code that connects to the database and inserts fake data into the table. To do this we'll use the faker package, so we'll need to install it first.
!pip install Faker

clear_output()
To add data to the table, we'll just generate some data for each column in the database table and save it into a list.
from faker import Faker

fake = Faker()

records = list()
for _ in range(1000):
    sex = fake.random_choices(elements=("male", "female"), length=1)[0]
    record = {
        "ssn": fake.ssn(),
        "age": fake.random_int(min=18, max=80),
        "sex": sex,
        "bmi": fake.random_int(min=15, max=50),
        "children": fake.random_int(min=0, max=5),
        "smoker": fake.boolean(),
        "region": fake.random_choices(elements=("southwest", "southeast", "northwest", "northeast"), length=1)[0],
        "first_name": fake.first_name_male() if sex =="male" else fake.first_name_female(),
        "last_name": fake.last_name()
    }
    records.append(record)
Notice that each field is generating data that does not necessarily fit the schema of the model. For example, the maximum value allowed by the model for the "age" field is 65, but the fake data can go up to 80. We'll use records that do not match the model's schema to test the decorator later.
Let's take a look at the first record that matches the model schema:
valid_record = next(record for record in records if record["age"] <= 65)

valid_record
{'ssn': '646-87-1351',
 'age': 31,
 'sex': 'female',
 'bmi': 31,
 'children': 1,
 'smoker': False,
 'region': 'northeast',
 'first_name': 'Vickie',
 'last_name': 'Anderson'}
Now let's find a record that does not fit the model's schema so we can use it later:
invalid_record = next(record for record in records if record["age"] > 65)

invalid_record
{'ssn': '361-47-3850',
 'age': 72,
 'sex': 'male',
 'bmi': 34,
 'children': 4,
 'smoker': False,
 'region': 'northeast',
 'first_name': 'Michael',
 'last_name': 'Pena'}
We'll use the ssn numbers later to test out the decorator's error handling.
valid_ssn = valid_record["ssn"]
invalid_ssn = invalid_record["ssn"]
Next, we'll put the 1000 fake records generated into the database table that we created above.
connection = psycopg2.connect(
    host="localhost",
    port="5432",
    database="data_enrichment",
    user="data_enrichment_user",
    password="data_enrichment_password")

cursor = connection.cursor()

for record in records:
    cursor.execute("INSERT INTO clients (ssn, first_name, last_name, age, sex, bmi, children, smoker, region)"
                   "VALUES (%s, %s, %s, %s, %s, %s, %s, %s, %s);",
                   (record["ssn"], record["first_name"], record["last_name"], record["age"], record["sex"],
                    record["bmi"], record["children"], record["smoker"], record["region"]))
    connection.commit()

cursor.close()
connection.close()
The database now has a table that has records that we can use to try out the model using the decorator.
We'll access a some records to see the data:
!docker run -it --rm \
    --network host postgres \
    psql postgresql://data_enrichment_user:data_enrichment_password@127.0.0.1:5432/data_enrichment \
    -c "SELECT ssn, first_name, last_name FROM clients LIMIT 5;"
     ssn     | first_name | last_name
-------------+------------+-----------
 646-87-1351 | Vickie     | Anderson
 194-94-3733 | Patricia   | Lee
 709-08-5148 | Seth       | James
 132-30-5594 | Edward     | Allen
 096-55-1187 | Mark       | Keith
(5 rows)
Trying out the Decorator
Now that we have some data in the database, we can try to make predictions with the decorated model.
decorator = PostgreSQLEnrichmentDecorator(
    host="localhost",
    port="5432",
    username="data_enrichment_user",
    password="data_enrichment_password",
    database="data_enrichment",
    table="clients",
    index_field_name="ssn",
    index_field_type="str",
    enrichment_fields=["age", "sex", "bmi", "children", "smoker", "region"])

decorated_model = decorator.set_model(model)
model_input = decorated_model.input_schema(ssn=valid_ssn)

prediction = decorated_model.predict(model_input)

prediction
InsuranceChargesModelOutput(charges=6416.86)
We provided a value for the ssn field and the decorator was able to retrieve the values for the other fields for the model to use.
Next, we'll see what happens when we try to do data enrichment with a record that does not exist in the database.
model_input = decorated_model.input_schema(ssn="123-45-6789")

try:
    decorated_model.predict(model_input)
except ValueError as e:
    print(e)
Could not find a record for data enrichment.
The decorator raised a ValueError exception because it could not find the needed record.
We can also leave some fields for the client of the model to provide and pull all other fields from the database. We just need to instantiate the decorator a little differently.
decorator = PostgreSQLEnrichmentDecorator(
    host="localhost",
    port="5432",
    username="data_enrichment_user",
    password="data_enrichment_password",
    database="data_enrichment",
    table="clients",
    index_field_name="ssn",
    index_field_type="str",
    enrichment_fields=["age", "sex", "bmi", "region"])

decorated_model = decorator.set_model(model)
To see which fields are now required by the model, we'll take a look at the input schema of the decorated model.
input_schema = decorated_model.input_schema.schema()

input_schema
{'title': 'InsuranceChargesModelInput',
 'type': 'object',
 'properties': {'ssn': {'title': 'Ssn', 'type': 'string'},
  'children': {'title': 'Children',
   'minimum': 0,
   'maximum': 5,
   'type': 'integer'},
  'smoker': {'title': 'Smoker', 'type': 'boolean'}},
 'required': ['ssn']}
The decorator has removed the age, sex, bmi, and region fields from the input schema. It has left the smoker and children fields in place, and it has added the ssn field as we expected.
Now we can try the decorator with this new input schema:
model_input = decorated_model.input_schema(ssn=valid_ssn, children=2, smoker=False)

prediction = decorated_model.predict(model_input)

prediction
InsuranceChargesModelOutput(charges=6123.85)
The decorator was able to bring in the values for the missing fields from the database and join them to the fields provided by the client in order to make a prediction.
Lastly, we'll select a client record in the database that does not meet the schema requirements of the model:
model_input = decorated_model.input_schema(ssn=invalid_ssn, children=2, smoker=False)

try:
    prediction = decorated_model.predict(model_input)
except MLModelSchemaValidationException as e:
    print(e)
1 validation error for InsuranceChargesModelInput
age
  ensure this value is less than or equal to 65 (type=value_error.number.not_le; limit_value=65)
Because we put some records in the database that do not meet the input schema of the model a ValueError was raised inside of the decorator instance. The record had an age value that is above 65, which the model cannot predict with.
Adding a Decorator to a Deployed Model
Now that we have a model and a decorator, we can combine them together into a service that is able to make predictions and also do data enrichment. To do this, we won't need to write any extra code, we can leverage the rest_model_service package to provide the RESTful API for the service. You can learn more about the package in this blog post.
To install the package, execute this command:
!pip install rest_model_service

clear_output()
To create a service for our model, all that is needed is that we add a YAML configuration file to the project. The configuration file looks like this:
service_title: Insurance Charges Model Service
models:
  - qualified_name: insurance_charges_model
    class_path: insurance_charges_model.prediction.model.InsuranceChargesModel
    create_endpoint: true
    decorators:
      - class_path: data_enrichment.postgresql.PostgreSQLEnrichmentDecorator
        configuration:
          host: "localhost"
          port: "5432"
          username: "data_enrichment_user"
          password: "data_enrichment_password"
          database: "data_enrichment"
          table: "clients"
          index_field_name: "ssn"
          index_field_type: "str"
          enrichment_fields:
            - "age"
            - "sex"
            - "bmi"
            - "children"
            - "smoker"
            - "region"
The service_title field is the name of the service as it will appear in the documentation. The models field is an array that contains the details of the models we would like to deploy in the service. The class_path points at the MLModel class that implement's the model's prediction logic. The decorators field contains the details of the decorators that we want to attach to the model instance. In this case, we want to use the PostgreSQLEnrichmentDecorator decorator class with the configuration we've used for local testing.
Using the configuration file, we're able to create an OpenAPI specification file for the model service by executing these commands:
export PYTHONPATH=./
export REST_CONFIG=./configuration/rest_config.yaml
generate_openapi --output_file="service_contract.yaml"
The service_contract.yaml file will be generated and it will contain the specification that was generated for the model service. The insurance_charges_model endpoint is the one we'll call to make predictions with the model. The model's input and output schemas were automatically extracted and added to the specification. If you inspect the contract, you'll find that the enrichment fields are not part of the input schema because they are being removed by the enrichment decorator. The ssn field has been added to the contract because it is needed to do data enrichment.
To run the service locally, execute these commands:
uvicorn rest_model_service.main:app --reload
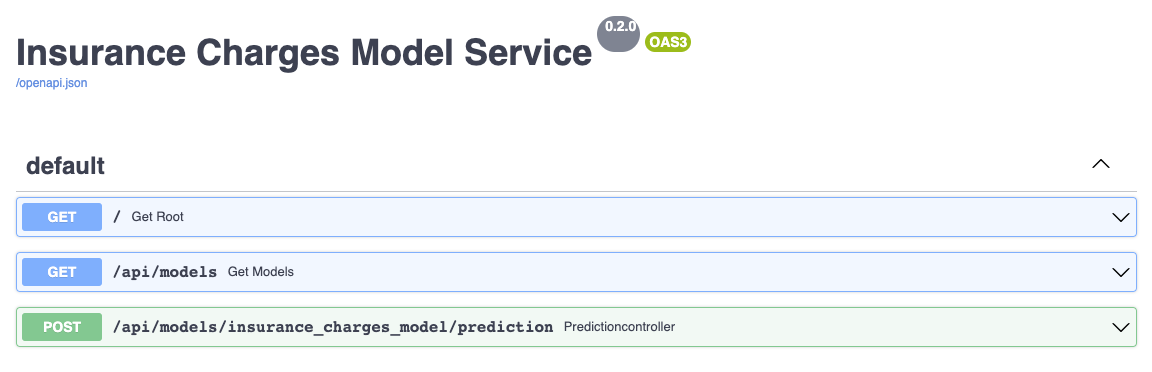
The service should come up and can be accessed in a web browser at http://127.0.0.1:8000. When you access that URL you will be redirected to the documentation page that is generated by the FastAPI package:
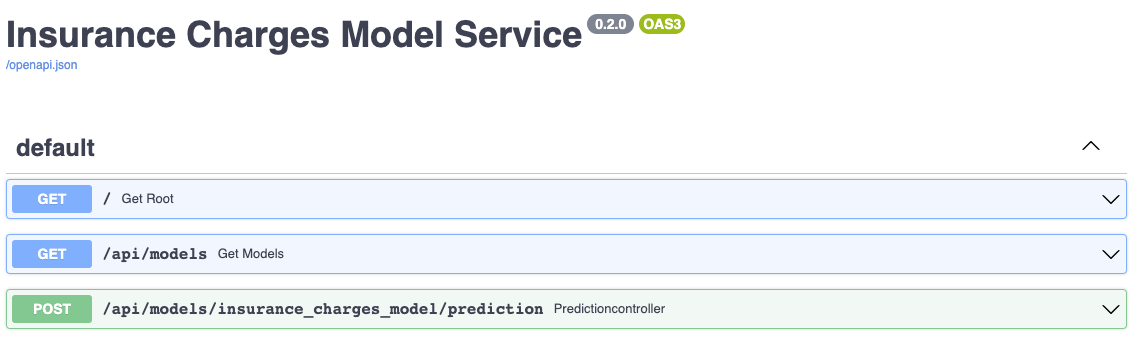
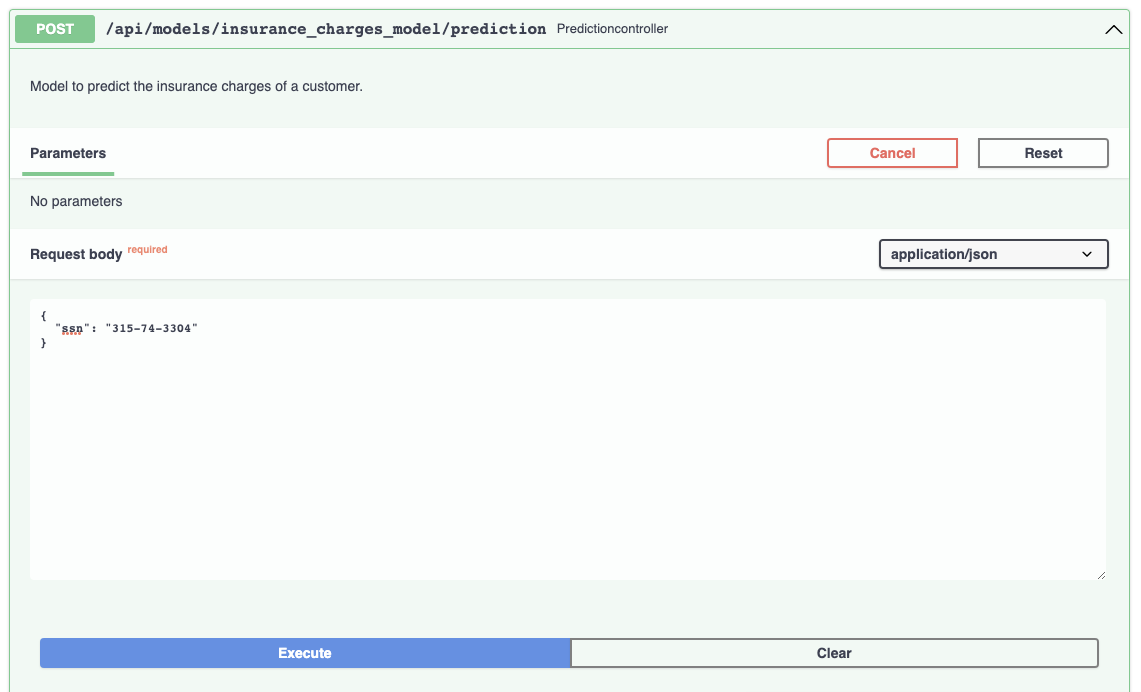
The documentation allows you to make requests against the API in order to try it out. Here's a prediction request against the insurance charges model:
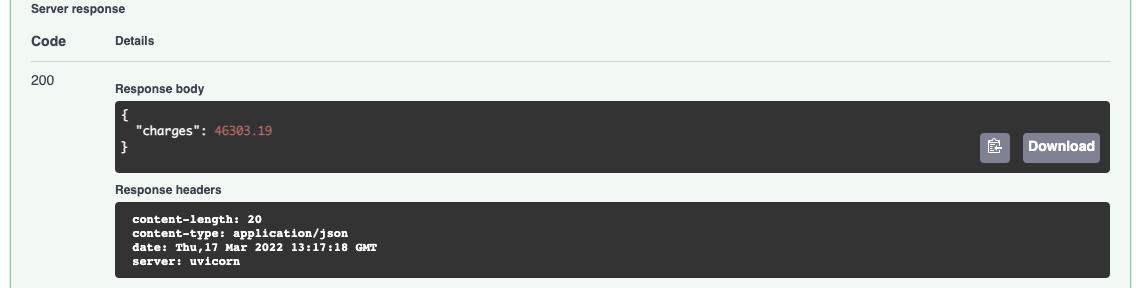
And the prediction result:
By using the MLModel base class provided by the ml_base package and the REST service framework provided by the rest_model_service package we're able to quickly stand up a service to host the model. The decorator that we want to test can also be added to the model through configuration, including all of its parameters.
Deploying the Model
Now that we have a working model and model service, we'll need to deploy it somewhere. We'll start by deploying the service locally. Once we have the service and database working locally, we'll deploy everything to the cloud using DigitalOcean's managed kubernetes service.
Creating a Docker Image
Before moving forward, let's create a docker image and run it locally. The docker image is generated using instructions in the Dockerfile:
FROM python:3.9-slim

MAINTAINER Brian Schmidt "6666331+schmidtbri@users.noreply.github.com"

WORKDIR ./service

RUN apt-get update
RUN apt-get --assume-yes install git

COPY ./data_enrichment ./data_enrichment
COPY ./configuration ./configuration
COPY ./LICENSE ./LICENSE
COPY ./requirements.txt ./requirements.txt

RUN pip install -r requirements.txt

CMD ["uvicorn", "rest_model_service.main:app", "--host", "0.0.0.0", "--port", "8000"]
The Dockerfile is used by this command to create a docker image:
!docker build -t insurance_charges_model_service:0.1.0 ..\

clear_output()
To make sure everything worked as expected, we'll look through the docker images in our system:
!docker image ls | grep insurance_charges_model_service
insurance_charges_model_service 0.1.0 f5b85418ebc7 2 days ago 1.53GB
The insurance_charges_model_service image is listed. Next, we'll start the image to see if everything is working as expected. However, we need to connect the docker containers to the same network first.
!docker network create data-enrichment-network
bcfa5ed0334b609c6f553caac67375c0571438f4541d75d63be79638a6e300f7
Next, we'll connect the running postgres image to the network.
!docker network connect data-enrichment-network postgres
Now we can start the service docker image connected to the same network as the postgres container.
!docker run -d \
    -p 8000:8000 \
    --net data-enrichment-network \
    -e REST_CONFIG=./configuration/local_rest_config.yaml \
    --name insurance_charges_model_service \
    insurance_charges_model_service:0.1.0
6e1bc98063053f9260e078fb4bef3e36637bb84e73b04441791e2c75fd0ad833
Notice that we're using a different configuration file that has a different hostname for the postgres instance. The postgres image is not accesible from localhost inside of the network so we needed to have the hostname "postgres" in the configuration.
The service should be accessible on port 8000 of localhost, so we'll try to make a prediction using the curl command running inside of a container connected to the network:
!docker run -it --rm \
    --net data-enrichment-network \
    curlimages/curl \
    curl -X 'POST' \
    'http://insurance_charges_model_service:8000/api/models/insurance_charges_model/prediction' \
    -H 'accept: application/json' \
    -H 'Content-Type: application/json' \
    -d '{"ssn": "646-87-1351"}'
{"charges":6416.86}
The model predicted that the insurance charges will be $6416.86 for the person whose SSN is 646-87-1351.
We're done with the service and the database so we'll shut down the docker containers and the docker network.
!docker kill postgres
!docker rm postgres

!docker kill insurance_charges_model_service
!docker rm insurance_charges_model_service

!docker network rm data-enrichment-network
postgres
postgres
insurance_charges_model_service
insurance_charges_model_service
data-enrichment-network
Setting up Digital Ocean
In order to deploy the model service to a DigitalOcean kubernetes cluster, we'll need to connect to the DigitalOcean API.
In this section we'll be using the doctl command line utility which will help us to interact with the Digital Ocean Kubernetes service. We followed these instructions to install the doctl utility. Before we can do anything with the Digital Ocean API, we need to authenticate, so we created an API token by following these instructions. Once we have the token we can add it to the doctl utility by creating a new authentication context with this command:
doctl auth init --context model-services-context
The command will ask for the token that we generated on the website.
The command creates a new context called "model-services-context" that we'll use to interact with the Digital Ocean API. The command asks for the API token we generated and saves it into the configuration file of the tool. To make sure that the context was created correctly and is the current context, execute this command:
!doctl auth list
default
model-services-context (current)
The newly created context should be listed and have "(current)" by its name. If the context we created is not the current context, we can switch to it with this command:
!doctl auth switch --context model-services-context
Now using context [model-services-context] by default
Now that we have the credentials necessary, we can start creating the infrastructure for our deployment.
Creating the Kubernetes Cluster
To create the kubernetes cluster and supporting infrastructure, we'll use Terraform. Terraform is an Infrastructure as Code (IaC) tool that will allow us to declaratively create our infrastructure in configuration files, and then create, manage, and destroy it with simple commands. The command line Terraform tool can be installed by following these intructions.
We wont be doing a deep dive into Terraform for this blog post because it would make the post too long. The Terraform module that we'll install is in the source code attached to this post, in the "terraform" folder.
To begin, we'll switch into the terraform folder and add our API token to an environment variable.
%cd ../terraform

%env DIGITALOCEAN_TOKEN=dop_v1_c857bb7bb4bed089000125513c49f642f03401253ec09178c41f94df665312a

clear_output()
Next, we'll initialize the Terraform environment.
!terraform init
Initializing the backend...

Initializing provider plugins...
- Finding latest version of hashicorp/kubernetes...
- Finding digitalocean/digitalocean versions matching "~> 2.0"...
- Installing hashicorp/kubernetes v2.11.0...
- Installed hashicorp/kubernetes v2.11.0 (signed by HashiCorp)
- Installing digitalocean/digitalocean v2.19.0...
- Installed digitalocean/digitalocean v2.19.0 (signed by a HashiCorp partner, key ID F82037E524B9C0E8)

...
The terraform environment is now initialized and stored in the terraform folder. We can now create a plan for the deployment of the resources.
The plan command required an input variable called "project_name" which allows the resources to have a shared naming convention. We provided the value through the command line option.
!terraform plan -var="project_name=model-services"
Terraform used the selected providers to generate the following execution plan.
Resource actions are indicated with the following symbols:
  + create

Terraform will perform the following actions:

  # digitalocean_container_registry.container_registry will be created
  + resource "digitalocean_container_registry" "container_registry" {
      + created_at             = (known after apply)
      + endpoint               = (known after apply)
      + id                     = (known after apply)
      + name                   = "model-services-registry"
      + region                 = (known after apply)
      + server_url             = (known after apply)
      + storage_usage_bytes    = (known after apply)
      + subscription_tier_slug = "basic"
    }

  # digitalocean_container_registry_docker_credentials.registry_credentials will be created
  + resource "digitalocean_container_registry_docker_credentials" "registry_credentials" {
      + credential_expiration_time = (known after apply)
      + docker_credentials         = (sensitive value)
      + expiry_seconds             = 1576800000
      + id                         = (known after apply)
      + registry_name              = "model-services-registry"
      + write                      = true
    }

...

Plan: 5 to add, 0 to change, 0 to destroy.

Changes to Outputs:
  + kubernetes_cluster_id = (known after apply)
  + registry_endpoint     = (known after apply)

───────────────────────────────────────────────────────────────────────────────

Note: You didn't use the -out option to save this plan, so Terraform can't
guarantee to take exactly these actions if you run "terraform apply" now.
The output of the plan command gives us a list of the resources that will be created. These resources are:
- docker registry, used to deploy images to the cluster
- docker registry credentials, used to allow access to the images from the cluster
- VPC, a private network for the cluster nodes
- kubernetes cluster, used to host the services
- kubernetes secret, to hold the docker registry credentials so that the cluster can load images from the docker registry
We can create the resources with the apply command.
!terraform apply -var="project_name=model-services" -auto-approve
Terraform used the selected providers to generate the following execution plan.
Resource actions are indicated with the following symbols:
  + create

Terraform will perform the following actions:

  # digitalocean_container_registry.container_registry will be created
  + resource "digitalocean_container_registry" "container_registry" {
      + created_at             = (known after apply)
      + endpoint               = (known after apply)
      + id                     = (known after apply)
      + name                   = "model-services-registry"
      + region                 = (known after apply)
      + server_url             = (known after apply)
      + storage_usage_bytes    = (known after apply)
      + subscription_tier_slug = "basic"
    }

...

Outputs:

kubernetes_cluster_id = "7eda057c-501f-414c-ad36-e4a75feac4e0"
registry_endpoint = "registry.digitalocean.com/model-services-registry"
The terraform stack returned the id of the cluster that was created. We'll need this id to connect to the cluster.
%cd ..
/Users/brian/Code/data-enrichment-for-ml-models
Pushing the Image
Now that we have a registry, we need to add credentials to our local docker daemon in order to be able to upload images, to do that we'll use this command:
!doctl registry login
Logging Docker in to registry.digitalocean.com
In order to upload the image, we need to tag it with the URL of the DO registry we created. The URL of the registry was an output of the terraform module we just created above. The docker tag command looks like this:
!docker tag insurance_charges_model_service:0.1.0 registry.digitalocean.com/model-services-registry/insurance_charges_model_service:0.1.0
Now we can push the image to the DigitalOcean docker registry.
!docker push registry.digitalocean.com/model-services-registry/insurance_charges_model_service:0.1.0
The push refers to repository [registry.digitalocean.com/model-services-registry/insurance_charges_model_service]

[1B4e8c730f: Preparing
[1B262abd28: Preparing
[1B103cfdc5: Preparing
[1Be6d9a4d6: Preparing
[1Ba89df31c: Preparing
[1B3bc716a2: Preparing
[1Bb9727396: Preparing
[1B7bf074b6: Preparing
[1B85df8c54: Preparing
[1Bafbe089a: Preparing
[1B90f11bed: Preparing
[1B50a1245f: Preparing
[13Be8c730f: Pushing  426.5MB/1.3GB
...
Accessing the Kubernetes Cluster
To access the cluster, doctl has another option that will set up the kubectl tool for us:
!doctl kubernetes cluster kubeconfig save 7eda057c-501f-414c-ad36-e4a75feac4e0
Notice: Adding cluster credentials to kubeconfig file found in "/Users/brian/.kube/config"
Notice: Setting current-context to do-nyc1-model-services-cluster
The unique identifier is for the cluster that was just created and is returned by the previous command. When the command finishes, the current kubectl context should be switched to the newly created cluster. To list the contexts in kubectl, execute this command:
!kubectl config get-contexts
CURRENT   NAME                             CLUSTER                          AUTHINFO                               NAMESPACE
*         do-nyc1-model-services-cluster   do-nyc1-model-services-cluster   do-nyc1-model-services-cluster-admin
          minikube                         minikube                         minikube
A listing of the contexts currently in the kubectl configuration should appear, and there should be a star next to the new cluster's context. To make sure everything is working we can get a list of the nodes in the cluster with this command:
!kubectl get nodes
NAME                                       STATUS   ROLES    AGE   VERSION
model-services-cluster-worker-pool-crmkf   Ready    <none>   55m   v1.22.8
model-services-cluster-worker-pool-crmkx   Ready    <none>   55m   v1.22.8
model-services-cluster-worker-pool-crmky   Ready    <none>   55m   v1.22.8
Creating a Kubernetes Namespace
Now that we have a cluster and are connected to it, we'll create a namespace to hold the resources for our model deployment. The resource definition is in the kubernetes/namespace.yml file. To apply the manifest to the cluster, execute this command:
!kubectl create -f kubernetes/namespace.yml
namespace/model-services created
To take a look at the namespaces, execute this command:
!kubectl get namespace
NAME              STATUS   AGE
default           Active   164m
kube-node-lease   Active   164m
kube-public       Active   164m
kube-system       Active   164m
model-services    Active   2s
The new namespace should appear in the listing along with other namespaces created by default by the system. To use the new namespace for the rest of the operations, execute this command:
!kubectl config set-context --current --namespace=model-services
Context "do-nyc1-model-services-cluster" modified.
Creating a Database
To create a PostgreSQL database instance in Kubernetes, we'll use the bitnami helm chart.
Helm charts are packaged applications that can be easily installed on a Kubernetes cluster. To install PostgreSQL we'll first add the bitnami helm repository:
!helm repo add bitnami https://charts.bitnami.com/bitnami
"bitnami" has been added to your repositories
Now we can apply the PostgreSQL chart to the current cluster and namespace with this command:
!helm install postgres bitnami/postgresql
NAME: postgres
LAST DEPLOYED: Sun May  1 23:36:50 2022
NAMESPACE: model-services
STATUS: deployed
REVISION: 1
TEST SUITE: None
NOTES:
CHART NAME: postgresql
CHART VERSION: 11.1.25
APP VERSION: 14.2.0

** Please be patient while the chart is being deployed **

PostgreSQL can be accessed via port 5432 on the following DNS names from within your cluster:

    postgres-postgresql.model-services.svc.cluster.local - Read/Write connection

To get the password for "postgres" run:

    export POSTGRES_PASSWORD=$(kubectl get secret --namespace model-services postgres-postgresql -o jsonpath="{.data.postgres-password}" | base64 --decode)

To connect to your database run the following command:

    kubectl run postgres-postgresql-client --rm --tty -i --restart='Never' --namespace model-services --image docker.io/bitnami/postgresql:14.2.0-debian-10-r77 --env="PGPASSWORD=$POSTGRES_PASSWORD" \
      --command -- psql --host postgres-postgresql -U postgres -d postgres -p 5432

    > NOTE: If you access the container using bash, make sure that you execute "/opt/bitnami/scripts/entrypoint.sh /bin/bash" in order to avoid the error "psql: local user with ID 1001} does not exist"

To connect to your database from outside the cluster execute the following commands:

    kubectl port-forward --namespace model-services svc/postgres-postgresql 5432:5432 &
    PGPASSWORD="$POSTGRES_PASSWORD" psql --host 127.0.0.1 -U postgres -d postgres -p 5432
The output of the helm chart contains some info about the deployment that we'll need later. The DNS name of the new PostgreSQL service is used in the configuration of the decorator.
We can view the newly created database instance by looking for the pods that are hosting it:
!kubectl get pods
NAME                    READY   STATUS    RESTARTS   AGE
postgres-postgresql-0   1/1     Running   0          104s
To access the database, we'll need to get the password created by the helm chart:
!kubectl get secret postgres-postgresql -o jsonpath="{.data.postgres-password}" | base64 --decode
SaF0fhHrRj
We can test the database by executing a simple SELECT statement from another pod in the cluster:
!kubectl run postgres-postgresql-client --rm --tty -i \
    --restart='Never' \
    --image docker.io/bitnami/postgresql:14.2.0-debian-10-r77 \
    --command -- psql postgresql://postgres:SaF0fhHrRj@postgres-postgresql:5432/postgres \
                -c "SELECT current_database();"
 current_database
------------------
 postgres
(1 row)

pod "postgres-postgresql-client" deleted
To create a table in the database, we'll execute a SQL command:
!kubectl run postgres-postgresql-client --rm --tty -i \
    --restart='Never' \
    --image docker.io/bitnami/postgresql:14.2.0-debian-10-r77 \
    --command -- psql postgresql://postgres:SaF0fhHrRj@postgres-postgresql:5432/postgres \
                -c "CREATE TABLE clients ( \
                    ssn         varchar(11) PRIMARY KEY, \
                    first_name  varchar(30) NOT NULL, \
                    last_name   varchar(30) NOT NULL, \
                    age         integer     NOT NULL, \
                    sex         varchar(6)  NOT NULL, \
                    bmi         integer     NOT NULL, \
                    children    integer     NOT NULL, \
                    smoker      boolean     NOT NULL, \
                    region      varchar(10) NOT NULL);"
CREATE TABLE
pod "postgres-postgresql-client" deleted
Next, we'll add some data to the table using the same code as we used for the local docker PostgreSQL instance. Before that, we'll need to connect to the instance using using port forwarding. Port forwarding is a simple way to connect to a pod running in the cluster from the local environment, it simply forwards all traffic from a local port to a remote port in the pod.
To start port forwarding, execute this command:
kubectl port-forward svc/postgres-postgresql 5432:5432
Now we can execute the python code that will add the data to the table:
connection = psycopg2.connect(
    host="localhost",
    port="5432",
    database="postgres",
    user="postgres",
    password="SaF0fhHrRj")

cursor = connection.cursor()

for record in records:
    cursor.execute("INSERT INTO clients (ssn, first_name, last_name, age, sex, bmi, children, smoker, region)"
                   "VALUES (%s, %s, %s, %s, %s, %s, %s, %s, %s);",
                   (record["ssn"], record["first_name"], record["last_name"], record["age"], record["sex"],
                    record["bmi"], record["children"], record["smoker"], record["region"]))
    connection.commit()

cursor.close()
connection.close()
The remote database instance should now have the data needed to try out the decorator running in the service. We can view some of the data with this command:
!kubectl run postgres-postgresql-client --rm --tty -i \
    --restart='Never' \
    --image docker.io/bitnami/postgresql:14.2.0-debian-10-r77 \
    --command -- psql postgresql://postgres:SaF0fhHrRj@postgres-postgresql:5432/postgres \
                -c "SELECT ssn, first_name, last_name FROM clients LIMIT 5;"
     ssn     | first_name | last_name
-------------+------------+-----------
 646-87-1351 | Vickie     | Anderson
 194-94-3733 | Patricia   | Lee
 709-08-5148 | Seth       | James
 132-30-5594 | Edward     | Allen
 096-55-1187 | Mark       | Keith
(5 rows)

pod "postgres-postgresql-client" deleted
Now that we're done putting data in the database, we can shut down the port forwarding process by pressing CTL-C or with this command:
pkill -f kubectl port-forward
Creating a Kubernetes Deployment and Service
The model service now has a database to access, so we'll be creating the model service resources. These are:
- Deployment: a declarative way to manage a set of pods, the model service pods are managed through the Deployment.
- Service: a way to expose a set of pods in a Deployment, the model services is made available to the outside world through the Service, the service type is LoadBalancer which means that a load balancer will be created for the service.
They are created within the Kubernetes cluster with this command:
!kubectl apply -f kubernetes/model_service.yml
deployment.apps/insurance-charges-model-deployment created
service/insurance-charges-model-service created
The deployment and service for the model service were created together. You can see the new service with this command:
!kubectl get services
NAME                              TYPE           CLUSTER-IP       EXTERNAL-IP   PORT(S)        AGE
insurance-charges-model-service   LoadBalancer   10.245.246.238   <pending>     80:31223/TCP   32s
postgres-postgresql               ClusterIP      10.245.0.250     <none>        5432/TCP       15m
postgres-postgresql-hl            ClusterIP      None             <none>        5432/TCP       15m
The Service type is LoadBalancer, which means that the cloud provider is providing a load balancer and public IP address through which we can contact the service. To view details about the load balancer provided by Digital Ocean for this Service, we'll execute this command:
!kubectl describe service insurance-charges-model-service | grep "LoadBalancer Ingress"
LoadBalancer Ingress: 157.230.202.103
The load balancer can take a while longer than the service to come up, until the load balancer is running the command won't return anything. The IP address that the Digital Ocean load balancer sits behind will be listed in the output of the command.
Once the load balancer comes up, we can view the service through a web browser:
The same documentation is displayes as when we deployed the service locally.
To make a prediction, we'll hit the IP service with a request:
!curl -X 'POST' \
  'http://157.230.202.103/api/models/insurance_charges_model/prediction' \
  -H 'accept: application/json' \
  -H 'Content-Type: application/json' \
  -d '{ "ssn": "646-87-1351" }'
{"charges":6416.86}
The decorator is working and accessing data from the database!
The service is using the configuration file in ./configuration/kubernetes_rest_config.yaml right now, which is configuring the PostgreSQL decorator to accept the "ssn" field and use it to load all other features needed by the model from the database. This is not the only way that we can use the decorator, so we'll try out another configuration.
To load another configuration file, we'll just change the environment variable value in the Kubernetes Deployment resource for the model service:
env:
  - name: REST_CONFIG
    value: ./configuration/kubernetes_rest_config2.yaml
...
The new configuration file causes the decorator to accept more fields from the user of the service. After changing the Deployment, we'll recreate it in the cluster with this command:
!kubectl apply -f kubernetes/model_service.yml
deployment.apps/insurance-charges-model-deployment configured
service/insurance-charges-model-service unchanged
The service pods are restarted with the new configuration, the service remains unchanhed. We can try out a request with this command:
!curl -X 'POST' \
  'http://157.230.202.103/api/models/insurance_charges_model/prediction' \
  -H 'accept: application/json' \
  -H 'Content-Type: application/json' \
  -d "{ \
      \"ssn\": \"646-87-1351\", \
      \"age\": 65, \
      \"bmi\": 50, \
      \"smoker\": true \
    }"
{"charges":46627.88}
The service now required more fields because the decorator is no longer loading those features from the database.
We'll try out one more configuration to show how powerful decorators can be. In a previous blog post we created a decorator that added a unique prediction id to every prediction returned by the model. We can add this decorator to the service by simply changing the configuration:
decorators:
  - class_path: data_enrichment.prediction_id.PredictionIDDecorator
  - class_path: data_enrichment.postgresql.PostgreSQLEnrichmentDecorator
    configuration:
    host: "postgres-postgresql.model-services.svc.cluster.local"
    port: "5432"
...
This configuration is in the ./configuration/kubernetes_rest_config3.yaml file. We recreate the Deployment again, this time pointing at this configuration file:
!kubectl apply -f kubernetes/model_service.yml
deployment.apps/insurance-charges-model-deployment configured
service/insurance-charges-model-service unchanged
We'll try the service one more time:
!curl -X 'POST' \
  'http://157.230.202.103/api/models/insurance_charges_model/prediction' \
  -H 'accept: application/json' \
  -H 'Content-Type: application/json' \
  -d "{ \
      \"ssn\": \"646-87-1351\", \
      \"age\": 65, \
      \"bmi\": 50, \
      \"smoker\": true \
    }"
{"charges":46627.88,"prediction_id":"4db189c2-5200-44a6-b6af-0e341d0fb9bc"}
The service returned a unique identifier field called "prediction_id" along with the prediction. This field was generated by the decorator we added through configuration. A full explanation of how the prediction ID decorator works can be found in the blog post.
This shows how easy and powerful it is to combine decorator with models in order to do more complex operations.
Deleting the Resources
Now that we're done with the service we need to destroy the resources. To delete the database deploymet, we'll delete the helm deployment:
!helm delete postgres
release "postgres" uninstalled
Since the persistent volume claim is not deleted with the chart, we'll delete it with a kubectl command:
!kubectl delete pvc -l app.kubernetes.io/instance=postgres
persistentvolumeclaim "data-postgres-postgresql-0" deleted
To delete the model service, we'll execute this command:
!kubectl delete -f kubernetes/model_service.yml
deployment.apps "insurance-charges-model-deployment" deleted
service "insurance-charges-model-service" deleted
To delete the namespace:
!kubectl delete -f kubernetes/namespace.yml
namespace "model-services" deleted
Lastly, to destroy the kubernetes cluster, execute these commands:
%cd ./terraform

!terraform plan -var="project_name=model-services" -destroy
/Users/brian/Code/data-enrichment-for-ml-models/terraform
digitalocean_vpc.cluster_vpc: Refreshing state... [id=5a0e94f2-bb9d-4814-bf5f-ccc2c2e98b84]
digitalocean_container_registry.container_registry: Refreshing state... [id=model-services-registry]
digitalocean_container_registry_docker_credentials.registry_credentials: Refreshing state... [id=model-services-registry]
digitalocean_kubernetes_cluster.cluster: Refreshing state... [id=7eda057c-501f-414c-ad36-e4a75feac4e0]
kubernetes_secret.cluster_registry_crendentials: Refreshing state... [id=default/docker-cfg]

Terraform used the selected providers to generate the following execution plan.
Resource actions are indicated with the following symbols:
  - destroy

Terraform will perform the following actions:

  # digitalocean_container_registry.container_registry will be destroyed
  - resource "digitalocean_container_registry" "container_registry" {
      - created_at             = "2022-05-02 00:48:55 +0000 UTC" -> null
      - endpoint               = "registry.digitalocean.com/model-services-registry" -> null
      - id                     = "model-services-registry" -> null
      - name                   = "model-services-registry" -> null
      - region                 = "sfo3" -> null
      - server_url             = "registry.digitalocean.com" -> null
      - storage_usage_bytes    = 694379520 -> null
      - subscription_tier_slug = "basic" -> null
    }

...

Plan: 0 to add, 0 to change, 5 to destroy.

Changes to Outputs:
  - kubernetes_cluster_id = "7eda057c-501f-414c-ad36-e4a75feac4e0" -> null
  - registry_endpoint     = "registry.digitalocean.com/model-services-registry" -> null

───────────────────────────────────────────────────────────────────────────────

Note: You didn't use the -out option to save this plan, so Terraform can't
guarantee to take exactly these actions if you run "terraform apply" now.
!terraform apply -var="project_name=model-services" -auto-approve -destroy
digitalocean_container_registry.container_registry: Refreshing state... [id=model-services-registry]
digitalocean_vpc.cluster_vpc: Refreshing state... [id=5a0e94f2-bb9d-4814-bf5f-ccc2c2e98b84]
digitalocean_container_registry_docker_credentials.registry_credentials: Refreshing state... [id=model-services-registry]
digitalocean_kubernetes_cluster.cluster: Refreshing state... [id=7eda057c-501f-414c-ad36-e4a75feac4e0]
kubernetes_secret.cluster_registry_crendentials: Refreshing state... [id=default/docker-cfg]

Terraform used the selected providers to generate the following execution plan.
Resource actions are indicated with the following symbols:
  - destroy

Terraform will perform the following actions:

  # digitalocean_container_registry.container_registry will be destroyed
  - resource "digitalocean_container_registry" "container_registry" {
      created_at             = "2022-05-02 00:48:55 +0000 UTC" -> null
      - endpoint               = "registry.digitalocean.com/model-services-registry" -> null
      - id                     = "model-services-registry" -> null
      - name                   = "model-services-registry" -> null
      - region                 = "sfo3" -> null
      - server_url             = "registry.digitalocean.com" -> null
      - storage_usage_bytes    = 694379520 -> null
      - subscription_tier_slug = "basic" -> null
    }

...
Closing
In this blog post, we showed how to use decorators to perform data enrichment for machine learning models. Data enrichment is a common requirement across many different ML model deployments. We went through the entire design and coding process for the decorator, local testing using Docker, creating the infrastucture using Terraform, and then deploying the solution to Kubernetes.
One of the benefits of using a decorator for the ML model is that we keep the model prediction code and the data access code separate from each other. The model code did not have to change at all for us to be able to perform data enrichment for the model. The RESTful service package code also didnt have to be modified because it supports adding decorators to models through configuration rather than doing it through code. In the end it was possible to cleanly combine the model, decorator, and service components into one cohesive solution through the use of configuration only. The service is also able to host multiple decorators for each model which also allows for more complex use cases for decorators.
Another benefit is that we are able to reuse the decorator we built in this blog post to do data enrichment for any ML model deployment that needs to pull data from a PostgreSQL database. The same decorator class can easily be instantiated and added to any model instance that follows the MLModel interface. We can do this because the decorator is built for flexibility, being able to be configured to load any number of fields from a database table and join the values into the model's input.