Policies for ML Model Deployments
In a previous blog post we introduced the decorator pattern for ML model deployments and then showed how to use the pattern to build extensions for a deployed model. For example, in this blog post we added data enrichment to a deployed model. In this blog post we added prediction caching to a deployed model. These extensions were added without having to modify the machine learning model prediction code at all, we were able to do it using the decorator pattern. In this blog post we’ll add policies to a deployed model in the same way.
This blog post was written in a Jupyter notebook, some of the code and commands found in it reflects this.
Introduction
Machine learning models are being used to make ever more important decisions in the modern world. Because of the power of data modeling, ML models are able to learn the nuances of a domain and make accurate predictions even in situations where a human expert would not be able to. However, ML models are not omniscient and they should not run without oversight from their operators. To handle situations in which we don't want to have an ML model make predictions, we can create a policy that steps in before the prediction is returned to the user. A policy that is applied to an ML model is simply a rule that ensures that the model will never make predictions that are unsafe to use. For example, we can create a policy that make sure that a machine learning model that makes predictions about optimal airline ticket prices never makes predictions that cost the airline money. A good policy for an ML model is one that allows the model some leeway while also ensuring that the model’s predictions are safe to use. In this blog post, we'll write policies for ML models and deploy the policies alongside the model using the decorator pattern.
A policy is a system of guidelines that are used to make decisions. A software-defined policy is simply a policy that is written as code and can be executed. Most of the time, the policies followed by a software system are hard-coded into the system using whichever programming language the system is written in. This is often good enough for, but sometimes the policies are complex enough or change often enough to warrant writing them in a specialized language that is specifically designed for policies. By writing policies separately from the system that they will work in, we can decouple them from the system and make the system simpler to work in. Policies can also be written by domain experts and more easily integrated into the software system in this way.
In this blog post we'll write policies for a deployed machine learning model, and we'll use the Rego policy language. Policy decisions are made by querying policies written in Rego that are executed by the Open Policy Agent which is a service that can be integrated into software systems. Other services can offload policy management and execution to the OPA service, accessing it through an RESTful API. The OPA service is specifically built for low-latency evaluations of policies. Rego and OPA are already used to review Kubernetes manifests for best practices, to review infrastructure deployments by checking Terraform plans, and to check for authorization within the Envoy service mesh.
In this blog post we’ll also build a decorator that applies policies to the input and output of a model by using the OPA service. By using the decorator pattern that we’ve shown in previous blog posts, we’ll be able to show how to integrate policies separately from the model itself. We'll show how to deploy the ML model inside of a RESTful service along with the decorator, all by modifying a simple configuration file.
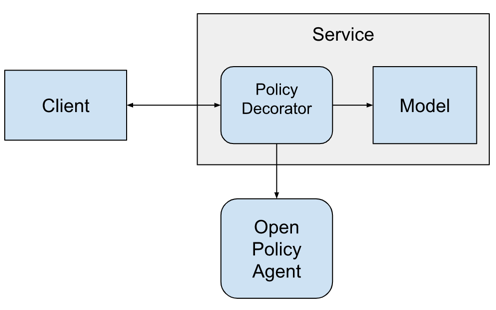
Software Architecture
The system we'll build will ultimately look like this:
Installing a Model
To make this blog post a little shorter we won't train a completely new model. Instead we'll install a model that we've built in a previous blog post. The code for the model is in this github repository.
The model is called the "Insurace Charges Model" and predicts the medical insurance charges based on features of a customer. To install the model, we can use the pip command and point it at the github repo of the model.
from IPython.display import clear_output

!pip install -e git+https://github.com/schmidtbri/regression-model#egg=insurance_charges_model

clear_output()
To make a prediction with the model, we'll import the model's class.
from insurance_charges_model.prediction.model import InsuranceChargesModel
Now we can instantiate the model using the class.
model = InsuranceChargesModel()

clear_output()
The model object contains everything needed to make a prediction. When the object was instantiated, it loaded the necessary model parameters.
The model object publishes some metadata about the model as attributes:
print(model.qualified_name)
print(model.display_name)
print(model.version)
print(model.description)
insurance_charges_model
Insurance Charges Model
0.1.0
Model to predict the insurance charges of a customer.
To make a prediction, we need to use the model's input schema class. The input schema class is a Pydantic class that defines a data structure that can be used by the model's predict() method to make a prediction.
The input schema can be accessed directly from the model object like this:
model.input_schema
insurance_charges_model.prediction.schemas.InsuranceChargesModelInput
We can view input schema of the model as a JSON schema document by calling the .schema() method on the Pydantic class.
model.input_schema.schema()
{'title': 'InsuranceChargesModelInput',
 'description': "Schema for input of the model's predict method.",
 'type': 'object',
 'properties': {'age': {'title': 'Age',
   'description': 'Age of primary beneficiary in years.',
   'minimum': 18,
   'maximum': 65,
   'type': 'integer'},
  'sex': {'title': 'Sex',
   'description': 'Gender of beneficiary.',
   'allOf': [{'$ref': '#/definitions/SexEnum'}]},
  'bmi': {'title': 'Body Mass Index',
   'description': 'Body mass index of beneficiary.',
   'minimum': 15.0,
   'maximum': 50.0,
   'type': 'number'},
  'children': {'title': 'Children',
   'description': 'Number of children covered by health insurance.',
   'minimum': 0,
   'maximum': 5,
   'type': 'integer'},
  'smoker': {'title': 'Smoker',
   'description': 'Whether beneficiary is a smoker.',
   'type': 'boolean'},
  'region': {'title': 'Region',
   'description': 'Region where beneficiary lives.',
   'allOf': [{'$ref': '#/definitions/RegionEnum'}]}},
 'definitions': {'SexEnum': {'title': 'SexEnum',
   'description': "Enumeration for the value of the 'sex' input of the model.",
   'enum': ['male', 'female'],
   'type': 'string'},
  'RegionEnum': {'title': 'RegionEnum',
   'description': "Enumeration for the value of the 'region' input of the model.",
   'enum': ['southwest', 'southeast', 'northwest', 'northeast'],
   'type': 'string'}}}
The model's input schema is called InsuranceChargesModelInput. The model expects five fields to be provided in order to make a prediction. All of the fields have type information as well as the allowed values. For example, the input schema states that the minimum allowed value for "bmi" is 15 and the maximum allowed value is 50.
To make a prediction, all we need to do is instantiate the input schema class and give it to the model object's predict() method:
from insurance_charges_model.prediction.schemas import SexEnum, RegionEnum

model_input = model.input_schema(
    age=42,
    sex=SexEnum.female,
    bmi=24.0,
    children=2,
    smoker=False,
    region=RegionEnum.northwest)

prediction = model.predict(model_input)

prediction
InsuranceChargesModelOutput(charges=8640.78)
The prediction is another Pydantic class, this one is of type InsuranceChargesModelOutput. The output contains a single field called "charges", which is the predicted amount of charges in dollars. The model predicts that the charges will be $8640.78. Notice that we needed to import two Enum classes in order to fill in the categorical fields with allowed values.
The policies that we'll write need to interact with the model through these schemas, so it's important to review them.
Creating a Policy
Rego policies are assertions on data, in this blog post that data is the ML model's input and output data structures. Using the Insurance Charges Model we installed above, we'll create a policy for this situation:
"Smokers over the age of 60 should not have a prediction made."
This policy is completely made up, its an example of a situation in which we would not want to return a prediction from the model for reasons other than the model's capabilities. The prediction that the model makes would still be valid because the model is capable of prediting the insurance chages for a 62 year old smoker, but business requirements may prevent the prediction from being used. This is a good place to add a policy that will enforce this business requirement. The policy looks like this:
package insurance_charges_model

customer_is_a_smoker_over_60 if {
    input.model_input.smoker
    input.model_input.age > 60
}
The policy is defined in the "insurance_charges_model" package. The policy is using the model input fields "smoker" which is a boolean field, and "age" which is an integer. The value "customer_is_a_smoker_over_60" is set to "true" if the conditions in the body of the rule are true. This policy is very simple and it does not actually make a decision about what to do with the model's prediction, all it does is detect whether the customer is a smoker over the age of 60. To create a decision we'll add another rule:
allow := true if {
    not customer_is_a_smoker_over_60
} else := false {
    customer_is_a_smoker_over_60
}
We've added a rule called "allow" to the policy. Very simply, the value for "allow" is set to true if the customer is not a smoker over the age of of 60, otherwise it is set to false. We'll use this rule to actually make a decision as to what to do with the prediction. It would also be nice to have a description as to why the decision was made, so we'll add one last rule to the insurance_charges_model policy package:
messages contains msg if {
    customer_is_a_smoker_over_60
    msg:= "Prediction cannot be made if customer is a smoker over the age of 60."
}
The last rule creates a "messages" array with explanations for the rules. If the "customer_is_a_smoker_over_60" rule is true, the messages array will contain an explanation for that particular decision. The structure of this policy package is designed to be extendable, so extra clauses can be added to the "allow" rule and "messages" rule as needed.
The policy file is called "insurance_charges_model.rego" and it is saved in the "policies" folder of the repository.
Trying Out the Policy
To show how the policy works, we'll start up the Open Policy Agent service in a Docker container.
!docker run -d \
    -p 8181:8181 \
    --name opa \
    openpolicyagent/opa run --server
84f6c5264e3b1c06e5d20891932e4e682cfd45754fac52dfd0a76ee1574f1302
Once the container is up and running, we'll install the OPA python package to make the integration a little easier. By using the package we won't need to make individual REST call to the service ourselves, we'll let the package handle that.
!pip install OPA-python-client

clear_output()
To contact the OPA service running in the Docker image, we'll create a client object:
from opa_client.opa import OpaClient

client = OpaClient(host="localhost", port=8181, version="v1")

client.check_connection()
"Yes I'm here :)"
The check_connection() method on the client reached out to the OPA service and checked for connectivity.
We can create policies in the OPA service by loading the policies from a file and sending it to the service.
client.update_opa_policy_fromfile("../policies/insurance_charges_model.rego",
                                  endpoint="insurance_charges_model")
True
The policy was created succesfully in the service, but just to make sure we can ask for a list of the policies:
client.get_policies_list()
['insurance_charges_model']
Looks like the insurance_charges_model package is loaded, now we can try it out with some data. We'll create some data using the model's input and output schemas:
policy_input_data = {
    "model_qualified_name": "insurance_charges_model",
    "model_version": "0.1.0",
    "model_input": {
        "age": 62,
        "sex": "female",
        "bmi": 24.0,
        "children": 2,
        "smoker": True,
        "region": "northwest"
    },
    "model_output": {
        "charges": 12345.0
    }
}
We'll be sending the model's qualified name and version, along with the model input and model output.
We can execute the policy against this data like this:
result = client.check_policy_rule(input_data=policy_input_data,
                                  package_path="insurance_charges_model")

result
{'result': {'allow': False,
  'customer_is_a_smoker_over_60': True,
  'messages': ['Prediction cannot be made if customer is a smoker over the age of 60.']}}
The "allow" rule evaluated to False, the reason being that the customer is a smoker over the age of 60. Let's try it again:
policy_input_data = {
    "model_qualified_name": "insurance_charges_model",
    "model_version": "0.1.0",
    "model_input": {
        "age": 45,
        "sex": "female",
        "bmi": 24.0,
        "children": 2,
        "smoker": True,
        "region": "northwest"
    },
    "model_output": {
        "charges": 12345.0
    }
}

result = client.check_policy_rule(input_data=policy_input_data,
                                  package_path="insurance_charges_model")

result
{'result': {'allow': True, 'messages': []}}
This time, the "allow" rule evaluated to true, because the age of the customer is below 60, however they are still a smoker. The rule works as expected because we wanted to disallow a prediction if the customer is a smoker AND also over the age of 60.
In this section we showed how to execute the Rego policy using the Open Policy Agent.
Testing the Policy
Rego policies can be tested by creating other Rego policies that assert the the policy is outputting the correct decision by using fake data. A Rego test looks like this:
package insurance_charges_model
import future.keywords

test_customer_is_a_smoker_over_60 if {
    customer_is_a_smoker_over_60 with input as {
        "model_input": {
            "age": 62,
            "sex": "female",
            "bmi": 24.0,
            "children": 2,
            "smoker": true,
            "region": "northwest"
        },
        "model_output": {
            "charges": 12345.0
        }
    }
}
The unit test is named "test_customer_is_a_smoker_over_60" and it tests that the rule evaluates to "true" given the input. This unit test along with 9 others is found in the insurance_charges_model_test.rego file in the policies folder in the project repository.
We'll run the test with this Docker command:
!docker run -it --rm \
    -v "$(pwd)"/../policies:/policies \
    openpolicyagent/opa:0.43.0 test ./policies
PASS: 10/10
The rego test command found all 10 tests and executed them. The tests are loaded by sharing the folder containing the policies with the Docker container as a volume. The "opa test" command then automatically found the insurance_charges_model_tests.rego file and executed all of the tests found inside. The tests all passed.
One of the good things about building policies with code is the ability to test the policies to add quality control to the policy codebase.
Creating the Policy Decorator
In order to cleanly integrate a deployed ML model with the Open Policy agent, we'll create a decorator that handles the application of policies. The decorator will execute "around" the model's output_schema property and predict() method.
from typing import List, Union
from pydantic import BaseModel
from ml_base.decorator import MLModelDecorator

from opa_client.opa import OpaClient


class PredictionNotAvailable(BaseModel):
    """Schema returned when a prediction is not available because of a policy decision."""
    messages: List[str]


class OPAPolicyDecorator(MLModelDecorator):
    """Decorator to do policy checks using the Open Policy Agent service.

    Args:
        host: Hostname of the OPA service.
        port: Port of the OPA service.
        policy_package: Name of the policy to apply to the model.

    """

    def __init__(self, host: str, port: int, policy_package: str) -> None:
        super().__init__(host=host, port=port, policy_package=policy_package)
        self.__dict__["_client"] = OpaClient(host=host,
                                             port=port,
                                             version="v1")

    @property
    def output_schema(self) -> BaseModel:
        """Decorator method that modifies the model's output schema to accomodate the policy decision.

        Note:
            This method will create a Union of the model's output schema and the PredictionNotAvailable
            schema and return it.

        """
        class NewUnion(BaseModel):
            __root__: Union[self._model.output_schema, PredictionNotAvailable]
        NewUnion.__name__ = self._model.output_schema.__name__

        return NewUnion

    def predict(self, data):
        """Decorate the model's predict() method, calling the OPA service with the model's input and output.

        Note:
            If a prediction is allowed the OPAPolicyDecorator predict() method will return an
            instance of the model's output schema. If a prediction is not allowed because of a policy
            violation, the decorator will return an instance of PredictionNotAvailable.

        """
        # make a prediction with the model
        prediction = self._model.predict(data=data)

        # build up data structure to send to the OPA service
        policy_check_data = {
            "model_qualified_name": self._model.qualified_name,
            "model_version": self._model.version,
            "model_input": data.dict(),
            "model_output": prediction.dict()
        }

        # call OPA service with model input and output
        response = self.__dict__["_client"].check_policy_rule(input_data=policy_check_data,
                                                              package_path=self._configuration["policy_package"])

        # if "allow" is True, then return the prediction
        if response["result"]["allow"]:
            return prediction
        # otherwise, return an instance of PredictionNotAvailable
        else:
            return PredictionNotAvailable(messages=response["result"]["messages"])

    def __del__(self):
        try:
            if self.__dict__["_client"] is not None:
                del self.__dict__["_client"]
        except KeyError:
            pass
The OPAPolicyDecorator class implements the decorator. The __init__() method is used to configure the decorator when it is instantiated. It has parameters for the hostname and port of the OPA service, and the policy package that we want to apply to the model.
The decorator actually modifies the output schema of the model that it is decorating. The output schema becomes a Union of the model's output schema and a schema called PredictionNotAvailable. The decorator needs to add this Union because it needs to be able to inform the users of the model when the policy does not allow a prediction to be returned. The modification of the output schema happens transparently to the user of the model, all they need to do is be able to handle the model's output when the PredictionNotAvailable output is returned.
The predict() method is the where the action happens. Every time we make a prediction, the decorator will pass the prediction input to the model instance and receive the prediction output from the model. The decorator then sends the model's input and output to the OPA service along with the name of the policy package that we want to apply. If the "allow" result comes back as True, then the prediction is returned to the calling code, if "allow" result is False then the decorator returns a PredictionNotAvailable instance. The "messages" array is returned inside of the PredictionNotAvailable instance if the policy does not allow the prediction.
Decorating the Model
To test out the decorator we’ll first instantiate the model object that we want to use with the decorator.
model = InsuranceChargesModel()
Next, we’ll instantiate the decorator with the parameters.
decorator = OPAPolicyDecorator(
    host="localhost",
    port=8181,
    policy_package="insurance_charges_model"
)
We can add the model instance to the decorator after it’s been instantiated like this:
decorated_model = decorator.set_model(model)
We can see the decorator and the model objects by printing the reference to the decorator:
decorated_model
OPAPolicyDecorator(InsuranceChargesModel)
The decorator object is printing out it's own type along with the type of the model that it is decorating.
The JSON Schema of the model output schema also reflects the Union that was created by the decorator:
decorated_model.output_schema.schema()
{'title': 'InsuranceChargesModelOutput',
 'anyOf': [{'$ref': '#/definitions/insurance_charges_model__prediction__schemas__InsuranceChargesModelOutput'},
  {'$ref': '#/definitions/PredictionNotAvailable'}],
 'definitions': {'insurance_charges_model__prediction__schemas__InsuranceChargesModelOutput': {'title': 'InsuranceChargesModelOutput',
   'description': "Schema for output of the model's predict method.",
   'type': 'object',
   'properties': {'charges': {'title': 'Charges',
     'description': 'Individual medical costs billed by health insurance to customer in US dollars.',
     'type': 'number'}}},
  'PredictionNotAvailable': {'title': 'PredictionNotAvailable',
   'description': 'Schema returned when a prediction is not available because of a policy decision.',
   'type': 'object',
   'properties': {'messages': {'title': 'Messages',
     'type': 'array',
     'items': {'type': 'string'}}},
   'required': ['messages']}}}
As we explained, the PredictionNotAvailable output is added by the OPAPolicyDecorator instance whenever the policy does not allow a prediction to be returned from the model. The Union is shown in the JSON Schema document using the "anyOf" field.
Trying out the Decorator
Now that we have some policies in the OPA service and a decorated model, we can try to make predictions with the decorated model.
To begin, we'll try a prediction that we know will succeed:
from insurance_charges_model.prediction.schemas import InsuranceChargesModelInput

model_input = InsuranceChargesModelInput(
    age=42,
    sex=SexEnum.female,
    bmi=24.0,
    children=2,
    smoker=False,
    region=RegionEnum.northwest)

prediction = decorated_model.predict(model_input)

prediction
InsuranceChargesModelOutput(charges=8640.78)
Since the customer is not a smoker or over the age of 60, we got a prediction back from the model. Next, we'll try another prediction:
model_input = InsuranceChargesModelInput(
    age=62,
    sex=SexEnum.female,
    bmi=24.0,
    children=2,
    smoker=True,
    region=RegionEnum.northwest)

prediction = decorated_model.predict(model_input)

prediction
PredictionNotAvailable(messages=['Prediction cannot be made if customer is a smoker over the age of 60.'])
The policy decorator stepped in when the OPA service returned a result with "allow" set to false. The decorator threw away the model's prediction and returned an instance of PredictionNotAvailable with the messages array that the policy running in the OPA service created.
Deploying the Decorator and Model
Now that we have a model and a decorator, we can combine them together in a service that is able to make predictions and also does policy checks. To do this, we won't need to write any extra code, we can leverage the rest_model_service package to provide the RESTful API for the service. You can learn more about the package in this blog post.
To install the package, execute this command:
!pip install rest_model_service

clear_output()
To create a service for our model, all that is needed is that we add a YAML configuration file to the project. The configuration file looks like this:
service_title: Insurance Charges Model Service
models:
  - qualified_name: insurance_charges_model
    class_path: insurance_charges_model.prediction.model.InsuranceChargesModel
    create_endpoint: true
    decorators:
      - class_path: policy_decorator.policy_decorator.OPAPolicyDecorator
        configuration:
          host: "localhost"
          port: 8181
          policy_package: insurance_charges_model
The service_title field is the name of the service as it will appear in the documentation. The models field is an array that contains the details of the models we would like to deploy in the service. The class_path field points at the MLModel class that implement's the model's prediction logic. The decorators field contains the details of the decorators that we want to attach to the model instance. In this case, we want to use the OPAPolicyDecorator decorator class with the configuration we've used for local testing.
Using the configuration file, we're able to create an OpenAPI specification file for the model service by executing these commands:
export PYTHONPATH=./
export REST_CONFIG=./configuration/local_rest_config.yaml
generate_openapi --output_file="service_contract.yaml"
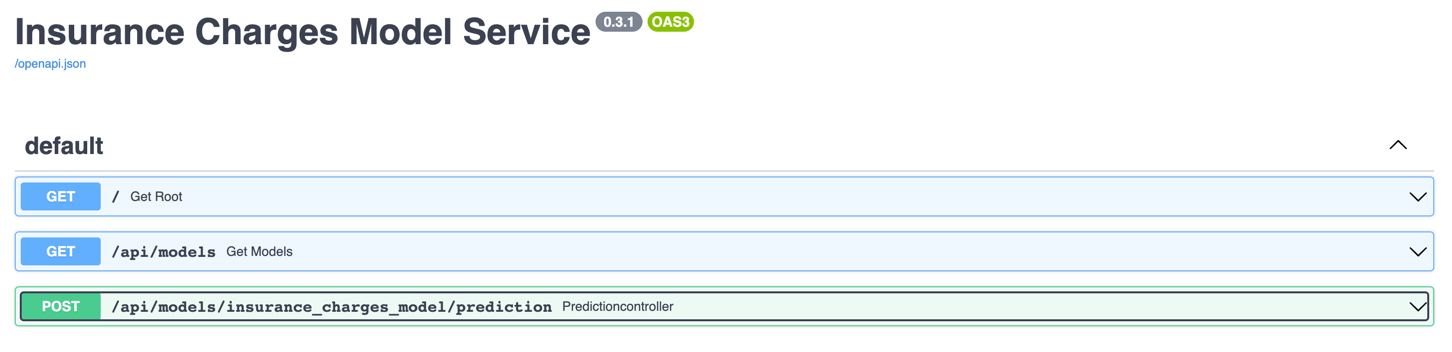
The service_contract.yaml file is generated and contains the OpenAPI specification that was generated for the model service. The insurance_charges_model endpoint is the one we'll call to make predictions with the model. The model's input and output schemas were automatically extracted and added to the specification. If you inspect the contract, you'll find that the model's output schema was automatically modified by the decorator in the same way as it was done in the example above, the output schema is a Union of the model's original output schema and the PredictionNotAvailable type. The OpenAPI specification file generated can be found at the root of the repository in the file named service_contract.yaml
To run the service locally, execute these commands:
uvicorn rest_model_service.main:app --reload
The service process starts up and can be accessed in a web browser at http://127.0.0.1:8000. The service renders the OpenAPI specification as a webpage that looks like this:
By using the MLModel base class provided by the ml_base package and the REST service framework provided by the rest_model_service package we're able to quickly stand up a service to host the model. The decorator that we want to deploy can also be added to the model through configuration, including all of their parameters.
We won't be testing the service right now, so we can stop the service process by hitting CTRL+C.
Creating a Docker Image
Now that we have a working model and model service, we'll need to deploy it somewhere. We'll start by deploying the service locally using Docker.
Let's create a docker image and run it locally. The docker image is generated using instructions in the Dockerfile:
# syntax=docker/dockerfile:1
FROM python:3.9-slim

ARG BUILD_DATE

LABEL org.opencontainers.image.title="Policies for ML Models"
LABEL org.opencontainers.image.description="Policies for machine learning models."
LABEL org.opencontainers.image.created=$BUILD_DATE
LABEL org.opencontainers.image.authors="6666331+schmidtbri@users.noreply.github.com"
LABEL org.opencontainers.image.source="https://github.com/schmidtbri/policies-for-ml-models"
LABEL org.opencontainers.image.version="0.1.0"
LABEL org.opencontainers.image.licenses="MIT License"
LABEL org.opencontainers.image.base.name="python:3.9-slim"

WORKDIR /service

ARG USERNAME=service-user
ARG USER_UID=10000
ARG USER_GID=10000

# install packages
RUN apt-get update \
    && apt-get install --assume-yes --no-install-recommends sudo \
    && apt-get install --assume-yes --no-install-recommends git \
    && apt-get clean \
    && rm -rf /var/lib/apt/lists/*

# create a user
RUN groupadd --gid $USER_GID $USERNAME \
    && useradd --uid $USER_UID --gid $USER_GID -m $USERNAME \
    && echo $USERNAME ALL=\(root\) NOPASSWD:ALL > /etc/sudoers.d/$USERNAME \
    && chmod 0440 /etc/sudoers.d/$USERNAME

# installing dependencies
COPY ./service_requirements.txt ./service_requirements.txt
RUN pip install -r service_requirements.txt

# copying code, configuration, and license
COPY ./configuration ./configuration
COPY ./policy_decorator ./policy_decorator
COPY ./LICENSE ./LICENSE

CMD ["uvicorn", "rest_model_service.main:app", "--host", "0.0.0.0", "--port", "8000"]

USER $USERNAME
The Dockerfile is used by this docker command to create a docker image:
!docker build -t insurance_charges_model_service:0.1.0 ../

clear_output()
To make sure everything worked as expected, we'll look through the docker images in our system:
!docker image ls | grep insurance_charges_model_service
insurance_charges_model_service 0.1.0 4b2747668a67 18 seconds ago 1.37GB
The insurance_charges_model_service image is listed. Next, we'll start the image to see if everything is working as expected. However, we need to connect the docker containers to the same network first. Let's create a Docker network:
!docker network create local-network
8a7d2d05523d01dd0fc082adac84bda01a012d7e847dcd4ffcc35df1031e18ab
Next, we'll connect the running OPA Docker image to the network.
!docker network connect local-network opa
Now we can start the service docker image connected to the same network as the OPA container.
!docker run -d \
    -p 8000:8000 \
    --net local-network \
    -e REST_CONFIG=./configuration/docker_rest_config.yaml \
    --name insurance_charges_model_service \
    insurance_charges_model_service:0.1.0
02dd79117cfe53949b30dea9e1aa8834bf2509e2cc707f42972eec955c3364ae
Notice that we're using the "docker_rest_config.yaml" configuration file that has a different hostname for the OPA service instance. The opa container is not accesible from localhost inside of the network so we needed to have the hostname "opa" in the configuration.
To make sure the server process started up correctly, we'll look at the logs:
!docker logs insurance_charges_model_service
/usr/local/lib/python3.9/site-packages/tpot/builtins/__init__.py:36: UserWarning: Warning: optional dependency `torch` is not available. - skipping import of NN models.
  warnings.warn("Warning: optional dependency `torch` is not available. - skipping import of NN models.")
INFO:     Started server process [1]
INFO:     Waiting for application startup.
INFO:     Application startup complete.
INFO:     Uvicorn running on http://0.0.0.0:8000 (Press CTRL+C to quit)
The service should be accessible on port 8000 of localhost, so we'll try to make a prediction using the curl command running inside of a container connected to the network:
!docker run -it --rm \
    --net local-network \
    curlimages/curl \
    curl -X 'POST' \
    'http://insurance_charges_model_service:8000/api/models/insurance_charges_model/prediction' \
    -H 'accept: application/json' \
    -H 'Content-Type: application/json' \
    -d "{ \
        \"age\": 42, \
        \"sex\": \"female\", \
        \"bmi\": 24.0, \
        \"children\": 2, \
        \"smoker\": false, \
        \"region\": \"northwest\" \
    }"
{"charges":8640.78}
The model predicted that the insurance charges will be $8640.78.
We'll try a prediction that will fail the policy check as well:
!docker run -it --rm \
    --net local-network \
    curlimages/curl \
    curl -X 'POST' \
    'http://insurance_charges_model_service:8000/api/models/insurance_charges_model/prediction' \
    -H 'accept: application/json' \
    -H 'Content-Type: application/json' \
    -d "{ \
        \"age\": 62, \
        \"sex\": \"female\", \
        \"bmi\": 24.0, \
        \"children\": 2, \
        \"smoker\": true, \
        \"region\": \"northwest\" \
    }"
{"messages":["Prediction cannot be made if customer is a smoker over the age of 60."]}
We're done with the local environment, so we'll shut down the OPA container, the model service container and the network we created for them.
!docker kill opa
!docker rm opa

!docker kill insurance_charges_model_service
!docker rm insurance_charges_model_service

!docker network rm local-network
opa
opa
insurance_charges_model_service
insurance_charges_model_service
local-network
Deploying the Model
To show the system in action, we’ll deploy the service and the Redis instance to a Kubernetes cluster. A local cluster can be easily started by using minikube. Installation instructions can be found here.
To start the minikube cluster execute this command:
!minikube start
😄 minikube v1.26.1 on Darwin 12.5.1
🎉 minikube 1.27.0 is available! Download it: https://github.com/kubernetes/minikube/releases/tag/v1.27.0
💡 To disable this notice, run: 'minikube config set WantUpdateNotification false'
✨ Using the virtualbox driver based on existing profile
👍 Starting control plane node minikube in cluster minikube
🔄 Restarting existing virtualbox VM for "minikube" ...
🐳 Preparing Kubernetes v1.24.3 on Docker 20.10.17 ...[K[K[K[K
▪ controller-manager.horizontal-pod-autoscaler-sync-period=5s
🔎 Verifying Kubernetes components...
▪ Using image k8s.gcr.io/metrics-server/metrics-server:v0.6.1
▪ Using image kubernetesui/dashboard:v2.6.0
▪ Using image gcr.io/k8s-minikube/storage-provisioner:v5
▪ Using image kubernetesui/metrics-scraper:v1.0.8
🌟 Enabled addons: storage-provisioner
🏄 Done! kubectl is now configured to use "minikube" cluster and "default" namespace by default
We'll use the Kubernetes Dashboard to view details about the model service. We can start it up in the minikube cluster with this command:
minikube dashboard --url
The command starts up a proxy that must keep running in order to forward the traffic to the dashboard UI in the minikube cluster.
Let's view all of the pods running in the minikube cluster to make sure we can connect.
!kubectl get pods -A
NAMESPACE              NAME                                         READY   STATUS    RESTARTS       AGE
kube-system            coredns-6d4b75cb6d-wrrwr                     1/1     Running   19 (23h ago)   43d
kube-system            etcd-minikube                                1/1     Running   19 (23h ago)   43d
kube-system            kube-apiserver-minikube                      1/1     Running   19 (23h ago)   43d
kube-system            kube-controller-manager-minikube             1/1     Running   5 (23h ago)    20d
kube-system            kube-proxy-5n4t9                             1/1     Running   18 (23h ago)   43d
kube-system            kube-scheduler-minikube                      1/1     Running   17 (23h ago)   43d
kube-system            metrics-server-8595bd7d4c-ptcsp              1/1     Running   15 (23h ago)   23d
kube-system            storage-provisioner                          1/1     Running   29             43d
kubernetes-dashboard   dashboard-metrics-scraper-78dbd9dbf5-xslpl   1/1     Running   11 (23h ago)   23d
kubernetes-dashboard   kubernetes-dashboard-5fd5574d9f-vbtnd        1/1     Running   14 (23h ago)   23d
The pods running the kubernetes dashboard and other cluster services appear in the kube-system and kubernetes-dashboard namespaces.
Creating a Kubernetes Namespace
Now that we have a cluster and are connected to it, we'll create a namespace to hold the resources for our model deployment. The resource definition is in the kubernetes/namespace.yaml file. To apply the manifest to the cluster, execute this command:
!kubectl create -f ../kubernetes/namespace.yaml
namespace/model-services created
resourcequota/model-services-resource-quota created
The namespace was created, alongside with a ResourceQuota which limits the amount of resources that can be taken by objects within the namespace.
To take a look at the namespaces, execute this command:
!kubectl get namespace
NAME                   STATUS   AGE
default                Active   43d
kube-node-lease        Active   43d
kube-public            Active   43d
kube-system            Active   43d
kubernetes-dashboard   Active   23d
model-services         Active   3s
The new namespace appears in the listing along with other namespaces created by default by the system. To use the new namespace for the rest of the operations, execute this command:
!kubectl config set-context --current --namespace=model-services
Context "minikube" modified.
Creating a Kubernetes Deployment and Service
The model service is deployed by using Kubernetes resources. These are:
- Model Service ConfigMap: a set of configuration options, in this case it is a simple YAML file that will be loaded into the running container as a volume mount. This resource allows us to change the configuration of the model service without having to modify the Docker image. The configuration file will overwrite the configuration files that were included with the Docker image.
- Deployment: a declarative way to manage a set of pods, the model service pods are managed through the Deployment. This deployment includes the model service as well as the OPA service running as a sidecar container.
- Service: a way to expose a set of pods in a Deployment, the model services is made available to the outside world through the Service.
The software architecture will look like this when it is running in the Kubernetes cluster:
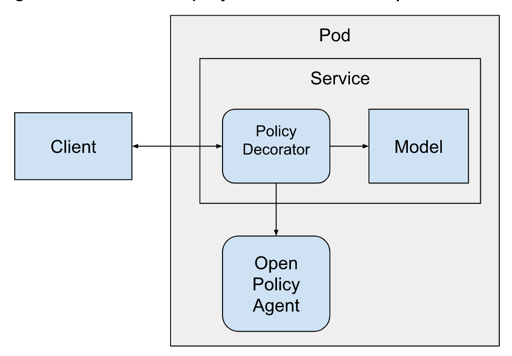
This way of deploying the OPA service is called the "sidecar" pattern because the service Pods will contain the main model service and the OPA service running right beside it in the same cluster node.
The sidecar OPA container is added to the model service pod with this YAML:
  ...
  - name: opa
    image: openpolicyagent/opa:0.43.0
    ports:
      - name: http
        containerPort: 8181
    imagePullPolicy: Never
    resources:
      requests:
        cpu: "100m"
        memory: "250Mi"
      limits:
        cpu: "200m"
        memory: "250Mi"
    args:
      - "run"
      - "--ignore=.*"
      - "--server"
      - "/policies"
    volumeMounts:
      - readOnly: true
        mountPath: /policies
        name: policies
    livenessProbe:
      httpGet:
        scheme: HTTP
        port: 8181
      initialDelaySeconds: 5
      periodSeconds: 5
    readinessProbe:
      httpGet:
        path: /health?bundle=true
        scheme: HTTP
        port: 8181
      initialDelaySeconds: 5
      periodSeconds: 5
  ...
This is not the complete YAML file, the Deployment is defined in the ./kubernetes/model_service.yaml file.
You'll notice that the policy is not going to be loaded through the API. We'll be adding the policy as a volume mounted on the /policies folder within the OPA container. The contents of the volume are going to come from a ConfigMap that we'll create with this command:
!kubectl create configmap policies --from-file ../policies/insurance_charges_model.rego
configmap/policies created
The ConfigMap is managed separately from the OPA service running in the Pod. Let's view the ConfigMap to make sure it was created successfully.
!kubectl describe configmaps policies
Name:         policies
Namespace:    model-services
Labels:       <none>
Annotations:  <none>

Data
====
insurance_charges_model.rego:
----
package insurance_charges_model

import future.keywords.contains
import future.keywords.if

customer_is_a_smoker_over_60 if {
  input.model_input.smoker
    input.model_input.age > 60
}

allow := true if {
  not customer_is_a_smoker_over_60
} else := false {
  customer_is_a_smoker_over_60
}

messages contains msg if {
  customer_is_a_smoker_over_60
    msg:= "Prediction cannot be made if customer is a smoker over the age of 60."
}


BinaryData
====

Events:  <none>
The contents of the ConfigMap match the contents of the original insurance_charges_model.rego file.
We're almost ready to start the model service, but before starting it we'll need to send the docker image from the local docker daemon to the minikube image cache:
!minikube image load insurance_charges_model_service:0.1.0
We can view the images in the minikube cache with this command:
!minikube image ls | grep insurance_charges_model_service
docker.io/library/insurance_charges_model_service:0.1.0
The model service resources are created within the Kubernetes cluster with this command:
!kubectl apply -f ../kubernetes/model_service.yaml
configmap/model-service-configuration created
deployment.apps/insurance-charges-model-deployment created
service/insurance-charges-model-service created
Let's get the names of the pods that are running the service:
!kubectl get pods
NAME                                                 READY   STATUS    RESTARTS   AGE
insurance-charges-model-deployment-66ff696fd-zbzdv   2/2     Running   0          29s
To make sure the service started up correctly, we'll check the logs of the model service:
!kubectl logs insurance-charges-model-deployment-66ff696fd-zbzdv -c insurance-charges-model
/usr/local/lib/python3.9/site-packages/tpot/builtins/__init__.py:36: UserWarning: Warning: optional dependency `torch` is not available. - skipping import of NN models.
  warnings.warn("Warning: optional dependency `torch` is not available. - skipping import of NN models.")
INFO:     Started server process [1]
INFO:     Waiting for application startup.
INFO:     Application startup complete.
INFO:     Uvicorn running on http://0.0.0.0:8000 (Press CTRL+C to quit)
Looks like the server process started correctly in the Docker container. The UserWarning is generated when we instantiate the model object, which means everything is running as expected.
We can also view the logs of the OPA service sidecar:
!kubectl logs insurance-charges-model-deployment-66ff696fd-zbzdv -c opa | head -n 5
{"addrs":[":8181"],"diagnostic-addrs":[],"level":"info","msg":"Initializing server.","time":"2022-09-21T14:09:05Z"}
{"level":"warning","msg":"OPA running with uid or gid 0. Running OPA with root privileges is not recommended. Use the -rootless image to avoid running with root privileges. This will be made the default in later OPA releases.","time":"2022-09-21T14:09:05Z"}
{"client_addr":"172.17.0.1:48928","level":"info","msg":"Received request.","req_id":1,"req_method":"GET","req_path":"/","time":"2022-09-21T14:09:13Z"}
{"client_addr":"172.17.0.1:48928","level":"info","msg":"Sent response.","req_id":1,"req_method":"GET","req_path":"/","resp_bytes":1391,"resp_duration":2.031405,"resp_status":200,"time":"2022-09-21T14:09:13Z"}
{"client_addr":"172.17.0.1:48930","level":"info","msg":"Received request.","req_id":2,"req_method":"GET","req_path":"/health","time":"2022-09-21T14:09:13Z"}
The deployment and service for the model service were created together. You can see the new service with this command:
!kubectl get services
NAME                              TYPE       CLUSTER-IP      EXTERNAL-IP   PORT(S)        AGE
insurance-charges-model-service   NodePort   10.107.89.237   <none>        80:30468/TCP   59s
Minikube exposes the service on a local port, we can get a link to the endpoint with this command:
minikube service insurance-charges-model-service --url -n model-services
The command output this URL:
http://192.168.59.100:30468
The command must keep running to keep the tunnel open to the running model service in the minikube cluster.
To make a prediction, we'll hit the service with a request:
!curl -X 'POST' \
  'http://192.168.59.100:30468/api/models/insurance_charges_model/prediction' \
  -H 'accept: application/json' \
  -H 'Content-Type: application/json' \
  -d "{ \
        \"age\": 62, \
        \"sex\": \"male\", \
        \"bmi\": 22, \
        \"children\": 5, \
        \"smoker\": true, \
        \"region\": \"southwest\" \
    }"
{"messages":["Prediction cannot be made if customer is a smoker over the age of 60."]}
We have the model service up and running in the local minikube cluster!
Looks like the policy was evaluated and the PredictionNotAvailable schema was returned. Let's try it with a request that we know will return a prediction:
!curl -X 'POST' \
  'http://192.168.59.100:30468/api/models/insurance_charges_model/prediction' \
  -H 'accept: application/json' \
  -H 'Content-Type: application/json' \
  -d "{ \
        \"age\": 42, \
        \"sex\": \"male\", \
        \"bmi\": 22, \
        \"children\": 5, \
        \"smoker\": false, \
        \"region\": \"southwest\" \
    }"
{"charges":9762.69}
The service is up and running with the OPA sidecar and the decorator is able to interact with the sidecar correctly to evaluate the policy we created.
Deleting the Resources
We're done working with the Kubernetes resources, so we will delete them and shut down the cluster.
To delete the policies ConfigMap, execute this command:
!kubectl delete configmap policies
configmap "policies" deleted
To delete the model service pods, execute this command:
!kubectl delete -f ../kubernetes/model_service.yaml
configmap "model-service-configuration" deleted
deployment.apps "insurance-charges-model-deployment" deleted
service "insurance-charges-model-service" deleted
To delete the model-services namespace, delete this command:
!kubectl delete -f ../kubernetes/namespace.yaml
namespace "model-services" deleted
resourcequota "model-services-resource-quota" deleted
To shut down the Kubernetes cluster:
!minikube stop
✋  Stopping node "minikube"  ...
🛑  1 node stopped.
Closing
In this blog post we showed how to deploy a machine learning model with a decorator that applied policies to the model's prediction. We built the policy using the Rego language and executed it with the Open Policy Agent. By adding the policy as a decorator, we’re able to decouple the model’s prediction logic from the policy logic, this makes both components more reusable and easier to test. In fact, the policy decorator can easily be reused in other ML deployments, as long as we write a policy that matches our model’s needs.
By writing the policy in an industry-standard language we’re enabling people that don’t have experience with ML or ML deployments to create complex policies that can be deployed alongside an ML model. The person that writes these policies is often a subject matter expert that understands the domain within which the model is working and the effect that the model’s operation will have on it. By using a policy-based approach to the problem of checking ML model predictions we’re able to simplify the deployment process as well, since a policy can be developed and deployed separately from the ML model deployment.
Adding the OPA sidecar to the deployment increased the complexity of the software because we have to worry about deploying an extra container in the Kubernetes pod to run the policy. This approach also increased the latency for each prediction because it requires inter-process communication to execute the policy for each prediction that the model service makes. For both of these reasons, using Rego and the Open Policy Agent may not be the ideal choice for all model deployments. In some situations, it may be better to just write the policy in Python and deploy it as a decorator alongside the model, this will make the policy decision add less time to the total prediction time.