Signed Parameters for Secure ML Model Deployments
This blog post was written in a Jupyter notebook, the code and commands found in it reflect this.
All of the code for this blog post is in this github repository.
Introduction
In the Python ecosystem, using pickle to serialize machine learning models is very common. Pickle is a built-in Python library module that makes it easy to convert in-memory objects into bytestreams that can be saved to a hard drive or sent over networks. Pickling an object is very quick and simple and is the easiest way to persist a complex Python object for later use. However, pickle is not a secure serialization standard. The documentation for the pickle module in the Python standard library explicitly mentions the insecure nature of the pickle format:
Warning The pickle module is not secure. Only unpickle data you trust.

It is possible to construct malicious pickle data which will execute arbitrary code during unpickling. Never unpickle data that could have come from an untrusted source, or that could have been tampered with.
What can we do about this? Pickling is the easiest way to save model objectsand using pickle for model serialization is ubiquitous in Data Science. One thing that we can do is make sure that the pickle files that hold our models are not modified in the time between the training process and the prediction process. This way, we can be sure that the contents of the file are benign. This is especially important in models that are deployed in production services that are running in sensitive environments. If we allow the model service that is hosting the model to load a pickle file that has been compromised, we can allow arbritrary code execution on the server.
One way to prevent the pickle file from being modified is by "signing" it. Signing a file means processing the data and creating a "signature" that we can use later to make sure that the contents of the file have not been changed since it was signed. In order to still be able to use pickle in a production setting, we'll require that the model parameters be signed right after they are created, then we'll check the signature before we load the parameters within the model service. If the signature does not match, we'll know that the model parameters are not safe to load. However, signing model parameters does not encrypt them, so it is still possible for someone with access to the pickle files to view the model parameters.
In this blog post, we'll be downloading a dataset, exploring it, training a model, signing the model parameters, and deploying the model parameters and model to a Kubernetes cluster as a RESTful service. We'll also be loading the model parameters from a network storage service to show how to secure the model parameters while they are stored separately from the model deployment.
Getting Data
In order to train a model, we'll need a dataset. The dataset we've chosen is the Diabetes Health Indicators Dataset available from Kaggle. The dataset contains data about health and the incidence of diabetetes. We'll be using the dataset to train a model that predicts whether or not a person is likely to have diabetes.
To make it easy to download the data, we'll install the kaggle python package.
from IPython.display import clear_output

%pip install kaggle

clear_output()
Next, we'll execute these commands to download the data and unzip it into the data folder in the project:
!mkdir -p ../data

!kaggle datasets download -d alexteboul/diabetes-health-indicators-dataset -p ../data --unzip

clear_output()
The files downloaded look like this:
!ls -la ../data
total 101232
drwxr-xr-x 5 brian staff 160 Mar 17 22:55 [34m.[m[m
drwxr-xr-x 25 brian staff 800 Mar 17 22:55 [34m..[m[m
-rw-r--r-- 1 brian staff 22738151 Mar 17 22:55 diabetes_012_health_indicators_BRFSS2015.csv
-rw-r--r-- 1 brian staff 6347570 Mar 17 22:55 diabetes_binary_5050split_health_indicators_BRFSS2015.csv
-rw-r--r-- 1 brian staff 22738154 Mar 17 22:55 diabetes_binary_health_indicators_BRFSS2015.csv
We'll focus on the "diabetes_binary_5050split_health_indicators_BRFSS2015.csv" dataset. Let's load the dataset into a Pandas dataframe:
import pandas as pd

data = pd.read_csv(f'../data/diabetes_binary_5050split_health_indicators_BRFSS2015.csv')
data.shape
(70692, 22)
The unprocessed dataset has 70692 rows and 22 columns.
The dataframe columns are these:
data.info()
<class 'pandas.core.frame.DataFrame'>
RangeIndex: 70692 entries, 0 to 70691
Data columns (total 22 columns):
 #   Column                Non-Null Count  Dtype
---  ------                --------------  -----
 0   Diabetes_binary       70692 non-null  float64
 1   HighBP                70692 non-null  float64
 2   HighChol              70692 non-null  float64
 3   CholCheck             70692 non-null  float64
 4   BMI                   70692 non-null  float64
 5   Smoker                70692 non-null  float64
 6   Stroke                70692 non-null  float64
 7   HeartDiseaseorAttack  70692 non-null  float64
 8   PhysActivity          70692 non-null  float64
 9   Fruits                70692 non-null  float64
 10  Veggies               70692 non-null  float64
 11  HvyAlcoholConsump     70692 non-null  float64
 12  AnyHealthcare         70692 non-null  float64
 13  NoDocbcCost           70692 non-null  float64
 14  GenHlth               70692 non-null  float64
 15  MentHlth              70692 non-null  float64
 16  PhysHlth              70692 non-null  float64
 17  DiffWalk              70692 non-null  float64
 18  Sex                   70692 non-null  float64
 19  Age                   70692 non-null  float64
 20  Education             70692 non-null  float64
 21  Income                70692 non-null  float64
dtypes: float64(22)
memory usage: 11.9 MB
The columns names are not all easy to understand so we'll rename some of them:
data = data.rename(columns = {
    "Diabetes_binary": "Diabetes",
    "HighBP": "HighBloodPressure",
    "HighChol": "HighCholesterol",
    "CholCheck": "CholesterolChecked",
    "HeartDiseaseorAttack": "HeartDiseaseOrHeartAttack",
    "PhysActivity": "PhysicalActivity",
    "HvyAlcoholConsump": "HeavyAlchoholConsumption",
    "NoDocbcCost": "NoDoctorsVisitBecauseOfCost",
    "GenHlth": "GeneralHealth",
    "MentHlth": "MentalHealth",
    "PhysHlth": "PhysicalHealth",
    "DiffWalk": "DifficultyWalking"
})
Profiling the Data
In order to profile the data, we'll use the sweetviz package. Let's install the package:
%pip install sweetviz

clear_output()
To profile the data, all that is needed is two lines of code:
import sweetviz as sv

report = sv.analyze(data)

clear_output()
Once the report is created, we'll save it to disk as an HTML file.
report.show_html(filepath="../diabetes_risk_model/model_files/data_report.html")
Report ../diabetes_risk_model/model_files/data_report.html was generated! NOTEBOOK/COLAB USERS: the web browser MAY not pop up, regardless, the report IS saved in your notebook/colab files.
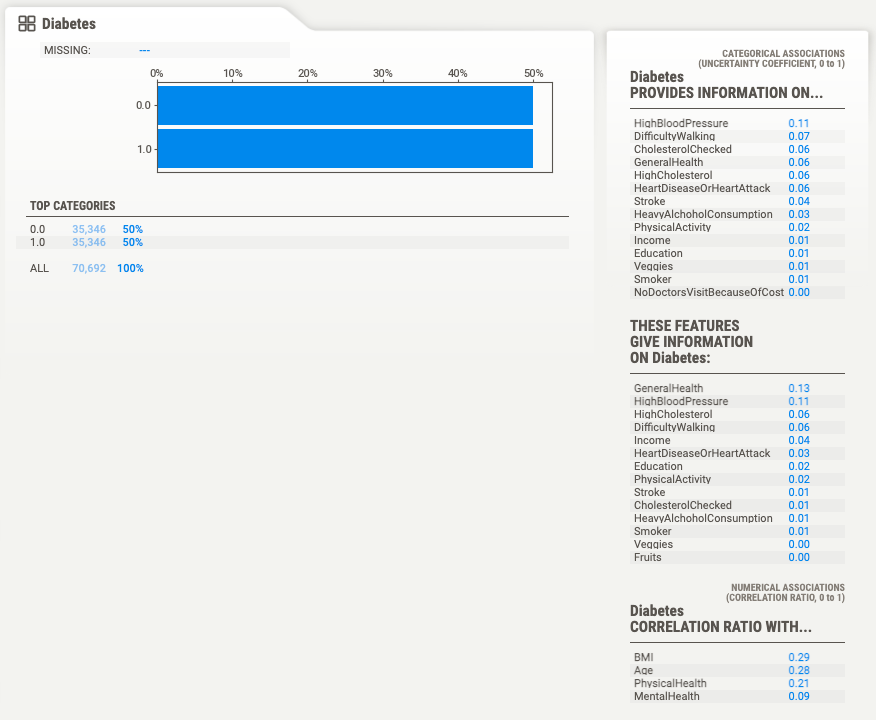
Right away the profile will tell us a few key details about the dataset:
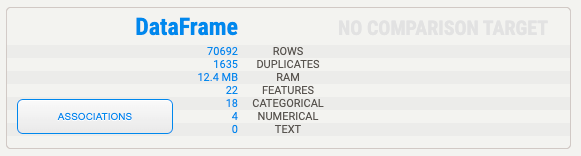
The dataset has 1635 duplicate rows, it has 22 features, 18 of which are categorical and 4 of which are numerical. The profile has a description for each variable. Here's the description for the "Diabetes" variable, which we'll use as the target variable.
By using the sweetviz package we can avoid writing the most common data profiling code. From the report we can tell that there are a few things we'll need to deal with:
- There are highly correlated variables.
- Some variables have outliers.
Training a Model
To train a model we'll be using the pycaret package.
Let's install the package first:
%pip install --pre pycaret

clear_output()
We'll setup the experiment like this:
from pycaret.classification import setup

diabetes_experiment = setup(data=data,
                            target="Diabetes",
                            data_split_stratify=True,
                            fix_imbalance=False,
                            remove_outliers=True,
                            normalize=True,
                            feature_selection=True,
                            remove_multicollinearity=True,
                            session_id=42)
| Description | Value | |
|---|---|---|
| 0 | Session id | 42 |
| 1 | Target | Diabetes |
| 2 | Target type | Binary |
| 3 | Original data shape | (70692, 22) |
| 4 | Transformed data shape | (68683, 5) |
| 5 | Transformed train set shape | (47421, 5) |
| 6 | Transformed test set shape | (21208, 5) |
| 7 | Numeric features | 21 |
| 8 | Preprocess | True |
| 9 | Imputation type | simple |
| 10 | Numeric imputation | mean |
| 11 | Categorical imputation | mode |
| 12 | Remove multicollinearity | True |
| 13 | Multicollinearity threshold | 0.900000 |
| 14 | Remove outliers | True |
| 15 | Outliers threshold | 0.050000 |
| 16 | Normalize | True |
| 17 | Normalize method | zscore |
| 18 | Feature selection | True |
| 19 | Feature selection method | classic |
| 20 | Feature selection estimator | lightgbm |
| 21 | Number of features selected | 0.200000 |
| 22 | Fold Generator | StratifiedKFold |
| 23 | Fold Number | 10 |
| 24 | CPU Jobs | -1 |
| 25 | Use GPU | False |
| 26 | Log Experiment | False |
| 27 | Experiment Name | clf-default-name |
| 28 | USI | bd08 |
We're telling pycaret that the target column is target="Diabetes". We're also asking the pycaret package to take care of several problems in the dataset. The fix_imbalance parameter tells pycaret to not try to balance the target variable. The remove_outliers parameter tells the package to remove outliers using PCA linear dimensionality reduction. The feature_selection option tells the package to remove unnecessary features from the training set. The remove_multicollinearity option tells the package to drop a feature if it is highly linearly correlated with other features.
After analyzing the dataset, we can see that pycaret removed some samples and some columns from the dataset. The original dataset had 70,692 samples, the preprocessed dataset has 68,683 samples. Pycaret also removed features, we had 21 features starting out, after preprocessing only 5 features remained. Pycaret has also added data imputers in the prediction pipeline, we'll use these later to deal with missing values when making predictions.
Once pycaret has been setup, we're ready to train some models.
from pycaret.classification import compare_models

best_model = compare_models()
| Model | Accuracy | AUC | Recall | Prec. | F1 | Kappa | MCC | TT (Sec) | |
|---|---|---|---|---|---|---|---|---|---|
| gbc | Gradient Boosting Classifier | 0.7318 | 0.8069 | 0.7818 | 0.7108 | 0.7446 | 0.4636 | 0.4660 | 0.6810 |
| lightgbm | Light Gradient Boosting Machine | 0.7313 | 0.8056 | 0.7823 | 0.7100 | 0.7444 | 0.4627 | 0.4652 | 0.2000 |
| ada | Ada Boost Classifier | 0.7309 | 0.8053 | 0.7616 | 0.7176 | 0.7389 | 0.4618 | 0.4627 | 0.3710 |
| ridge | Ridge Classifier | 0.7281 | 0.0000 | 0.7444 | 0.7210 | 0.7325 | 0.4562 | 0.4565 | 0.1030 |
| lda | Linear Discriminant Analysis | 0.7281 | 0.8007 | 0.7444 | 0.7210 | 0.7325 | 0.4562 | 0.4565 | 0.1040 |
| lr | Logistic Regression | 0.7279 | 0.8015 | 0.7409 | 0.7222 | 0.7314 | 0.4559 | 0.4561 | 1.6740 |
| svm | SVM - Linear Kernel | 0.7265 | 0.0000 | 0.7552 | 0.7148 | 0.7338 | 0.4529 | 0.4545 | 0.1080 |
| qda | Quadratic Discriminant Analysis | 0.7265 | 0.7940 | 0.7610 | 0.7119 | 0.7356 | 0.4530 | 0.4541 | 0.1000 |
| nb | Naive Bayes | 0.7210 | 0.7939 | 0.7207 | 0.7212 | 0.7209 | 0.4420 | 0.4420 | 0.1090 |
| rf | Random Forest Classifier | 0.7001 | 0.7617 | 0.7204 | 0.6923 | 0.7061 | 0.4002 | 0.4006 | 1.1040 |
| knn | K Neighbors Classifier | 0.6942 | 0.7485 | 0.7166 | 0.6859 | 0.7008 | 0.3883 | 0.3888 | 0.2640 |
| et | Extra Trees Classifier | 0.6900 | 0.7467 | 0.6760 | 0.6955 | 0.6856 | 0.3800 | 0.3802 | 1.0550 |
| dt | Decision Tree Classifier | 0.6867 | 0.7368 | 0.6688 | 0.6937 | 0.6810 | 0.3735 | 0.3738 | 0.1070 |
| dummy | Dummy Classifier | 0.5000 | 0.5000 | 0.0000 | 0.0000 | 0.0000 | 0.0000 | 0.0000 | 0.0890 |
The function displays a table of the model metrics, highlighting the models with the highest metrics in each category. The function also returns the best model found:
print(best_model)
GradientBoostingClassifier(ccp_alpha=0.0, criterion='friedman_mse', init=None,
                           learning_rate=0.1, loss='log_loss', max_depth=3,
                           max_features=None, max_leaf_nodes=None,
                           min_impurity_decrease=0.0, min_samples_leaf=1,
                           min_samples_split=2, min_weight_fraction_leaf=0.0,
                           n_estimators=100, n_iter_no_change=None,
                           random_state=42, subsample=1.0, tol=0.0001,
                           validation_fraction=0.1, verbose=0,
                           warm_start=False)
In this case, pycaret returned the GradientBoostingClassifier as the best model. The model selected has the highest accuracy, AUC, recall, and F1 score, but does not have the highest precision. This first step is only to get an idea of the way the different types of models perform on the problem. We'll need to choose among the models for the one that meets our requirements.
There are other things to take into account when selecting a model. For example, certain models take a lot more memory and CPU time to make predictions. In certain situations, it would be better to select a model with lower accuracy but that is able to meet the requirements of the deployment environment.
It looks like the Gradient Boosting Classifier model has the highest F1 score, while also having a high accuracy. So we'll select it to keep working with. To train a gbc model, we'll call the pycaret create_model() function.
from pycaret.classification import create_model

model = create_model("gbc")
| Accuracy | AUC | Recall | Prec. | F1 | Kappa | MCC | |
|---|---|---|---|---|---|---|---|
| Fold | |||||||
| 0 | 0.7264 | 0.8041 | 0.7770 | 0.7057 | 0.7396 | 0.4528 | 0.4551 |
| 1 | 0.7367 | 0.8050 | 0.7907 | 0.7137 | 0.7502 | 0.4734 | 0.4762 |
| 2 | 0.7298 | 0.8048 | 0.7684 | 0.7133 | 0.7398 | 0.4597 | 0.4611 |
| 3 | 0.7357 | 0.8053 | 0.7979 | 0.7096 | 0.7511 | 0.4714 | 0.4751 |
| 4 | 0.7318 | 0.8098 | 0.7765 | 0.7128 | 0.7433 | 0.4636 | 0.4655 |
| 5 | 0.7314 | 0.8075 | 0.7765 | 0.7123 | 0.7430 | 0.4628 | 0.4647 |
| 6 | 0.7268 | 0.7999 | 0.7817 | 0.7043 | 0.7410 | 0.4535 | 0.4563 |
| 7 | 0.7357 | 0.8104 | 0.7890 | 0.7129 | 0.7490 | 0.4713 | 0.4740 |
| 8 | 0.7310 | 0.8060 | 0.7789 | 0.7108 | 0.7433 | 0.4620 | 0.4641 |
| 9 | 0.7328 | 0.8164 | 0.7813 | 0.7122 | 0.7452 | 0.4656 | 0.4678 |
| Mean | 0.7318 | 0.8069 | 0.7818 | 0.7108 | 0.7446 | 0.4636 | 0.4660 |
| Std | 0.0034 | 0.0042 | 0.0081 | 0.0031 | 0.0040 | 0.0068 | 0.0070 |
Once the model has been created, we can do hyperparameter tuning with the tune_model() function.
from pycaret.classification import tune_model

tuned_model = tune_model(model, n_iter=10, optimize="F1")
| Accuracy | AUC | Recall | Prec. | F1 | Kappa | MCC | |
|---|---|---|---|---|---|---|---|
| Fold | |||||||
| 0 | 0.7296 | 0.8041 | 0.7826 | 0.7077 | 0.7433 | 0.4593 | 0.4619 |
| 1 | 0.7377 | 0.8051 | 0.7952 | 0.7133 | 0.7520 | 0.4754 | 0.4786 |
| 2 | 0.7254 | 0.8024 | 0.7668 | 0.7081 | 0.7363 | 0.4508 | 0.4524 |
| 3 | 0.7341 | 0.8054 | 0.7971 | 0.7078 | 0.7498 | 0.4682 | 0.4720 |
| 4 | 0.7316 | 0.8088 | 0.7736 | 0.7136 | 0.7424 | 0.4632 | 0.4649 |
| 5 | 0.7357 | 0.8055 | 0.7793 | 0.7167 | 0.7467 | 0.4713 | 0.4731 |
| 6 | 0.7241 | 0.7996 | 0.7805 | 0.7014 | 0.7389 | 0.4483 | 0.4511 |
| 7 | 0.7411 | 0.8086 | 0.7882 | 0.7204 | 0.7528 | 0.4822 | 0.4844 |
| 8 | 0.7342 | 0.8055 | 0.7858 | 0.7123 | 0.7473 | 0.4685 | 0.4710 |
| 9 | 0.7330 | 0.8149 | 0.7789 | 0.7134 | 0.7447 | 0.4660 | 0.4680 |
| Mean | 0.7327 | 0.8060 | 0.7828 | 0.7115 | 0.7454 | 0.4653 | 0.4677 |
| Std | 0.0050 | 0.0039 | 0.0088 | 0.0051 | 0.0051 | 0.0099 | 0.0100 |
Fitting 10 folds for each of 10 candidates, totalling 100 fits
We asked pycaret to maximize the F1 score of the model. By tuning the hyperameters, we were able to raise the F1 score from 0.7446 to 0.7454.
Validating the Model
Pycaret is integrated with the yellowbrick package for creating visualizations. We can easily generate many standard plots to show the performance of our model.
The area under the curve plot can be generated like this:
from pycaret.classification import plot_model

plot_model(tuned_model, plot="auc", save=True)

clear_output()
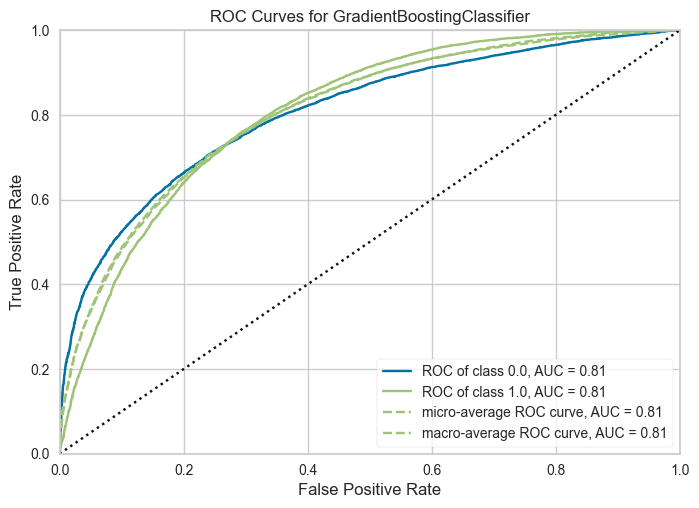
The AUC plot is useful for understanding the tradeoffs between the true positive rate and the false positive rate of the model's predictions.
The confusion matrix can be plotted like this:
plot_model(tuned_model, plot="confusion_matrix", save=True)

clear_output()
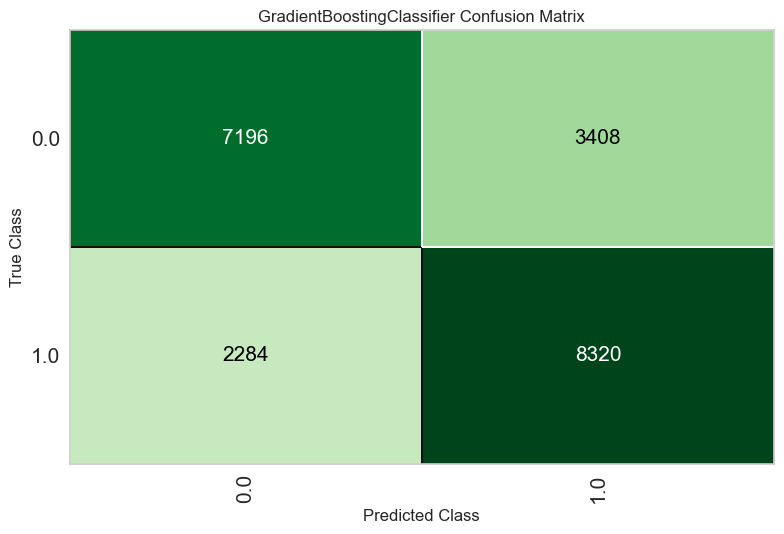
The confusion matrix is useful for understanding which classes are being "confused" for each other by the model. The confusion matrix shows how many predictions were correctly and incorrectly made for each combination of classes.
The classification report can be plotted like this:
plot = plot_model(tuned_model, plot="class_report", save=True)

clear_output()
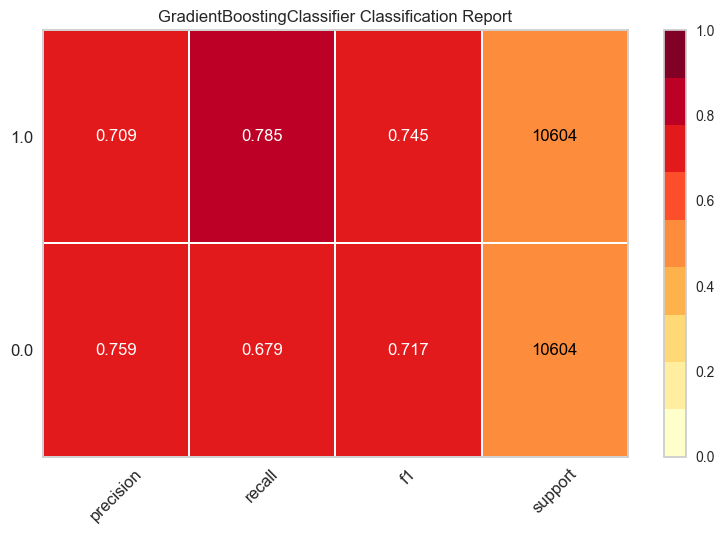
The classification report shows the precision, recall, F1, and support metrics of the model for each class.
The class prediction error can be plotted like this:
plot = plot_model(tuned_model, plot="error", save=True)

clear_output()
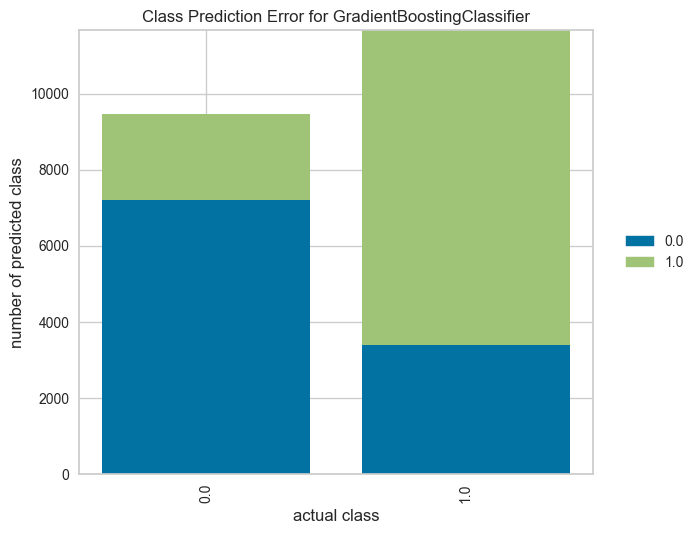
The class prediction error is similar to the classification report and confusion matrix, but highlights the per-class prediction error of the model.
The feature importance can be plotted like this:
plot = plot_model(tuned_model, plot="feature", save=True)

clear_output()
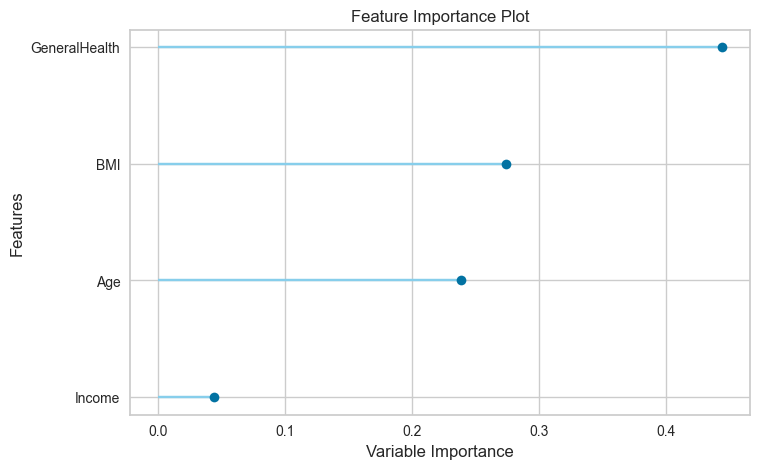
The feature importance plot is for understanding which features are most useful for making accurate predictions.
The learning curve can be plotted like this:
plot = plot_model(tuned_model, plot="learning", save=True)

clear_output()
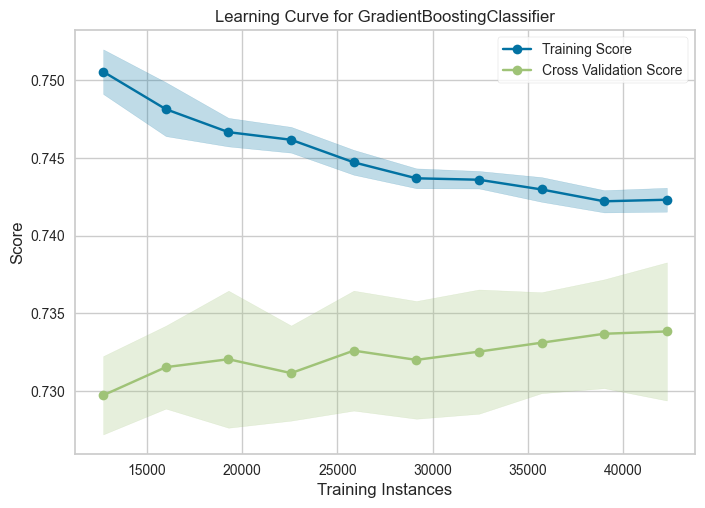
The learning curve shows how the quality of the model varies when tested with the training set and the validation set, when using a varying number of training samples. This is useful for showing whether the model is underfit or overfit on the dataset.
Finalizing the Model
Once we have a tuned and validated model, we can use the entire dataset to train it again, in order to leverage the data samples that were held out for the testing and validation sets.
from pycaret.classification import finalize_model

finalized_model = finalize_model(tuned_model)
Now that we have a trained, validated, and finalized model, we'll save it disk for later use.
import pickle

with open("../diabetes_risk_model/model_files/model.pkl", "wb") as file:
    pickle.dump(finalized_model, file)
Signing the Model Parameters
Once we have the model parameters saved as a pickle file, we can sign the model parameters cryptographically. Signing the model parameters will enable us to ensure that the bytes that we are saving are exactly the same bytes that will be used to make predictions. The process involves creating a "signature" for the model parameters, and later verifying the signature.
To sign the model parameters we'll use the itsdangerous package. This package is useful for sending data through untrusted channels, where there is a chance that an attacker can modify the data.
Let's install the package:
%pip install itsdangerous

clear_output()
Signing messages requires that we come up with a secret key that is only known to us. We'll create a key and store it in a string variable:
import secrets
import string

secret_key = "".join(secrets.choice(string.ascii_uppercase + string.ascii_lowercase) for _ in range(64))
secret_key
'wjtRFppXQpxTChQnNcQJKGlLHKJBmAHMepfFbqvOoUrnuxIsKdiLCrrypYFQsqcw'
Next, we'll load the model parameters that we just saved into a bytes object so that we can sign them:
with open("../diabetes_risk_model/model_files/model.pkl", "rb") as file:
    model_bytes = file.read()
The signing process looks like this:
from itsdangerous import Signer

signer = Signer(secret_key)

signed_model_bytes = signer.sign(model_bytes)
The signed model bytes now have a signature appended to them, which means that the model can't be deserialized using pickle anymore. We have to unsign them to be able to do that. Here is how the unisigning process looks like:
unsigned_model_bytes = signer.unsign(signed_model_bytes)
The model bytes were verified using the secret key, and the signature was removed from the bytes object. Now we can unpickle the model object as we normally would:
import pickle

model = pickle.loads(model_bytes)

type(model)
pycaret.internal.pipeline.Pipeline
To show how the process would go if the model bytes were modified, let's add a single byte to the end of the signed bytes:
changed_signed_model_bytes = signed_model_bytes + bytes([1])
Now let's try to unsign the bytes object:
from itsdangerous import BadSignature

try:
    signer.unsign(changed_signed_model_bytes)
except BadSignature as e:
    print("BadSignature exception raised!")
BadSignature exception raised!
Because the bytes were modified, the unsign method raised an exception.
Let's save the signed model bytes to disk, alongside the original model pickle file we created above:
with open("../diabetes_risk_model/model_files/signed_model.pkl", "wb") as file:
    file.write(signed_model_bytes)
Packaging the Model Parameters
We now have signed model parameters. In order to deploy them we'll package them together with other results of the training process.
The model parameters are in the model_files folder:
!ls -la ../diabetes_risk_model/model_files
total 11936
drwxr-xr-x 6 brian staff 192 Mar 17 23:31 [34m.[m[m
drwxr-xr-x 8 brian staff 256 Feb 25 23:50 [34m..[m[m
-rw-r--r--@ 1 brian staff 6148 Mar 15 22:40 .DS_Store
-rw-r--r--@ 1 brian staff 1261313 Mar 17 22:57 data_report.html
-rw-r--r-- 1 brian staff 2419848 Mar 17 23:20 model.pkl
-rw-r--r-- 1 brian staff 2419876 Mar 17 23:31 signed_model.pkl
In the process of training this model, we created a few files containing the descriptive of the training set and other things. We'll save those files alongside the model parameters in a zip file.
import shutil

shutil.make_archive("../diabetes_risk_model/diabetes_risk_model-0.1.0-2023_03_17",
                    "zip",
                    "../diabetes_risk_model/model_files")
'/Users/brian/Code/securing-parameters-for-ml-models/diabetes_risk_model/diabetes_risk_model-0.1.0-2023_03_17.zip'
The command created a .zip file with all of the files in the model_files folder. The name of the zip file has the model name, model version, and today's date in it. This allows us to easily understand what the contents of the zip file are.
Now that we have the model files in a .zip file, we can delete the original files from the folder:
!rm ../diabetes_risk_model/model_files/data_report.html
!rm ../diabetes_risk_model/model_files/model.pkl
!rm ../diabetes_risk_model/model_files/signed_model.pkl
!mv ../diabetes_risk_model/diabetes_risk_model-0.1.0-2023_03_17.zip ../diabetes_risk_model/model_files/diabetes_risk_model-0.1.0-2023_03_17.zip
This packaging process ensures that all of the results of the model training process end up in one archive that we can use later. All of the data and model check results are packaged along with the serialized model so its easy to review the model training process.
Storing the Model Parameters
In order to store the model parameters, we'll be using a local S3 compatible service called minio. The minio project replicates the S3 API, and also provides a docker image.
To use the minio service, we'll first need a folder to store the files that it will host:
mkdir -p ../minio_data
To run an instance of minio locally, use this command:
!docker run -d \
    -p 9000:9000 \
    -p 9001:9001 \
    -e "MINIO_ACCESS_KEY=TEST" \
    -e "MINIO_SECRET_KEY=ASDFGHJKL" \
    --name minio \
    -v $(pwd)/../minio_data:/data \
    quay.io/minio/minio server /data --console-address ":9001"
d5283c718b1b1dc8d60eadbc03a2834647088474431c66bd032eab726670c1d7
The minio service instance running in the docker container is accessing the local filesystem to serve files. When minio is running in this way, it makes the folders it finds in the local filesystem available as buckets through its API, in exactly the same API as the AWS S3 service.
In order to easily interact with the minio service, we'll use the minio package.
%pip install minio

clear_output()
Let's create a client to connect to the minio service:
from minio import Minio

minio_client = Minio("127.0.0.1:9000",
                     access_key='TEST',
                     secret_key='ASDFGHJKL',
                     secure=False)
Let's make a bucket for the model files:
minio_client.make_bucket("model-files")
Now let's upload the packaged model parameters to the bucket so that we can make predictions with the model parameters later.
import io


with open("../diabetes_risk_model/model_files/diabetes_risk_model-0.1.0-2023_03_17.zip", "rb") as file:
    zip_bytes = file.read()

result = minio_client.put_object(
    bucket_name="model-files",
    object_name="diabetes_risk_model-0.1.0-2023_03_17.zip",
    data=io.BytesIO(zip_bytes),
    length=len(zip_bytes)
)
The model parameters are now in place to be used for making predictions. The zip file shows up in the Minio UI:

The reason that we went through the process of uploading the model parameters in an external storage service is to show how they can be hosted in an external location. By signing the model parameters before we store them in the minio service, we can be sure that the parameters are not tampered with even if the minio service is compromised. Because we signed the model parameters, the attacker would also need to figure out the secret key to be able to modify the model parameters that the deployed model is using.
Making Predictions with the Model
We now have a working model that accepts Pandas dataframes as input and also returns predictions in dataframes. This is useful in the context of model training, but makes integrating the model with other software components a lot more complicated. To make the model easier to use, we'll need to create input and output schemas for the model and also create a wrapper class that provides a consistent interface for the model.
We'll create the model's input and output schemas with the pydantic package, which is used for data validation. By creating the schemas using this package we're able to fully document the inputs that the model accepts and the expected outputs of the model we're going to deploy.
%pip install pydantic

clear_output()
To begin, we'll define the allowed values for the categorical variables. The model uses three categorical variables, so we'll define three Enum classes that contain the values accepted for these variables. By using enumerated values, we can ensure that the model can only receive values in these inputs that it has previously seen in the training set.
from enum import Enum


class GeneralHealth(str, Enum):
    """How would you say that in general your health is?"""
    EXCELLENT = "EXCELLENT"
    VERY_GOOD = "VERY_GOOD"
    GOOD = "GOOD"
    FAIR = "FAIR"
    POOR = "POOR"

    @staticmethod
    def map(value) -> float:
        mapping = {
            "EXCELLENT": 1.0,
            "VERY_GOOD": 2.0,
            "GOOD": 3.0,
            "FAIR": 4.0,
            "POOR": 5.0
        }
        return mapping[value]


class Age(str, Enum):
    """How old are you?"""
    EIGHTEEN_TO_TWENTY_FOUR = "EIGHTEEN_TO_TWENTY_FOUR"
    TWENTY_FIVE_TO_TWENTY_NINE = "TWENTY_FIVE_TO_TWENTY_NINE"
    THIRTY_TO_THIRTY_FOUR = "THIRTY_TO_THIRTY_FOUR"
    THIRTY_FIVE_TO_THIRTY_NINE = "THIRTY_FIVE_TO_THIRTY_NINE"
    FORTY_TO_FORTY_FOUR = "FORTY_TO_FORTY_FOUR"
    FORTY_FIVE_TO_FORTY_NINE = "FORTY_FIVE_TO_FORTY_NINE"
    FIFTY_TO_FIFTY_FOUR = "FIFTY_TO_FIFTY_FOUR"
    FIFTY_FIVE_TO_FIFTY_NINE = "FIFTY_FIVE_TO_FIFTY_NINE"
    SIXTY_TO_SIXTY_FOUR = "SIXTY_TO_SIXTY_FOUR"
    SIXTY_FIVE_TO_SIXTY_NINE = "SIXTY_FIVE_TO_SIXTY_NINE"
    SEVENTY_TO_SEVENTY_FOUR = "SEVENTY_TO_SEVENTY_FOUR"
    SEVENTY_FIVE_TO_SEVENTY_NINE = "SEVENTY_FIVE_TO_SEVENTY_NINE"
    EIGHTY_OR_OLDER = "EIGHTY_OR_OLDER"

    @staticmethod
    def map(value) -> float:
        mapping = {
            "EIGHTEEN_TO_TWENTY_FOUR": 1.0,
            "TWENTY_FIVE_TO_TWENTY_NINE": 2.0,
            "THIRTY_TO_THIRTY_FOUR": 3.0,
            "THIRTY_FIVE_TO_THIRTY_NINE": 4.0,
            "FORTY_TO_FORTY_FOUR": 5.0,
            "FORTY_FIVE_TO_FORTY_NINE": 6.0,
            "FIFTY_TO_FIFTY_FOUR": 7.0,
            "FIFTY_FIVE_TO_FIFTY_NINE": 8.0,
            "SIXTY_TO_SIXTY_FOUR": 9.0,
            "SIXTY_FIVE_TO_SIXTY_NINE": 10.0,
            "SEVENTY_TO_SEVENTY_FOUR": 11.0,
            "SEVENTY_FIVE_TO_SEVENTY_NINE": 12.0,
            "EIGHTY_OR_OLDER": 13.0
        }
        return mapping[value]


class Income(str, Enum):
    """What is your income?"""
    LESS_THAN_10K = "LESS_THAN_10K"
    BETWEEN_10K_AND_15K = "BETWEEN_10K_AND_15K"
    BETWEEN_15K_AND_20K = "BETWEEN_15K_AND_20K"
    BETWEEN_20K_AND_25K = "BETWEEN_20K_AND_25K"
    BETWEEN_25K_AND_35K = "BETWEEN_25K_AND_35K"
    BETWEEN_35K_AND_50K = "BETWEEN_35K_AND_50K"
    BETWEEN_50K_AND_75K = "BETWEEN_50K_AND_75K"
    SEVENTY_FIVE_THOUSAND_OR_MORE = "SEVENTY_FIVE_THOUSAND_OR_MORE"

    @staticmethod
    def map(value) -> float:
        mapping = {
            "LESS_THAN_10K": 1.0,
            "BETWEEN_10K_AND_15K": 2.0,
            "BETWEEN_15K_AND_20K": 3.0,
            "BETWEEN_20K_AND_25K": 4.0,
            "BETWEEN_25K_AND_35K": 5.0,
            "BETWEEN_35K_AND_50K": 6.0,
            "BETWEEN_50K_AND_75K": 7.0,
            "SEVENTY_FIVE_THOUSAND_OR_MORE": 8.0
        }
        return mapping[value]
The enum classes contain the values that were originally found in the training dataset. These variables were actually encoded as numbers in the dataset, so we also added a map() method to each Enum class that returns the corresponding number for the enumerated value passed into it. We'll be using the map() method of each Enum class later.
If we didn't provide these enumerated values and the mapping, we'd be asking the user of the model to encode the values before sending them to the model. They would have to read and understand the dataset documentation to create their prediction request. By creating enumerations for the categorical values, we make it much easier to use the model.
Now that we have the categorical variables defined, we can define the input schema for the model:
from typing import Optional
from pydantic import BaseModel, Field


class DiabetesRiskModelInput(BaseModel):
    body_mass_index: Optional[int] = Field(ge=15, le=60, description="Body Mass Index.")
    general_health: Optional[GeneralHealth] = Field(description="How would you say that in general your health is?")
    age: Optional[Age] = Field(description="How old are you?")
    income: Optional[Income] = Field(description="What is your income?")
The schema is called "DiabetesRiskModelInput" and contains fields for each variable found in the dataset. We're using the Enum classes we defined above for the categorical fields, and we defined a field for the numerical variable. Each numerical field has a range of allowed values that matches the range of the numerical variable found in the dataset. Each field also has a description of the variable that helps the user of the model to correctly feed data to the model. We only have 4 input variables because the feature selection process removed 17 features from the training set of the model.
The process of creating an input data schema exposes information found in the dataset that the model was originally trained on to the user of the model. For example, the body_mass_index variable only allows values between 15 and 60, which is the range of the variable in the training set.
To show how the schema classes work, let's try to instantiate the DiabetesRiskModelInput class:
input_instance = DiabetesRiskModelInput(
    body_mass_index=20,
    general_health=GeneralHealth.VERY_GOOD,
    age=Age.THIRTY_TO_THIRTY_FOUR,
    income=Income.BETWEEN_20K_AND_25K
)

input_instance
DiabetesRiskModelInput(body_mass_index=20, general_health=<GeneralHealth.VERY_GOOD: 'VERY_GOOD'>, age=<Age.THIRTY_TO_THIRTY_FOUR: 'THIRTY_TO_THIRTY_FOUR'>, income=<Income.BETWEEN_20K_AND_25K: 'BETWEEN_20K_AND_25K'>)
The instance of the schema class contains all of the information needed to make a a prediction.
Now let's try to instantiate it with values that are not allowed by the schema:
from pydantic import ValidationError


try:
    input_instance = DiabetesRiskModelInput(
        body_mass_index=10,
        general_health=GeneralHealth.VERY_GOOD,
        age=Age.THIRTY_TO_THIRTY_FOUR,
        income=Income.BETWEEN_20K_AND_25K)
except ValidationError as e:
    print(e)
    print("ValidationError exception raised!")
1 validation error for DiabetesRiskModelInput
body_mass_index
  ensure this value is greater than or equal to 15 (type=value_error.number.not_ge; limit_value=15)
ValidationError exception raised!
The class was not instantiated succesfully because the value for body_mass_index is too low and the model cannot accept it. By using the pydantic package, we're able to describe what values the model is able to accept.
We can also ommit values because they are optional:
input_instance = DiabetesRiskModelInput(
    body_mass_index=20,
    age=Age.THIRTY_TO_THIRTY_FOUR,
    income=Income.BETWEEN_20K_AND_25K)

input_instance
DiabetesRiskModelInput(body_mass_index=20, general_health=None, age=<Age.THIRTY_TO_THIRTY_FOUR: 'THIRTY_TO_THIRTY_FOUR'>, income=<Income.BETWEEN_20K_AND_25K: 'BETWEEN_20K_AND_25K'>)
In this case, we did not provide a value for general_health, which is filled in with a value of "None". We can do this because the model has built-in imputers that can provide a default value when it is not provided by the user of the model.
Now that we have the model's input schema defined, we'll define the output schema:
class DiabetesRisk(str, Enum):
    """Risk of diabetes."""
    NO_DIABETES = "NO_DIABETES"
    DIABETES = "DIABETES"

    @staticmethod
    def map(value: float) -> str:
        mapping = {
            0.0: DiabetesRisk.NO_DIABETES,
            1.0: DiabetesRisk.DIABETES
        }
        return mapping[value]


class DiabetesRiskModelOutput(BaseModel):
    """Diabetes risk model output."""
    diabetes_risk: DiabetesRisk
The model is a classification model and the output schema simply enumerates the classes that the model can predict. We also added a map() method to the DiabetesRisk class in order to map the number that is output by the model to a value that can be returned to the user.
One of the benefits of using the pydantic package is that each schema class can create a JSON Schema description for itself:
json_schema = DiabetesRiskModelOutput.schema()

json_schema
{'title': 'DiabetesRiskModelOutput',
 'description': 'Diabetes risk model output.',
 'type': 'object',
 'properties': {'diabetes_risk': {'$ref': '#/definitions/DiabetesRisk'}},
 'required': ['diabetes_risk'],
 'definitions': {'DiabetesRisk': {'title': 'DiabetesRisk',
   'description': 'Risk of diabetes.',
   'enum': ['NO_DIABETES', 'DIABETES'],
   'type': 'string'}}}
JSON schemas are useful for documenting data structures. We'll use this JSON schema later in order to automatically build documentation for the deployed model.
Now that we have the input and output schemas defined, now we can tie it all together by creating a wrapper class for the model. To do this we'll use the ml_base package.
To install the ml_base package, execute this command:
%pip install ml_base

clear_output()
The ml_base package defines a simple base class for model prediction code that allows us to "wrap" the prediction code for a model in a class that follows the MLModel interface. This interface publishes this information about the model:
- Qualified Name, a unique identifier for the model.
- Display Name, a friendly name for the model used in user interfaces.
- Description, a description for the model.
- Version, semantic version of the model codebase.
- Input Schema, an object that describes the model's input data.
- Output Schema, an object that describes the model's output schema.
The MLModel interface dictates that the model class implements two methods:
- __init__(), the initialization method which loads any model parameters needed to make predictions
- predict(), prediction method that receives model inputs makes a prediction and returns model outputs
By using the MLModel base class we'll be able to do more interesting things later with the model. If you'd like to learn more about the ml_base package, here is some documentation about it.
We'll define the wrapper class like this:
import os
import pandas as pd
import pickle
from io import BytesIO
import zipfile
from itsdangerous import Signer
from minio import Minio
from ml_base import MLModel


class DiabetesRiskModel(MLModel):
    """Prediction logic for the Diabetes Risk Model."""

    @property
    def display_name(self) -> str:
        return "Diabetes Risk Model"

    @property
    def qualified_name(self) -> str:
        return "diabetes_risk_model"

    @property
    def description(self) -> str:
        return "Model to predict the diabetes risk of a patient."

    @property
    def version(self) -> str:
        return "0.1.0"

    @property
    def input_schema(self):
        return DiabetesRiskModelInput

    @property
    def output_schema(self):
        return DiabetesRiskModelOutput

    def __init__(self, model_parameters_version: str,
                 model_files_bucket: str,
                 minio_url: str,
                 minio_access_key: str,
                 minio_secret_key: str,
                 parameters_signing_key: str):
        # retrieving values from environment variables if the values provided have ${} around them
        if minio_access_key[0:2] == "${" and minio_access_key[-1] == "}":
            minio_access_key = os.environ[minio_access_key[2:-1]]

        if minio_secret_key[0:2] == "${" and minio_secret_key[-1] == "}":
            minio_secret_key = os.environ[minio_secret_key[2:-1]]

        if parameters_signing_key[0:2] == "${" and parameters_signing_key[-1] == "}":
            parameters_signing_key = os.environ[parameters_signing_key[2:-1]]

        minio_client = Minio(minio_url,
                             access_key=minio_access_key,
                             secret_key=minio_secret_key,
                             secure=False)
        try:
            # accessing the model file stored in minio
            response = minio_client.get_object(model_files_bucket,
                                               f"{self.qualified_name}-{self.version}-{model_parameters_version}.zip")
            zip_bytes = BytesIO(response.data)

            response.close()
            response.release_conn()

            # unzipping the parameters
            with zipfile.ZipFile(zip_bytes) as zf:
                if "signed_model.pkl" not in zf.namelist():
                    raise ValueError("Could not find signed model file in zip file.")
                signed_model_bytes = zf.read("signed_model.pkl")
        except Exception as e:
            raise RuntimeError("Could not access model file.") from e

        # checking the signed parameters
        signer = Signer(parameters_signing_key)
        unsigned_model_bytes = signer.unsign(signed_model_bytes)

        # unpickling the model object
        self._model = pickle.loads(unsigned_model_bytes)

    def predict(self, data: DiabetesRiskModelInput) -> DiabetesRiskModelOutput:
        if type(data) is not DiabetesRiskModelInput:
            raise ValueError("Input must be of type 'DiabetesRiskModelInput'")

        X = pd.DataFrame([[
            None, None, None,
            data.body_mass_index,
            None, None, None, None, None, None, None, None, None,
            GeneralHealth.map(data.general_health),
            None, None, None, None,
            Age.map(data.age),
            None,
            Income.map(data.income),
        ]], columns=['HighBloodPressure', 'HighCholesterol', 'CholesterolChecked', 'BMI', 'Smoker', 'Stroke',
                     'HeartDiseaseOrHeartAttack', 'PhysicalActivity', 'Fruits', 'Veggies',
                     'HeavyAlchoholConsumption', 'AnyHealthcare', 'NoDoctorsVisitBecauseOfCost',
                     'GeneralHealth', 'MentalHealth', 'PhysicalHealth', 'DifficultyWalking', 'Sex',
                     'Age', 'Education', 'Income'])

        y_hat = float(self._model.predict(X)[0])

        return DiabetesRiskModelOutput(diabetes_risk=DiabetesRisk.map(y_hat))
The model class __init__() method loads the model parameters from the minio service, verifies the signature, and deserializes the pickle into a model object that we can use to make predictions. The predict() method uses the model object to make predictions. Notice that we mapped the enumerated values into the numbers that the model expects to see before making a prediction with the model, and also mapped the model's prediction back into an enumerated value that can be returned to the user.
Let's instantiate the model class we defined above:
model = DiabetesRiskModel(
    model_parameters_version="2023_03_17",
    model_files_bucket="model-files",
    minio_url="127.0.0.1:9000",
    minio_access_key="TEST",
    minio_secret_key="ASDFGHJKL",
    parameters_signing_key="wjtRFppXQpxTChQnNcQJKGlLHKJBmAHMepfFbqvOoUrnuxIsKdiLCrrypYFQsqcw")
When the model object is instantiated, the init method loaded the zip file that contains the model pickle file from the minio service, verified that the bytes have not been changed using the secret key, and deserialized the model. The model object is ready to use to make predictions.
We can make a prediction with the model by first building a DiabetesRiskModelInput object:
input_instance = DiabetesRiskModelInput(
    body_mass_index=20,
    general_health=GeneralHealth.VERY_GOOD,
    age=Age.THIRTY_TO_THIRTY_FOUR,
    income=Income.BETWEEN_20K_AND_25K
)
Then use the input object with the model's predict() method:
prediction = model.predict(input_instance)

prediction
DiabetesRiskModelOutput(diabetes_risk=<DiabetesRisk.NO_DIABETES: 'NO_DIABETES'>)
The model predicted that the patient does not have diabetes.
Creating a RESTful Service
Now that we have a working model that loads and verifies parameters from minio, we can deploy the model into a service. To do this, we won't need to write any extra code, we can leverage the rest_model_service package to provide the RESTful API for the service. You can learn more about the package in this blog post.
To install the package, execute this command:
%pip install rest_model_service

clear_output()
To create a service for our model, all that is needed is that we add a YAML configuration file to the project. The configuration file looks like this:
service_title: Diabetes Risk Model Service
models:
  - class_path: diabetes_risk_model.prediction.model.DiabetesRiskModel
    create_endpoint: true
    configuration:
      model_parameters_version: "2023_03_17"
      model_files_bucket: model-files
      minio_url: 127.0.0.1:9000
      minio_access_key: TEST
      minio_secret_key: ASDFGHJKL
      parameters_signing_key: wjtRFppXQpxTChQnNcQJKGlLHKJBmAHMepfFbqvOoUrnuxIsKdiLCrrypYFQsqcw
The "service_title" field is the name of the service as it will appear in the documentation. The "models" field is an array that contains the details of the models we would like to deploy in the service. The "class_path" points at the MLModel class that implements the model's prediction logic.
Using the configuration file, we're able to create an OpenAPI specification file for the model service by executing these commands:
export PYTHONPATH=./
generate_openapi --configuration_file=configuration/rest_config.yaml --output_file=service_contract.yaml
The generate_openapi command generated the service_contract.yaml file which contains the OpenAPI specification for the model service. The "/api/models/diabetes_risk_model/prediction" endpoint is the one we'll call to make predictions with the model. The model's input and output schemas were automatically extracted and added to the specification. The service_contract.yaml is available in the root of the Github repository.
To run the model service locally, execute these commands:
export REST_CONFIG=./configuration/rest_config.yaml
uvicorn rest_model_service.main:app --reload
The service comes up and can be accessed in a web browser at http://127.0.0.1:8000. When you access that URL you will be redirected to the documentation page that is generated by the FastAPI package:
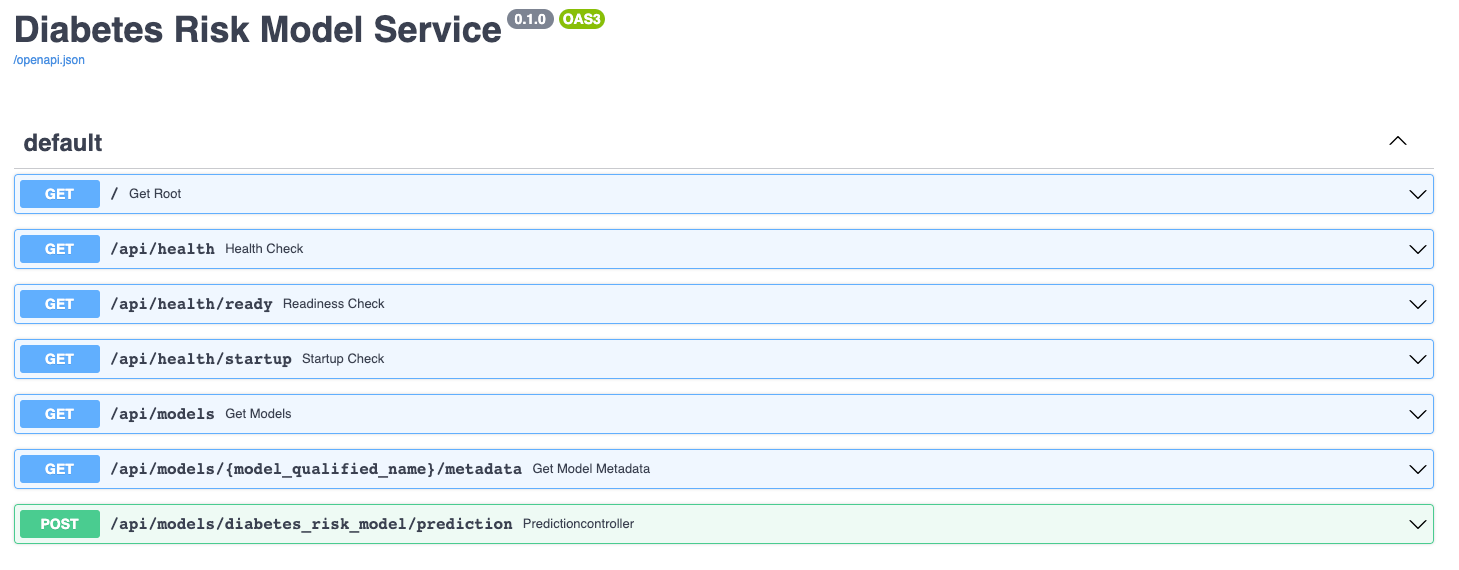
The documentation allows you to make requests against the API in order to try it out. Here's a prediction request against the diabetes risk model:
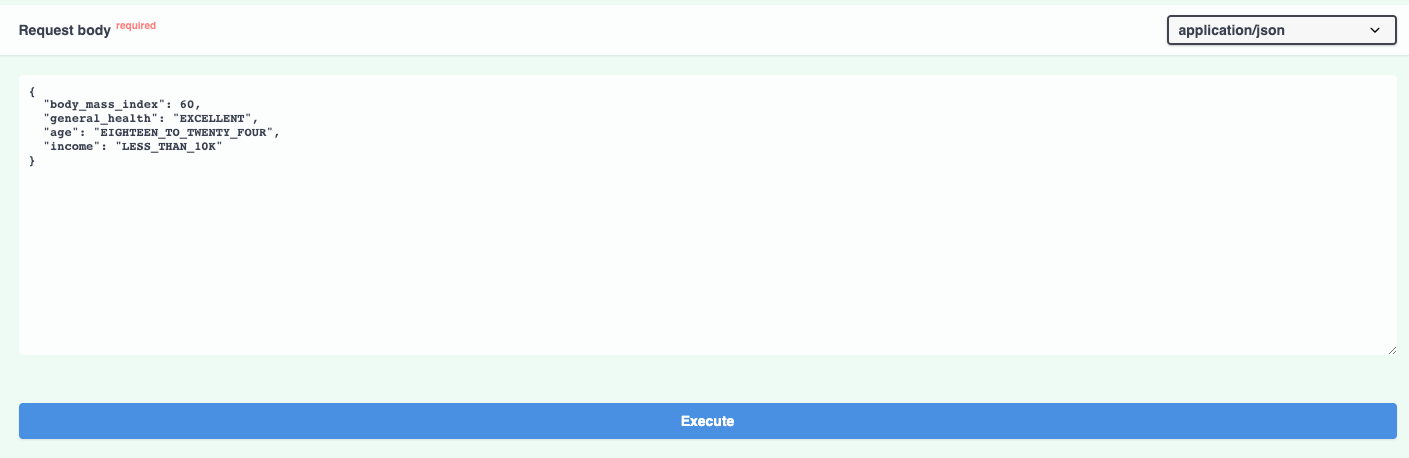
And the prediction result:
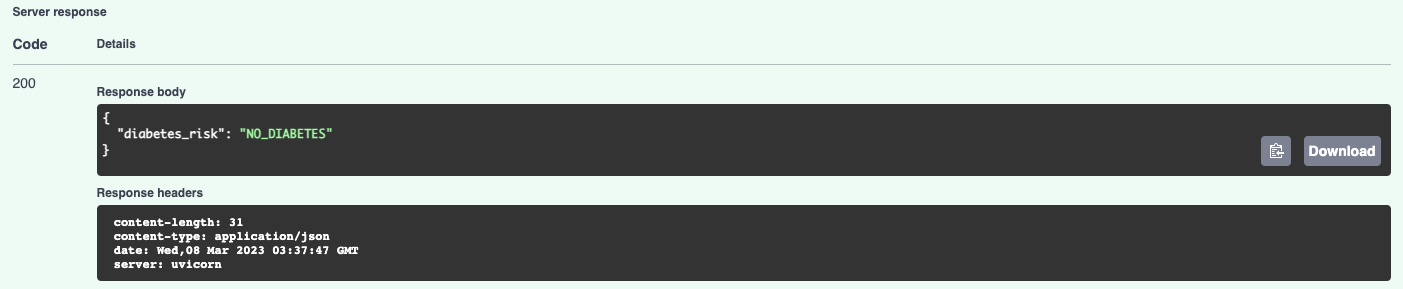
By using the MLModel base class provided by the ml_base package and the REST service framework provided by the rest_model_service package we're able to quickly stand up a service to host the model. We're done with the model service, so we'll stop it with CTL+C.
Creating a Docker Image
Now that we have a working model and model service, we'll need to deploy it somewhere. We'll start by deploying the service locally using Docker.
Let's create a docker image and run it locally. The docker image is generated using instructions in the Dockerfile:
# syntax=docker/dockerfile:1
FROM python:3.9-slim

ARG BUILD_DATE

LABEL org.opencontainers.image.title="Diabetes Risk Model Service"
LABEL org.opencontainers.image.description="Diabetes Risk Model Service."
LABEL org.opencontainers.image.created=$BUILD_DATE
LABEL org.opencontainers.image.authors="6666331+schmidtbri@users.noreply.github.com"
LABEL org.opencontainers.image.source="https://github.com/schmidtbri/securing-parameters-for-ml-models"
LABEL org.opencontainers.image.version="0.1.0"
LABEL org.opencontainers.image.licenses="MIT License"
LABEL org.opencontainers.image.base.name="python:3.9-slim"

WORKDIR /service

ARG USERNAME=service-user
ARG USER_UID=10000
ARG USER_GID=10000

# install packages
RUN apt-get update -y && \
    apt-get install -y --no-install-recommends sudo && \
    apt-get install -y --no-install-recommends libgomp1 && \
    apt-get clean && \
    rm -rf /var/lib/apt/lists/*

# create a user
RUN groupadd --gid $USER_GID $USERNAME && \
    useradd --uid $USER_UID --gid $USER_GID -m $USERNAME && \
    echo $USERNAME ALL=\(root\) NOPASSWD:ALL > /etc/sudoers.d/$USERNAME && \
    chmod 0440 /etc/sudoers.d/$USERNAME

# installing dependencies
COPY ./service_requirements.txt ./service_requirements.txt
RUN pip install --no-cache -r service_requirements.txt

# copying model code and license
COPY ./diabetes_risk_model ./diabetes_risk_model
COPY ./LICENSE ./LICENSE

USER $USERNAME

RUN sudo chown $USERNAME:$USERNAME -R /service && \
    sudo chmod -R +rw /service  && \
    sudo mkdir -p  /var/folders/vb && \
    sudo chown $USERNAME:$USERNAME -R /var/folders/vb && \
    sudo chmod -R +rw /var/folders/vb

CMD ["uvicorn", "rest_model_service.main:app", "--host", "0.0.0.0", "--port", "8000"]
This Dockerfile is used by this docker command to create a docker image:
!docker build -t diabetes_risk_model_service:0.1.0 ../

clear_output()
To make sure everything worked as expected, we'll look through the docker images in our system:
!docker image ls | grep diabetes_risk_model_service
diabetes_risk_model_service 0.1.0 92d771f815ee 48 seconds ago 1.2GB
The diabetes_risk_model_service image is listed. To test the model service docker image with the minio docker container that is already running, we'll need to create a network for them first.
!docker network create local-test-network
7e66d4b4dd92e454d4a662c51678a3e05d61ca1389b566ec07afef7630cb1b93
Next, we'll connect the running minio container to the network.
!docker network connect local-test-network minio
Now we can start the model service docker image connected to the same network as the minio container.
!docker run -d \
    --name diabetes_risk_model_service \
    -p 8000:8000 \
    --net local-test-network \
    -v $(pwd)/../configuration:/service/configuration \
    -e REST_CONFIG=./configuration/docker_rest_config.yaml \
    diabetes_risk_model_service:0.1.0
a9b9f3b22af0c2b2e74f1c01e062c56c921b9f689c0284b308a3e93ed6990eba
Notice that we provided the configuration YAML file to the service running in the docker image by mounting the local configuration folder.
To make sure the server process started up correctly, we'll look at the logs:
!docker logs diabetes_risk_model_service
INFO:     Started server process [1]
INFO:     Waiting for application startup.
INFO:     Application startup complete.
INFO:     Uvicorn running on http://0.0.0.0:8000 (Press CTRL+C to quit)
The logs don't show any errors, looks like the model parameters were loaded and verified correctly from the minio service when the service started up.
The service should be accessible on port 8000 of localhost, so we'll try to make a prediction using the curl command:
!curl -X 'POST' \
  'http://0.0.0.0:8000/api/models/diabetes_risk_model/prediction' \
  -H 'accept: application/json' \
  -H 'Content-Type: application/json' \
  -d '{ \
    "body_mass_index": 20, \
    "general_health": "EXCELLENT", \
    "age": "EIGHTEEN_TO_TWENTY_FOUR", \
    "income": "LESS_THAN_10K" \
}'
{"diabetes_risk":"NO_DIABETES"}
The model predicted that the patient does not have diabetes.
We're done with the docker containers, so we'll shut them down along with the docker network.
!docker kill diabetes_risk_model_service
!docker rm diabetes_risk_model_service

!docker kill minio
!docker rm minio

!docker network rm local-test-network
diabetes_risk_model_service
diabetes_risk_model_service
minio
minio
local-test-network
Creating a Kubernetes Cluster
To show the system in action, we’ll deploy the model service and the minio service to a Kubernetes cluster. A local cluster can be easily started by using minikube. Installation instructions can be found here.
To start the minikube cluster execute this command:
!minikube start
😄 minikube v1.28.0 on Darwin 13.2.1
🎉 minikube 1.29.0 is available! Download it: https://github.com/kubernetes/minikube/releases/tag/v1.29.0
💡 To disable this notice, run: 'minikube config set WantUpdateNotification false'
✨ Using the docker driver based on existing profile
👍 Starting control plane node minikube in cluster minikube
🚜 Pulling base image ...
🔄 Restarting existing docker container for "minikube" ...
🐳 Preparing Kubernetes v1.25.3 on Docker 20.10.20 ...[K[K[K[K[K[K[K[K[K[K[K[K[K[K[K[K[K[K[K[K[K[K[K[K[K[K[K[K[K[K[K[K[K[K[K[K[K[K[K[K[K[K[K[K[K[K[K[K[K[K[K[K[K[K[K[K[K[K[K[K[K[K[K[K[K[K[K[K[K[K[K[K[K[K[K[K[K[K[K[K[K[K[K[K[K[K[K[K[K[K[K[K[K[K[K[K[K[K[K[K[K[K[K[K[K[K[K[K[K[K[K[K[K[K[K[K[K[K[K[K[K[K[K[K[K[K[K[K[K[K[K[K[K[K[K[K[K[K[K[K[K[K[K[K[K[K[K[K[K[K[K[K[K[K[K[K[K[K[K[K[K[K[K[K[K[K[K[K[K[K[K[K[K[K[K[K[K[K[K[K[K[K[K[K[K[K[K[K[K[K[K[K[K[K[K[K[K[K[K[K[K[K[K[K[K[K[K[K[K[K[K[K[K[K[K[K[K[K[K[K[K[K[K[K[K[K[K[K[K[K[K[K[K[K[K[K[K[K[K[K[K[K[K[K[K[K[K[K[K[K[K[K[K[K[K[K[K[K[K[K[K[K[K[K[K[K[K[K[K[K
🔎 Verifying Kubernetes components...
▪ Using image gcr.io/k8s-minikube/storage-provisioner:v5
▪ Using image docker.io/kubernetesui/metrics-scraper:v1.0.8
▪ Using image docker.io/kubernetesui/dashboard:v2.7.0
💡 Some dashboard features require the metrics-server addon. To enable all features please run:
minikube addons enable metrics-server
🌟 Enabled addons: storage-provisioner, default-storageclass, dashboard
🏄 Done! kubectl is now configured to use "minikube" cluster and "default" namespace by default
Let's view all of the pods running in the minikube cluster to make sure we can connect to it using the kubectl command.
!kubectl get pods -A
NAMESPACE              NAME                                        READY   STATUS    RESTARTS       AGE
kube-system            coredns-565d847f94-2v6l9                    1/1     Running   15 (82s ago)   72d
kube-system            etcd-minikube                               1/1     Running   15 (2d ago)    72d
kube-system            kube-apiserver-minikube                     1/1     Running   14 (2d ago)    72d
kube-system            kube-controller-manager-minikube            1/1     Running   15 (82s ago)   72d
kube-system            kube-proxy-ztbgd                            1/1     Running   14 (2d ago)    72d
kube-system            kube-scheduler-minikube                     1/1     Running   14 (2d ago)    72d
kube-system            storage-provisioner                         1/1     Running   26 (2d ago)    72d
kubernetes-dashboard   dashboard-metrics-scraper-b74747df5-x559p   1/1     Running   14 (2d ago)    72d
kubernetes-dashboard   kubernetes-dashboard-57bbdc5f89-9jvln       1/1     Running   18 (82s ago)   72d
Looks like we can connect, we're ready to start deploying the model service to the cluster.
Creating a Namespace
We'll first create a namespace to hold the resources for our model service. The resource definition is in the kubernetes/namespace.yaml file. To apply the manifest to the cluster, execute this command:
!kubectl create -f ../kubernetes/namespace.yaml
namespace/model-services created
The namespace was created. To take a look at the namespaces, execute this command:
!kubectl get namespace
NAME                   STATUS   AGE
default                Active   72d
kube-node-lease        Active   72d
kube-public            Active   72d
kube-system            Active   72d
kubernetes-dashboard   Active   72d
model-services         Active   3s
The new namespace appears in the listing along with other namespaces created by default by the system. To use the new namespace for the rest of the operations, execute this command:
!kubectl config set-context --current --namespace=model-services
Context "minikube" modified.
Now the rest of the kubectl commands that we execute will automatically be applied in the "model-services" namespace.
Creating the Storage Service
To store the model parameters, we'll need to deploy minio to the cluster as a service. We can do this by using the helm tool and a helm chart provided by minio.
First let's add the minio helm repository:
!helm repo add minio https://charts.min.io/
"minio" has been added to your repositories
The minion helm repository is now available to be used.
Let's apply the minio helm chart:
!helm install minio --set rootUser=TEST,rootPassword=ASDFGHJKL \
  --set persistence.enabled=true \
  --set persistence.size=2Gi \
  --set resources.requests.cpu=1 \
  --set resources.limits.cpu=2 \
  --set resources.requests.memory=250Mi \
  --set resources.limits.memory=500Mi \
  --set mode=distributed,replicas=2 \
  minio/minio
NAME: minio
LAST DEPLOYED: Sat Mar 18 00:15:07 2023
NAMESPACE: model-services
STATUS: deployed
REVISION: 1
TEST SUITE: None
NOTES:
MinIO can be accessed via port 9000 on the following DNS name from within your cluster:
minio.model-services.svc.cluster.local

To access MinIO from localhost, run the below commands:

  1. export POD_NAME=$(kubectl get pods --namespace model-services -l "release=minio" -o jsonpath="{.items[0].metadata.name}")

  2. kubectl port-forward $POD_NAME 9000 --namespace model-services

Read more about port forwarding here: http://kubernetes.io/docs/user-guide/kubectl/kubectl_port-forward/

You can now access MinIO server on http://localhost:9000. Follow the below steps to connect to MinIO server with mc client:

  1. Download the MinIO mc client - https://min.io/docs/minio/linux/reference/minio-mc.html#quickstart

  2. export MC_HOST_minio-local=http://$(kubectl get secret --namespace model-services minio -o jsonpath="{.data.rootUser}" | base64 --decode):$(kubectl get secret --namespace model-services minio -o jsonpath="{.data.rootPassword}" | base64 --decode)@localhost:9000

  3. mc ls minio-local
The minio service was installed. We can view the pods running to see if it's running correctly:
!kubectl get pods
NAME      READY   STATUS    RESTARTS   AGE
minio-0   1/1     Running   0          82s
minio-1   1/1     Running   0          82s
The minio service is running in two pods. The minio service is accessible through a set of Kubernetes Services:
!kubectl get services
NAME            TYPE        CLUSTER-IP       EXTERNAL-IP   PORT(S)    AGE
minio           ClusterIP   10.108.159.154   <none>        9000/TCP   2m4s
minio-console   ClusterIP   10.110.151.171   <none>        9001/TCP   2m4s
minio-svc       ClusterIP   None             <none>        9000/TCP   2m4s
We'll upload the model parameters by accessing the minio-console service. To do that, we'll need to connect to the minio instance using using port forwarding. Port forwarding is a simple way to connect to a service running in the cluster from the local environment, it simply forwards all traffic from a local port to a remote port that is hosting the service.
To start port forwarding the minio-console service, execute this command:
minikube service minio-console --url -n model-services
This command has to run continuously for the port forwarding to work. The UI of the minio instance that is running in the cluster is now available locally:
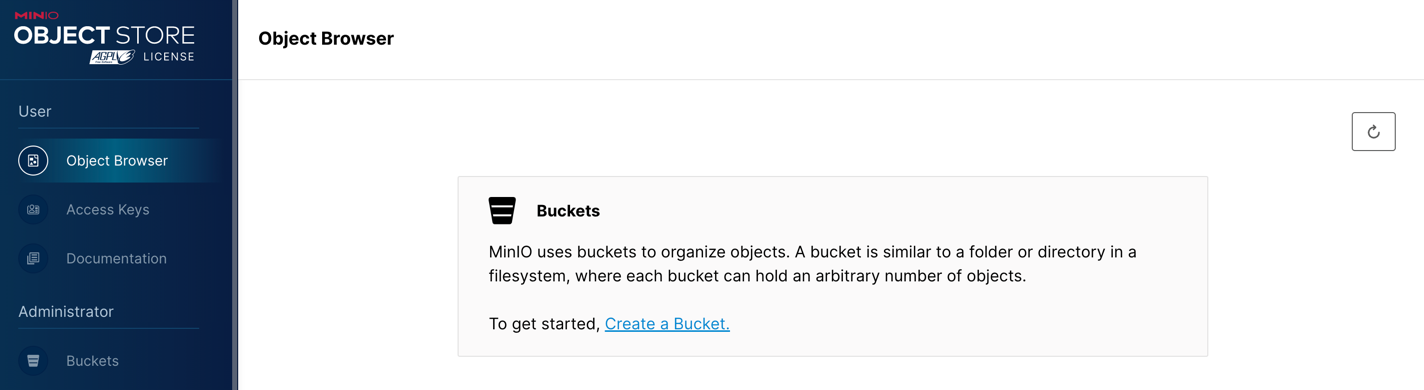
In order to keep things short, I created the "model-files" bucket and uploaded model .zip file that were working with above.
We now have model parameters for the model service to access. Now ready to deploy the model service to the cluster.
Creating a Deployment and Service
The model service is deployed by using Kubernetes resources. These are:
- Secret: a set of configuration string that are stored by Kubernetes that can be provided to Pods running within the cluster. The secrets will be the minio login details and the secret key used to verify the model parameters.
- ConfigMap: a set of configuration options, in this case it is a simple YAML file that will be loaded into the running container as a volume mount. This resource allows us to change the configuration of the model service without having to modify the Docker image.
- Deployment: a declarative way to manage a set of Pods, the model service pods are managed through the Deployment.
- Service: a way to expose a set of Pods in a Deployment, the model service is made available to the outside world through the Service.
We're almost ready to deploy the model service, but before starting it we'll need to send the docker image from the local docker daemon to the minikube image cache:
!minikube image load diabetes_risk_model_service:0.1.0
We can view the images in the minikube cache with this command:
!minikube image ls | grep diabetes_risk_model_service
docker.io/library/diabetes_risk_model_service:0.1.0
The model service will need to access the YAML configuration file that we used for the local service above. This is file is in the /configuration folder and is called "kubernetes_rest_config.yaml", its customized for the kubernetes environment we're building.
To create a ConfigMap for the service, execute this command:
!kubectl create configmap model-service-configuration \
    --from-file=../configuration/kubernetes_rest_config.yaml
configmap/model-service-configuration created
The model service also needs to access three secrets:
- minio access key, used for accessing the minio service
- minio secret key, used for accessing the minio service
- parameters signing key used for verifying the model parameters
These secrets can't be added to the ConfigMap because they need to be encrypted to be secure. We'll store these secrets as Secrets in kubernetes with these commands:
!kubectl create secret generic diabetes-risk-model-service-secrets \
    --from-literal=minio-access-key=TEST \
    --from-literal=minio-secret-key=ASDFGHJKL \
    --from-literal=parameters-signing-key=wjtRFppXQpxTChQnNcQJKGlLHKJBmAHMepfFbqvOoUrnuxIsKdiLCrrypYFQsqcw
secret/diabetes-risk-model-service-secrets created
The model service Deployment and Service are created within the Kubernetes cluster with this command:
!kubectl apply -f ../kubernetes/model_service.yaml
deployment.apps/diabetes-risk-model-deployment created
service/diabetes-risk-model-service created
Lets view the Deployment to see if it is available yet:
!kubectl get deployments
NAME                             READY   UP-TO-DATE   AVAILABLE   AGE
diabetes-risk-model-deployment   1/1     1            1           65s
To get an idea of how the service went through the startup process, let's look a the service logs. Let's get the names of the pods that are running the service:
!kubectl get pods | grep diabetes-risk-model
diabetes-risk-model-deployment-ff7887475-5q2j5 1/1 Running 0 68s
Using the pod name, we can get the logs from Kubernetes:
!kubectl logs diabetes-risk-model-deployment-ff7887475-5q2j5 -c diabetes-risk-model
INFO:     Started server process [1]
INFO:     Waiting for application startup.
INFO:     Application startup complete.
INFO:     Uvicorn running on http://0.0.0.0:8000 (Press CTRL+C to quit)
INFO:     172.17.0.1:35258 - "GET /api/health/startup HTTP/1.1" 503 Service Unavailable
INFO:     172.17.0.1:35272 - "GET /api/health/startup HTTP/1.1" 503 Service Unavailable
INFO:     172.17.0.1:55252 - "GET /api/health/startup HTTP/1.1" 503 Service Unavailable
INFO:     172.17.0.1:55264 - "GET /api/health/startup HTTP/1.1" 200 OK
INFO:     172.17.0.1:55270 - "GET /api/health/ready HTTP/1.1" 200 OK
INFO:     172.17.0.1:49028 - "GET /api/health HTTP/1.1" 200 OK
Looks like the process started up correctly.
The Kubernetes Service details look like this:
!kubectl get services | grep diabetes-risk-model-service
diabetes-risk-model-service NodePort 10.99.180.41 <none> 80:31452/TCP 2m29s
We'll run another proxy process locally to be able to access the model service endpoint:
minikube service diabetes-risk-model-service --url -n model-services
The command outputs this URL:
http://127.0.0.1:55659
We can send a request to the model service through the local endpoint like this:
!curl -X 'POST' \
  'http://127.0.0.1:55659/api/models/diabetes_risk_model/prediction' \
  -H 'accept: application/json' \
  -H 'Content-Type: application/json' \
  -d '{ \
    "body_mass_index": 60, \
    "general_health": "EXCELLENT", \
    "age": "EIGHTEEN_TO_TWENTY_FOUR", \
    "income": "LESS_THAN_10K" \
}'
{"diabetes_risk":"NO_DIABETES"}
The model is deployed within Kubernetes!
Deleting the Resources
We're done working with the Kubernetes resources, so we will delete them and shut down the cluster.
To delete the model service Deployment and Service, execute this command:
!kubectl delete -f ../kubernetes/model_service.yaml
deployment.apps "diabetes-risk-model-deployment" deleted
service "diabetes-risk-model-service" deleted
We'll also delete the ConfigMap:
!kubectl delete configmap model-service-configuration
configmap "model-service-configuration" deleted
Next, we'll delete the secrets:
!kubectl delete secret diabetes-risk-model-service-secrets
secret "diabetes-risk-model-service-secrets" deleted
To delete the minio deployment execute this command:
!helm delete minio
release "minio" uninstalled
The minio service used Persistent Volume Claims to store data. Since these are not deleted with the minio helm chart, we'll delete it with a kubectl command:
!kubectl delete pvc -l app=minio
persistentvolumeclaim "export-minio-0" deleted
persistentvolumeclaim "export-minio-1" deleted
To delete the model-services namespace, execute this command:
!kubectl delete -f ../kubernetes/namespace.yaml
namespace "model-services" deleted
To shut down the minikube cluster:
!minikube stop
✋  Stopping node "minikube"  ...
🛑  Powering off "minikube" via SSH ...
🛑  1 node stopped.
Closing
In this blog post we trained, validated, signed, and verified a set of model parameters to ensure that they remain secure. This process is needed because of the inherent security problems that Python pickles bring with them. The signing and verificationprocess added a little bit of complexity, but it's worth it to ensure the security of the model deployment.
We also showed how to deploy the serialized model parameters to a storage service, and how to access them from the deployed model. We did this to show a common vulnerability of machine learning model deployments. Since a lot of model parameters are not deployed alongside the prediction code, they are deployed in a separate storage service from which they are loaded. This practice makes the deployment of model parameters faster, but adds another attack vector that needs to be secured. Since the model parameters are stored in a storage server, an attacker can access the storage service and modify the model parameters in order to do arbritrary code execution in the server where the model is deployed. By adding a signature verification process before the model parameters can be deserialized, we made the deployment of model parameters a little more secure.
One way to improve this process is to make it into a plug-in that can be easily added to model training and prediction code, making it simpler to add to a training pipeline and model deployment. Another way to improve it is by adding a key cycling mechanism to ensure that secret keys do not remain in production for a long time.