This blog post builds on the ideas started in three previous blog posts.
In this blog post I'll show how to deploy the same ML model that l deployed as a batch job in this blog post, as a task queue in this blog post, and inside an AWS Lambda in this blog post.
The code in this blog post can be found in this github repo.
Introduction
In general, when a client communicates with a software service two patterns are available: synchronous and asynchronous communication. When doing synchronous communication, a message is sent to the service which blocks the sender until the operation is done and the result is returned to the client. With an asynchronous message, the service receives the message and does not block the sender of the message while it does the processing. We've already seen an asynchronous deployment for a machine learning model in a previous blog post. In this blog post, we'll show a similar type of deployment that is useful in different situations. We'll be focusing on deploying an ML model as part of a stream processing system.
Stream processing is a data processing paradigm that treats a dataset as an unending stream of ordered records. A stream processor works by receiving a record from a data stream, processing it, and putting it in another data stream. This approach is different from batch processing, in which a process sees a data set as a batch of records that are processed together in one processing run. Stream processing is inherently asynchronous, since a producer of records does not have to coordinate with the process that consumes the records.
In order for a stream processor to receive messages from producers, a message broker is often used. In this case, the message broker acts as middleware that enables producers and consumers to communicate without being explicitly aware of each other. The message broker allows the system to be more decoupled than in other types of software architectures.
In a previous blog post, we used Redis as a message broker to deploy a model inside a task queue. One thing that is different about the current blog post and that one is the lack of a result backend, since we are not going to store the results of a prediction into a result store for later retrieval. The ML model stream processor we'll build will pick up data used for prediction from the message broker and put the resulting predictions back into the message broker. Instead of Redis, we'll be using Kafka as the message broker.
Software Architecture

The model stream processor application we will build will communicate with other software components through topics on a message broker. A topic is a channel of communication that exists in a message broker. A software service can "produce" messages to a topic and also "consume" messages from a topic. Each model will need three topics for its own use: an input topic from which it will receive data used to make predictions, an output topic to which it will write the prediction results, and an error topic to which it will write any input messages that caused an error to occur. The error topic is essentially an invalid message channel for the model.
Kafka for Stream Processing
To show how to deploy an ML model as a stream processor, we'll be using Kafka as the message broker service. Over the last few years, Kafka has become an important tool for doing stream processing because of its high performance and rich tool ecosystem.
To connect to Kafka from python, we'll use the aiokafka python library. This library can be used to produce and consume messages on kafka as well as other operations. The aiokafka library uses the asyncio library to improve the performance of the application. Asyncio is a new library in python that helps to write concurrent code that performs IO-bound operations in a more performant manner. The async/await syntax will appear in the code of this blog post, I won't go out of my way to explain it since there are many better places to learn about this programming paradigm.
Package Structure
-   model_stream_processor
    -   __init__.py
    -   app.py (application code)
    -   config.py (configuration for the application)
    -   ml_model_stream_processor.py (MLModel stream processor class)
    -   model_manager.py (model manager singleton class)
-   scripts
    -   create_topics.py (script for automating topic creation)
    -   receive_messages.py (script for receiving messages from a topic)
    -   send_messages.py (script for sending messages to a topic)
-   tests (unit test suite)
-   Makefile
-   README.md
-   docker-compose.yml
-   requirements.txt
-   setup.py
-   test_requirements.txt
This structure can be seen in the github repository.
MLModelStreamProcessor Class
To be able to have an MLModel that sends and receives data from Kafka topics, we'll write a class that wraps around an MLModel instance. The class will take care of finding and connecting to Kafka brokers, serializing and deserializing the messages from Kafka, and detecting errors.
We'll start by creating the class:
class MLModelStreamProcessor(object):
    """Processor class for MLModel stream processors."""
The code above can be found here.
The __init__() method of the class contains a lot of the functionality of the class:
def __init__(self, model_qualified_name, loop, bootstrap_servers):
    model_manager = ModelManager()
    self._model = model_manager.get_model(model_qualified_name)

    if self._model is None:
        raise ValueError("'{}' not found in ModelManager instance.".format(model_qualified_name))

    base_topic_name = "model_stream_processor.{}.{}.{}".format(model_qualified_name,
        self._model.major_version,
        self._model.minor_version)

    self.consumer_topic = "{}.inputs".format(base_topic_name)
    self.producer_topic = "{}.outputs".format(base_topic_name)
    self.error_producer_topic = "{}.errors".format(base_topic_name)

    self._consumer = AIOKafkaConsumer(self.consumer_topic, loop=loop,
        bootstrap_servers=bootstrap_servers, group_id=__name__)
    self._producer = AIOKafkaProducer(loop=loop,
        bootstrap_servers=bootstrap_servers)
The code above can be found here.
When the processor class is first instantiated, the first thing it does is to get an instance of the ModelManager class and then to get an instance of the model it will manage from it. The model is identified by the qualified_name, which should be unique for the model we're trying to deploy. The __init__ method also accepts an asyncio loop that is created once for the whole application, and also the name of the kafka bootstrap server to use. Before we try to finish initializing the stream processor, we check that the model instance actually exists within the ModelManager singleton, if the model can't be found we'll raise an exception.
After that, we generate the kafka topic names for the three topics that each model needs. The topic names are generated from scratch and cannot be parameterized. The base_topic_name is the same for all three topics and contains the name of the stream processing application, the qualified name of the model, and the model's major and minor versions. Then we can generate the three unique names of the topics we'll need for the model from the base_topic_name. The consumer topic will contain input data for the model, the producer topic will contain the output of the model for successful predictions, and the error producer topic will contain all of the input messages that caused errors in the model.
Once this is done, we are finally able to create the consumer and producer object that we'll use to write and read from Kafka. These objects are created once and reused throughout the lifecycle of the stream processor. The producer and consumer classes are provided by the aiokafka package.
Even though we have an initialized stream processor object once we finish executing the __init__() method of the class, we still need to start the producer and consumer object within the stream processor object. The start method is used at application startup to connect the stream processor to the Kafka topics that it will use:
async def start(self):
    await self._consumer.start()
    await self._producer.start()
The code above can be found here.
Once the stream processor class is initialized and started, we need to process messages:
async def process(self):
    async for message in self._consumer:
    try:
        data = json.loads(message.value)
        prediction = self._model.predict(data=data)
        serialized_prediction = json.dumps(prediction).encode()
        await self._producer.send_and_wait(self.producer_topic, serialized_prediction)
    except Exception as e:
        await self._producer.send_and_wait(self.error_producer_topic, message.value)
The code above can be found here.
The process() method uses an async for loop to continuously process messages from the input Kafka topic. The message is then deserialized using JSON, and the resulting data structure is sent to the model's predict() method. The prediction result is then serialized to a JSON string and encoded to a byte array. Lastly, the prediction is written to the output Kafka topic. If any exceptions are raised during this process, the input message that caused the error is written to the error Kafka topic so that we can try to reprocess it later (or try some other error handling method).
Just like the Kafka producer and consumers are started in the start() method of the class, we need a stop() method so that they can be shut down gracefully:
async def stop(self):
    await self._consumer.stop()
    await self._producer.stop()
The code above can be found here.
Installing the Model
Now that we have a streaming processor class, we can install a model package that will be hosted by the class. To do this, we'll use the iris_model package that we built in a previous blog post. The model package can be installed from its git repository with this command:
pip install git+https://github.com/schmidtbri/ml-model-abc-improvements
Now we can add the model's details to the config.py module so that we can dynamically load the model into the application later:
class Config(dict):
    models = [
        {
            "module_name": "iris_model.iris_predict",
            "class_name": "IrisModel"
        }
    ]
The code above can be found here.
This configuration class is used by the application in all environments. The module_name and class_name fields allow the application to find the MLModel class that implements the prediction functionality of the iris_model package.
Streaming Application
In order to use the MLModelStreamProcessor class, we need to write code that will dynamically instantiate it from configuration for each MLModel class that will be hosted by the application. We'll do this in the app.py module:
configuration = __import__("model_stream_processor"). \
    __getattribute__("config"). \
    __getattribute__(os.environ["APP_SETTINGS"])

model_manager = ModelManager()
model_manager.load_models(Config.models)
The code above can be found here.
The application starts by importing a configuration class, using a special environment variable called "APP_SETTINGS", the configuration class is imported from the config.py module. The application also instantiates the ModelManager singleton that hosts the models. A full explanation of the ModelManager class can be found in previous blog posts.
Next we'll create the function that actually starts and runs the application:
def main():
    loop = asyncio.get_event_loop()
    asyncio.set_event_loop(loop)
The code above can be found here.
The main() function of the application first starts up an asyncio event loop that will be shared by all of the stream processors in the application. The loop allows the streaming processors to efficiently cooperate to do IO-bound tasks like writing to the network.
Once we have an event loop, we can start instantiating the streaming processors:
stream_processors = []
for model in model_manager.get_models():
    stream_processors.append(MLModelStreamProcessor(
        model_qualified_name=model["qualified_name"],
        loop=loop,
        bootstrap_servers=configuration.bootstrap_servers))
The code above can be found here.
Each stream processor is responsible for hosting one MLModel object from the ModelManager singleton that we initialized above.
The stream processors are not started up and connected to a Kafka topic yet, so we start them up like this:
for stream_processor in stream_processors:
    loop.run_until_complete(stream_processor.start())
The code above can be found here.
Each stream processor is started by calling the start method(). Since the method is asynchronous, it is called by using the run_until_complete() method of the asyncio loop.
try:
    for stream_processor in stream_processors:
        loop.run_until_complete(stream_processor.process())
except KeyboardInterrupt:
    logging.info("Process interrupted.")
finally:
    for stream_processor in stream_processors:
        loop.run_until_complete(stream_processor.stop())
    loop.close()
    logging.info("Successfully shutdown the processors.")
The code above can be found here.
When all of the stream processors are started up, we are ready to process messages from Kafka. To do this, we call the process() method of each stream processor with the asyncio loop. The loop will run the processors forever, unless a keyboard interrupt is received. When an interrupt happens, each processor is stopped by calling the stop() method, then we close the asyncio loop itself, and then we can exit the application.
The application is started from the command line with this code at the bottom of the module:
if __name__ == "__main__":
    main()
The code above can be found here.
Now that we have an application that can run the stream processor classes, we can test things against a Kafka broker instance.
Setting Up a Development Environment
To set up a development environment we'll use docker images with the docker compose tool. The docker images come from the official dockerhub repository of Confluent, which is the company that manages the Kafka project. The docker-compose tool is useful for building development environments because it automates a lot of steps that would need to be performed manually.
The docker-compose.yml file in the project root contains configuration for three services:
- zookeeper, a service for maintaining shared configuration and doing synchronization
- kafka, the message broker, which depends on zookeeper
- confluent control center, a user interface service useful for debugging
The docker-compose.yml file contains the docker image information, configuration options, and network settings for each service. It also contains dependency information for each service so that they are started in the right order.
To start up the three services, we need to execute this command from the root of the project:
docker-compose up
To see if everything came up correctly, execute this command in another shell:
docker-compose ps
If everything looks good, there should be three docker images running and the confluent control center UI should be accessible at this URL: http://localhost:9021/.
Creating Kafka Topics
In order to more easily create the topics needed to deploy the stream processor for a model, I created a simple command line tool. The tool reads the configuration of the streaming application, generates the correct topic names, connects to the kafka broker and creates the topics for each model. The tool can be found in the scripts folder in the create_topics.py module.
To use the tool, execute these commands from the root of the project:
export PYTHONPATH=./
python scripts/create_topics.py --bootstrap_servers=localhost:9092
The first command set the PYTHONPATH environment variable so that the configuration module can be found, the second command executes the CLI tool that creates the topics.
Now we can go into the confluent control center UI and see the topics that were just created:

Since the configuration points at the iris_model package, there are now three topics for that model's stream processor. If more models are listed in the configuration of the application, more topics would be created by the tool.
Running the Application
Now that we have the broker and topics for the stream processor, we can start up the application send some messages to the model.
First, we'll start the application with these commands in a new command shell:
export APP_SETTINGS=ProdConfig
export PYTHONPATH=./
python model_stream_processor/app.py
The streaming processor for the iris_model wrote these messages to the log:
INFO:model_stream_processor:Initializing stream processor for model: iris_model
INFO:model_stream_processor:iris_model stream processor: Consuming messages from topic..
INFO:model_stream_processor:iris_model stream processor: Producing messages to topics...
INFO:model_stream_processor:iris_model stream processor: Starting consumer and producer.
The stream processor is now ready to receive messages in the "inputs" topic. To more easily send messages to a topic, I built a simple CLI tool that reads messages from stdin and send them to the topic, the tool is in the send_messages.py module. To use the tool, execute this command in a new command shell:
python scripts/send_messages.py --topic=model_stream_processor.iris_model.0.1.inputs --bootstrap_servers=localhost:9092
The tool will start and wait for input from the command line, every time the ENTER key is pressed the contents of stdin will be sent to the "inputs" topic.
To be able to see the output messages produced by the stream processor I built a similar CLI tool that consumes messages from a topic and prints them to the screen. The tool is in the receive_messages.py module. To use it, execute this command in a new command shell:
python scripts/receive_messages.py --topic=model_stream_processor.iris_model.0.1.outputs --bootstrap_servers=localhost:9092
Now we're ready to send some messages to the stream processor. To do this, type the following JSON string into the send_messages command that we started above:
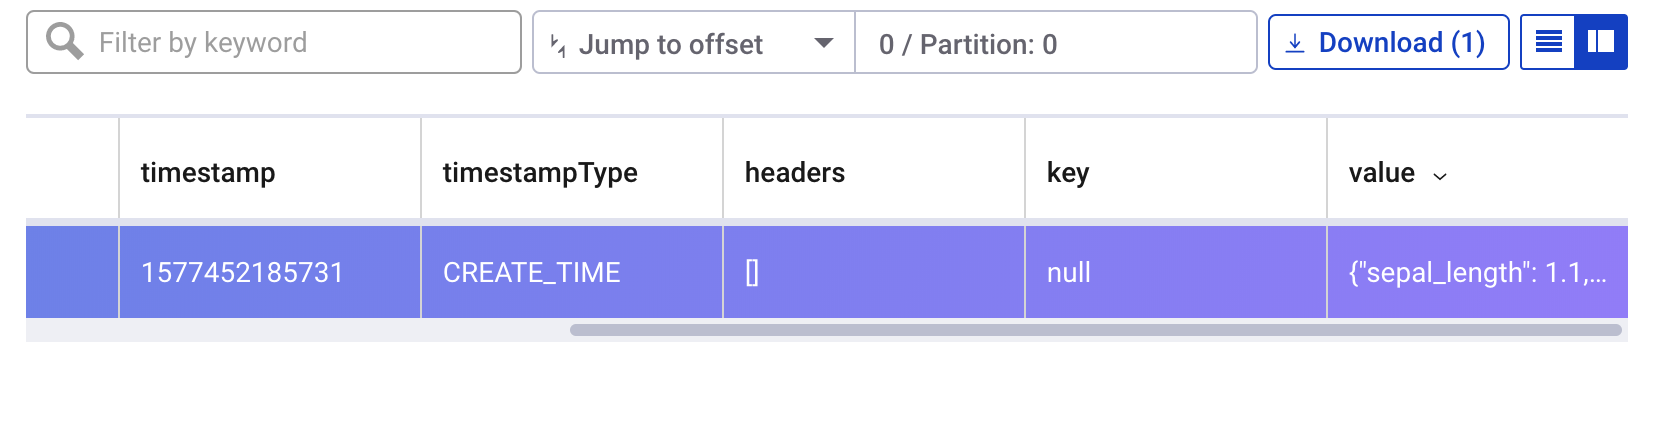
{"sepal_length": 1.1, "sepal_width": 1.2, "petal_length": 1.3, "petal_width": 1.4}
The receive_messages command should print out the prediction message from the model stream processor:
{"species": "setosa"}
The last thing we can test is the error handling of the stream processor. To do this we have to listen to the "errors" topic of the stream processor. We can do this by executing the receive_messages command with the "errors" topic as an option:
python scripts/receive_messages.py --topic=model_stream_processor.iris_model.0.1.errors --bootstrap_servers=localhost:9092
To cause an error in the stream processor we can send in a malformed JSON string to the send_messages command that should still be running:
{"sepal_length": 1.1, "sepal_width": 1.2, "petal_length": 1.3, "petal_width": 1.4
The stream processor will catch the exception and send the input that caused the error to the "errors" topic. We can see the message that caused the error in the confluent control center UI:
Closing
In this blog post, we've shown how to deploy an ML model inside a streaming application. This type of deployment is becoming more and more useful in recent times, as the popularity of stream processing and Kafka grows. As in previous blog posts, we've built an application that can support any number of ML models that implement the MLModel interface The only requirement for deployment is that the model package is installed in the environment and the configuration of the application is updated. The flexibility of this approach has allowed us to deploy the iris_model ML model in five different applications without any modification of the model code itself.
Another benefit of the stream processing application shown in this blog post is the fact that we are using an asyncio-compatible Kafka client library. By using asynchronous programming, we are able to greatly increase the performance of the code. In tests, asynchronous python code is able to significantly outperform normal synchronous code. The performance boost is most pronounced when working with file IO and network IO applications, which our streaming processor application will definitely benefit from.
To keep things simple, we used JSON strings in the messages we sent through Kafka. However, there are more efficient standards for serializing data which we could have used. For example, the confluent schema registry works with Avro schemas, and Avro is well supported in the Kafka ecosystem. Another way we can improve in the project are the CLI tools that were built to test the application. They are very simple and don't support many of the options that would be needed for a real production application. For example the create_topics.py script only creates topics with a replication factor of one. We can improve this tool by adding more of the options supported by Kafka's topic creation CLI tool.