This blog post builds on the ideas started in three previous blog posts.
The code in this blog post can be found in this github repo.
Introduction
When building software, we may come across situations in which we want to execute a long-running operation behind the scenes while keeping the main execution path of the code running. This is useful when the software needs to remain responsive to a user, and the long running operation would get in the way. These types of operations often involve contacting another service over the network or writing data to IO. For example, when a web service needs to send an email, often the best way to do it is to launch a task in the background that will actually send the email, and return a response to the client immediately.
These types of tasks are often handled in a task queue, which can also be called a job queue. A task queue is a service that receives requests to perform tasks, and handles finding the resources necessary for the task, and scheduling the task. It can also store the results of the tasks for later retrieval. Tasks usually execute asynchronously, which means that the client does not wait for the result of the task, but synchronous execution can also be supported.
A task queue can also execute tasks on many different physical computers, which makes it a distributed system. To handle communication between many machines, a task queue often makes use of a message broker service to handle message passing between the worker processes that execute the tasks and the clients of the tasks. A message broker service acts as a middle man, receiving, storing, routing, and sending messages between many different services. A message router service is an implementation of the publish-subscribe pattern. The benefits of using this pattern is that the services that communicate over the message broker remain decoupled from each other.
A task queue can be useful for machine learning model deployments, since a machine learning model may take some time to make a prediction and return a result. Most often, the ML prediction algorithm itself is CPU-bound, which means that it is limited by the availability of CPU time. This means that a task queue is usually not necessary for the deployment of the ML model itself, but for dealing with the loading of data that the prediction algorithm may need to make a prediction which is an IO-bound process. Another situation in which a task queue may be useful is when we need to make thousands of predictions and return them as a result; in this case it would be useful to launch an asynchronous task that will take care of the predictions behind the scenes and then come back later to access the results.
Task Queueing With Celery
Celery is a python package that handles most of the complexity of distributing and executing tasks across different processes. Celery is able to use many different types of message brokers to distribute tasks, for this blog post we'll use the Redis message broker. In order to access task results, Celery supports several kinds of result storage backends, for this blog we'll also use Redis to store the prediction results of the model. As in previous blog posts, we'll be deploying the iris_model package, which was developed as an example and has now been deployed several times.
Since we are now dealing with more than one service and we are communicating data between several different processes over a network, it's useful to visualize the activity of the task queue with a software architecture diagram:
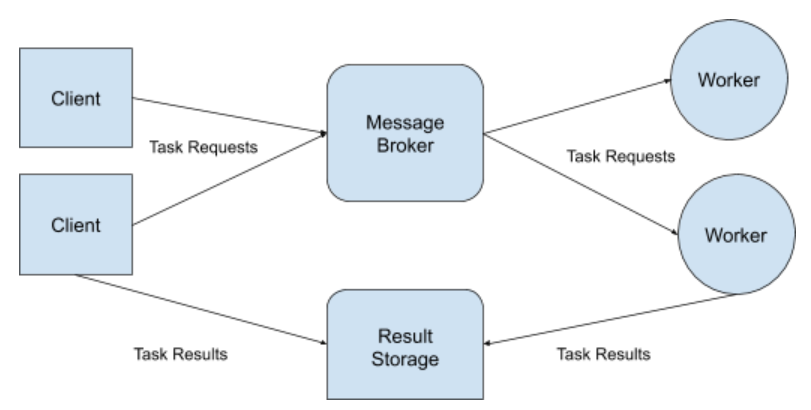
The client application installs the Celery application package and sends task requests through the tasks that are defined in it, whenever a task needs to be executed, it sends a message to the task broker with any parameters that the task needs to execute. The message broker receives messages and holds them until they are picked up by the worker processes. The workers are running the Celery application and pick up messages from the message broker, when a task is completed, they store the results to the result storage backend.
Package Structure
To begin, I set up the project structure for the application package:
- model_task_queue ( python package for task queue app )
    - __init__.py
    - __main__.py ( command line entry point )
    - celery.py ( celery application )
    - config.py
    - ml_model_task.py ( task class )
- scripts
    - simple_test.py ( single prediction test )
    - continuous_test.py ( multiple prediction test )
- tests ( unit tests )
- Makefle
- README.md
- requirements.txt
- test_requirements.txt
- setup.py
This structure can be seen here in the github repository.
Model Async Task
Creating an asynchronous task with the Celery package is simple, it's as easy as putting a function decorator on a function. An example of how to do this can be found in the Celery startup guide. The function decorator allows the client application to call the function just like a local function, while having the actual execution of the code happen asynchronously in a worker process running in a different computer. In the client code, the function acts as a facade that hides the complexities of parameter serialization/deserialization, network communication and other complexities of the distributed nature of the task queue.
The function decorator is a simple way to get started with Celery tasks, but we have some special requirements that make it hard to create Celery tasks this way. For example, Celery task functions don't maintain state between requests. If we had to instantiate an MLModel object for every task request, the model parameters would have to be loaded and deserialized over and over for each request. To get around this limitation we'll have to code the ML model async task in such a way that it can maintain an instance of an MLModel object in memory between requests. A way to do this can be found in the Celery documentation here.
Following the example in the documentation, we'll define a class that inherits from the celery.Task base class:
from celery import Task

class MLModelPredictionTask(Task):
    """Celery Task for making ML Model predictions."""
The code above can be found here.
Now we'll define the task class' __init__ method:
def __init__(self, module_name, class_name):
    """Class constructor."""
    super().__init__()
    self._model = None

    model_module = importlib.import_module(module_name)
    model_class = getattr(model_module, class_name)

    if issubclass(model_class, MLModel) is False:
        raise ValueEror("MLModelPredictionTask can only be used with subtypes of MLModel.")

    # saving the reference to the class to avoid having to import it again
    self._model_class = model_class

    # adding a name to the task object
    self.name = "{}.{}".format(__name__, model_class.qualified_name)
The code above can be found here.
The __init__() method accepts two parameters: the name of the module where we can find the MLModel-derived class, and the name of the class in that module that implements the prediction functionality. The __init__() method then calls the __init__() method of the Celery Task base class to make sure that all of the required initialization code is executed correctly. Then the "_model" property is set to None (for now). After this, we dynamically import the MLModel class from the environment, and check that it is a subclass of MLModel. Next, we save a reference to the class in the "_model_class" property of the new task object but we do not instantiate the model class itself, the reason for this is explained below. Lastly, we set a unique name for the Celery task based on the name of the MLModelPredictionTask class' module and the qualified name of the MLModel class that is being hosted inside of this instance of the MLModelPredictionTask class. The name of the task is set dynamically so that we are able to host many different models within the same celery application, while guaranteeing that the tasks will have unique names.
Next, we have the initialize() method is responsible for instantiating the model class, and saving the reference as a property of the MLModelPredictionTask object:
def initialize(self):
    model_object = self._model_class()
    self._model = model_object
The code above can be found here.
Lastly, the run() method is responsible for doing the work of the async task:
def run(self, data):
    if self._model is None:
        self.initialize()
        return self._model.predict(data=data)
The code above can be found here.
The run() method checks if the model class is instantiated before it attempts to make a prediction. If it is not instantiated, it calls the initialize() method to create the model object before making a prediction with it. The run() method is the one that defines the actual functionality of the Celery task.
In previous blog posts, the instantiation of the model class happens in the __init__() method of the class that is managing the model object. After this, we can use the model class to make a prediction. We have to take a different approach in this application because we need to keep the model class from being instantiated in the client application that is using the asynchronous task. This happens because the client application instantiates and manages an instance of the task class in its own process space, and uses it to communicate with the worker processes that are actually doing the work. To keep the model class from being instantiated in the client application, the run() method is actually responsible for initializing the model class instead of the __init__() method. The only downside to this approach is that when the worker process instantiates the task class, it will not have an instance of the model class in memory, it will only be created the first time that a prediction is made.
Celery Application
Now that we have a Celery task that can host an MLModel-based class, we can start building a Celery application that hosts the tasks. To do this, we first have to instantiate a task registry to hold the instantiated tasks:
First, we will install a machine learning model that will be hosted by the Celery application. For this we'll use the iris_model package that I've already shown in previous blog posts:
pip install git+https://github.com/schmidtbri/ml-model-abc-improvements#egg=iris_model
Then, we'll create a configuration class for the application:
class Config(object):
    """Configuration for all environments."""
    models = [
        {
            "module_name": "iris_model.iris_predict",
            "class_name": "IrisModel"
        }
    ]
The code above can be found here.
The configuration class defines property called "models" that is a list of dictionaries, each dictionary containing two keys. The "module_name" key points at a module that contains an MLModel-derived class, and the "class_name" key contains the name of the class. By storing the locations of the classes in this way, adding a new MLModel class to the application is as simple as adding an entry to the list. The configuration above points at the IrisModel class that we just installed in the iris_model package. This class is meant to hold configuration that is shared by all of the environments.
In the same file we also store configuration for different environments, here is the configuration class for the production environment:
class ProdConfig(Config):
    """Configuration for the prod environment."""
    broker_url = 'redis://localhost:6379/0'
    result_backend = 'redis://localhost:6379/0'
The code above can be found here.
The configuration is pointing at a redis service on the localhost for now. Now that we have configuration taken care of, we can start building the Celery application. To do this we start by instantiating a task registry:
registry = TaskRegistry()
The code above can be found here.
Next, we add tasks to the task registry:
for model in Config.models:
    registry.register(MLModelPredictionTask(module_name=model["module_name"], class_name=model["class_name"]))
The code above can be found here.
The loop iterates through the list of models in the configuration, instantiates a MLModelPredictionTask for each model, and registers the new task with the task registry object we defined above.
Celery tasks are usually automatically registered in a task registry as soon as they are instantiated, but we have a special situation because of the dynamic and configuration-driven nature of the Celery application. The manual registration of the task shown above is needed because we don't know how many tasks we will be hosting in the application, we only know this once the application starts up and reads the configuration.
Now that we have a task registry with tasks in it, we can create the Celery application object:
app = Celery(__name__, tasks=registry)
The code above can be found here.
The name of the application is pulled from the module name, and the tasks parameter is the task registry object we defined above.
Lastly, we need to point the Celery application to a broker and result backend so that the clients and workers can communicate. These settings are loaded from the configuration classes we've already defined:
app.config_from_object("model_task_queue.config.{}".format(os.environ['APP_SETTINGS']))
The code above can be found here.
The name of the environment is loaded from an environment variable called "APP_SETTINGS". The environment variable is then used to load the correct configuration object from the config.py file.
Using the Task
To use the iris_model task in the Celery application we just built, we'll need to start up an instance of redis to serve as the message broker and storage backend for the task queue. To do this, we can use a docker image with this command:
docker run -d -p 6379:6379 redis
Now that we have a redis instance to communicate with, we can start a Celery worker process:
export OBJC_DISABLE_INITIALIZE_FORK_SAFETY=YES
export APP_SETTINGS=ProdConfig
export PYTHONPATH=./
python3 -m model_task_queue --loglevel INFO
The OBJC_DISABLE_INITIALIZE_FORK_SAFETY environment variable is needed in MacOS to allow Celery to fork processes when handling task execution. The APP_SETTINGS environment variable is needed so that the Celery application will load the right configuration. The PYTHONPATH environment allows the Python interpreter to find the dependencies of the Celery application. The last command start the Celery worker process by calling the script in the __main__.py module.
Next, we can try out the task itself in a python interactive session:
>>> import os
>>> os.environ["APP_SETTINGS"] = "ProdConfig"
>>> from model_task_queue.celery import app
>>> task = app.tasks["model_task_queue.ml_model_task.iris_model"]
>>> task.__dict__
{'_model': None, '_model_class': <class
'iris_model.iris_predict.IrisModel'>, 'name':
'model_task_queue.ml_model_task.iris_model', '_exec_options':
{'queue': None, 'routing_key': None, 'exchange': None,
'priority': None, 'expires': None, 'serializer': 'json',
'delivery_mode': None, 'compression': None, 'time_limit': None,
'soft_time_limit': None, 'immediate': None, 'mandatory': None,
'ignore_result': False}}
When using the celery task, we first need to instantiate the Celery application object that is hosting the task. This happens when we import the model_task_queue.celery module. Once we have the application object, we can query the app.tasks dictionary for the model task we are interested in. The name of the task is dynamically generated from the qualified name of the model that it is hosting.
As can be seen above, when the task is first instantiated, it does not have an object reference in the _model property. This is as we intended, since we are using the Celery application as a client and we don't want the task to instantiate the model class which would cause the model to be deserialized in the client process.
Now that we have an instance of the task, we can try to execute it:
>>> result = task.delay(data={ "sepal_length": 5.0, "sepal_width": 3.2, "petal_length": 1.2, "petal_width": 0.2})
>>> result.ready()
True
>>> result.get()
{'species': 'setosa'}
We use the task.delay() method to call the task asynchronously, getting back a result object that can be used to get a result once the task is completed. The ready() method of the result can be used to check on the status of the result of the task. Once it is completed, the result can be retrieved from the result backend with the get() method.
If the task throws an exception, the result will also throw an exception when it is accessed:
>>> result = task.delay(data={ "sepal_length": 5.0, "sepal_width": 3.2, "petal_length": 1.2, "petal_width": "asdfg"})
>>> result.ready()
True
>>> result.get()
Traceback (most recent call last):
...
ml_model_abc.MLModelSchemaValidationException: Failed to validate input data: Key 'petal_width' error: asdfg should be instance of 'float'
Because the "petal_width" field contains data that does not meet the schema of the iris model, the model threw an exception of type MLModelSchemaValidationException. The exception was caught by the celery worker, serialized, and transported back to the client.
Test Script
In order to test the Celery application, we'll code a script that will make use of the iris_model task asynchronously. To use the application, we import the Celery application from the module where it is defined:
from model_task_queue.celery import app
The code above can be found here.
Next, we'll define a function that start a task, wait for it to complete, and return the prediction result:
def request_task(data):
    task = app.tasks["model_task_queue.ml_model_task.iris_model"]
    result = task.delay(data=data)

    # waiting for the task to complete
    while result.ready() is not True:
        time.sleep(1)
        prediction = result.get(timeout=1)
    return prediction
The code above can be found here.
Lastly, we'll define a function that uses the function above to test the iris_model task concurrently:
def run_test():
    data = [
            {"sepal_length": 5.0, "sepal_width": 3.2, "petal_length": 1.2, "petal_width": 0.2},
            {"sepal_length": 5.5, "sepal_width": 3.5, "petal_length": 1.3, "petal_width": 0.2},
            {"sepal_length": 4.9, "sepal_width": 3.1, "petal_length": 1.5, "petal_width": 0.1},
            {"sepal_length": 4.4, "sepal_width": 3.0, "petal_length": 1.3, "petal_width": 0.2}
        ]
    with Executor(max_workers=4) as exe:
        jobs = [exe.submit(request_task, d) for d in data]
        results = [job.result() for job in jobs]
        print("The tasks returned these predictions: {}\".format(results))
The code above can be found here.
The function sets up a few inputs for the model in the data list. It then calls the task concurrently using the ThreadPoolExecutor context manager from the concurrent Python package. The context manager executes the request_task() function concurrently in four worker processes.
To run the script, we'll need the redis docker image and the worker process to be running. The script above can be executed from the command line by using these commands:
export PYTHONPATH=./
export APP_SETTINGS=ProdConfig
python3 scripts/concurrent_test.py
Closing
In this blog post I showed how to build a task queue application that is able to host machine learning models. A task queue is very useful in certain situations for deploying ml models because of capabilities that it brings to the table.Task queues allow applications to do work asynchronously behind the scenes without having the main application being affected.
The ML model deployment strategy I showed in this blog post works in the same way as the previous blog posts I've published. The Celery application I built does not work with only one ML model, it works with any ML model that uses the MLModel base class. The application is also able to host any number of models, and they are loaded from configuration which means that a new model can be added to the Celery application without modifying the code. By following good software engineering design practices, we are able to easily put machine learning models into production without having to worry about the implementation details of the models. All of these capabilities stem from the design of the MLModel base class.
Another interesting feature of the Celery package is that we can launch tasks from a variety of different languages. There are client libraries for node.js and PHP. This flexibility makes it possible to use Python for building and deploying ML models, and to use other languages for the work that is best suited for them.
A drawback of this approach is that when the Celery application is built and deployed, the dependencies of the machine learning models that it is hosting are installed along with it. This means that if two models depend on different versions of scikit-learn or pandas, for example, they won't be able to be installed in the same Celery application. This limits the usefulness of the Celery application somewhat, since it can't host models together that have conflicting requirements.
Another drawback of this approach is the extra complexity that it entails, since it requires message broker service, a result storage service, and the worker processes to be running for the task queue to be available to client applications. All of these requirements add extra complexity to this deployment option.
The Celery application I built is only able to deal with single prediction requests. Even though this is useful it would make more sense for the Celery application to be used to run longer prediction jobs that make thousands of predictions at a time. An improvement that can be made to the task is to be able to launch prediction tasks that take large files as input, feed the individual records in the file as inputs to the model, and store the resulting predictions back into a storage service. The long-running task can also be instrumented to report its progress back to the client that requested the predictions.