This blog post continues the ideas started in two previous blog posts.
The code in this blog post can be found in this github repo.
Introduction
In previous blog posts I showed how to build a simple base class for abstracting machine learning models and how to create a python package that makes use of the base class. In this blog post I aim to use the ideas from the previous blog posts to build a simple application that uses the MLModel base class to deploy a model. I will be using the iris_model package built in this blog post.
When creating software, interacting with a component through an abstraction makes the code easier to understand and evolve. In the vocabulary of software design patterns, this is called the strategy pattern. When using the strategy pattern, the implementation details of a software component (the "strategy") are not decided up front, they are deferred until later. Instead, the interface between the code that is using the component and the component itself is designed and put into code. When it is time to write the code that uses the component, it is written against the abstract interface, trusting that the component will provide an implementation that matches the agreed-on interface. Afterwards, an implementation of the strategy can be implemented as needed. This approach makes it possible to easily switch between implementations of the strategy easily. It also makes it possible to decide which implementation of the strategy to use at runtime, which makes the software more flexible.
By interacting with machine learning models through the MLModel abstraction, it becomes possible to build applications that can host any model that implements the MLModel interface. This way, simple model deployments become much faster since a custom-made application is not needed to put a model into production. The application I will show in this blog post takes advantage of this fact to allow a software engineer to install and deploy any number of models that implement the MLModel base class inside a web application.
Overall, I aim to show how to deploy the model code in the iris_model package into a simple web application. I also want to show how the MLModel abstraction makes the use of machine learning models much easier in production software.
Flask Web Application
One of the simplest ways to build a web application with python is to use the Flask framework. Flask makes it easy to set up a simple web application that serves web pages and a RESTful interface.
To begin, I set up the project structure for the application package:
- model_service
    - static ( folder containing the static web assets )
    - templates ( folder for the html templates
    - __init__.py
    - config.py
    - endpoints.py
    - model_manager.py
    - schemas.py
    - views.py
- scripts ( folder containing scripts )
- tests ( folder containing the unit test suite)
- requirements.txt
- test_requirements.txt
This structure can be seen here in the github repository.
The Flask application is set up with this code in the __init__.py file:
app = Flask(__name__)
if os.environ.get("APP_SETTINGS") is not None:
    app.config.from_object(os.environ['APP_SETTINGS'])
    bootstrap = Bootstrap(app)
The code above can be found here.
The Flask application is initiated by instantiating the Flask() class. The configuration is being imported by the configuration classes found in the config.py file, there is one configuration class per environment. The environment name is being imported as the "APP_SETTINGS" environment variable, which makes it easy to change the configuration of the app at runtime.
The configuration classes can be found here. More information about this pattern for managing and importing configuration details in Flask applications can be found here. Lastly, I am using the flask_bootstrap package for adding bootstrap elements to the web pages, this package is initiated after loading the configuration.
So far, this is a simple Flask application that is not able to manage or serve machine learning models, in the next section we will start to add the functionality needed to do this.
Model Manager Class
In order to use the iris_model class within the Flask application we are building, we need to have a way to manage the model object within the Python process. To do this we will create a ModelManager class that follows the singleton pattern. The ModelManager class will be instantiated one time at application startup. The ModelManager singleton instantiates MLModel classes from configuration, and returns information about the model objects being managed as well as references to the model objects.
Let's get started, here is the class declaration:
class ModelManager(object):
    _models = []
The code above can be found here.
The ModelManager class has a private list property called _models that will contain the references to the model objects that are under management.
Now we need a way to actually instantiate the model classes, the code to do this is below:
@classmethod
def load_models(cls, configuration):
    for c in configuration:
        model_module = importlib.import_module(c["module_name"])
        model_class = getattr(model_module, c["class_name"])
        model_object = model_class()

        if isinstance(model_object, MLModel) is False:
            raise ValueError("The ModelManager can only hold references to objects of type MLModel.")

        cls._models.append(model_object)
The code above can be found here.
The load_models() class method receives a configuration dictionary object and iterates through it, importing the classes from the environment, instantiating the classes, and saving the references to the objects in the _models class property. The method also checks that the classes being imported and instantiated are instances of the MLModel base class. The ModelManager singleton object is able to hold any number of model objects.
The ModelManager class also provides three other methods that help to use the models that it manages. The get_models() method returns a list of dictionaries with information about the model object. The get_model_metadata() method returns detailed data about a single model object, identified with the qualified_name property of the model object. The metadata returned by this method contains the input and output schemas of the model encoded as JSON schema dictionaries. Lastly, the get_model() method searches the models in the _models list and returns a reference to one model object. When searching through the list of model objects in the _models class property, the qualified name of the model is used to identify the model.
With the ModelManager class, we can now test it out with the iris_model package from the previous blog post. To do this we need to install the package from github by executing this command:
pip install git+https://github.com/schmidtbri/ml-model-abc-improvements
Once we have the iris_model package installed in the environment, we can use a python interactive session to execute this code to try out the ModelManager class:
>>> from model_service.model_manager import ModelManager
>>> model_manager = ModelManager()
>>> model_manager.load_models(configuration=[
...     {
...         "module_name": "iris_model.iris_predict",
...         "class_name": "IrisModel"
...     }
...])
>>> model_manager.get_models()
[{'display_name': 'Iris Model', 'qualified\_name': 'iris_model', 'description': 'A machine learning model for predicting the species of a flower based on its measurements.', 'major\_version': 0, 'minor_version': 1}]
The ModelManager class is being used to load the IrisModel class which is found in the the iris_model package within the iris_predict module, the information needed to find the class is held within the configuration. Once the model object is instantiated, the get_models() method is called to get data about the models in memory.
In order to use the ModelManager class within the Flask application we have to instantiate it and call the load_model(). Since the model classes will load their parameters from disk when they are instantiated, it's important that we only do this one time at application startup. We can do that by adding this code to the __init__.py module:
@app.before_first_request
def instantiate_model_manager():
    model_manager = ModelManager()
    model_manager.load_models(configuration=app.config["MODELS"])
The code above can be found here.
The \@app.before_first_request decorator on the function causes it to be executed before requests can be handled by the application. The model manager configuration is loaded from the Flask application configuration found here.
The ModelManager class handles the complexities of instantiating and managing model objects in memory. As long as a MLModel-derived class can be found in the python environment, then it can be loaded and managed by the ModelManager class.
Flask REST Endpoints
To make use of the models hosted in the ModelManager object, we will first build a simple REST interface that will allow clients to find and make predictions. To define the data models that are returned by the REST interface we make use of the marshmallow schema package. Although it's not strictly necessary to use it to build a web app, the marshmallow package provides a simple and quick way to build schemas and do serialization and deserialization.
The Flask application has three endpoints: a models endpoint for getting information about all models hosted by the app, a metadata endpoint for getting information about a specific model, and a predict endpoint for making predictions with a specific model.
The models endpoint is created by registering a function with the Flask application:
@app.route("/api/models", methods=['GET'])
def get_models():
    model_manager = ModelManager()
    models = model_manager.get_models()
    response_data = model_collection_schema.dumps(dict(models=models)).data
    return response_data, 200
The code above can be found here.
The function uses the ModelManager class to access data about all models hosted within it. It uses the get_models() method in the same way that the index defined above view does. The response_data is serialized using a marshmallow schema object which is instantiated from the schema class defined here.
The metadata endpoint is built similarly to the models endpoint. The metadata endpoint function uses the ModelManager class to access information about the models. In the same way as the models endpoint, the metadata endpoint also defines a set of schema classes for serialization.
The predict endpoint functions differently from the previous endpoints since it does not define a schema class for the input and output data that is expects. If a client wants to know what fields it needs to send to a model to make a prediction, it can find a description of the fields in the JSON schema published by the metadata endpoint. If a new version of a model with new input or output schemas is installed into the Flask application, the code of the Flask app would not have to change at all to accommodate the new model.
Flask Views
The Flask framework is also able to render web pages using Jinja templates, a great guide for learning about this can be found here. To add webpages rendered with Jinja templates to the web application I added the templates folder to the application package. In it I created the base html template, from which other templates inherit. The base template uses styles from the bootstrap package. To render the templates into views I also added the views.py module.
In order to show some information about the models that are in the ModelManager object, I added the index.html template. To render the template, I added this code to the views.py module:
@app.route('/', methods=['GET'])
def index():
    model_manager = ModelManager()
    models = model_manager.get_models()
    return render_template('index.html', models=models)
The code above can be found here.
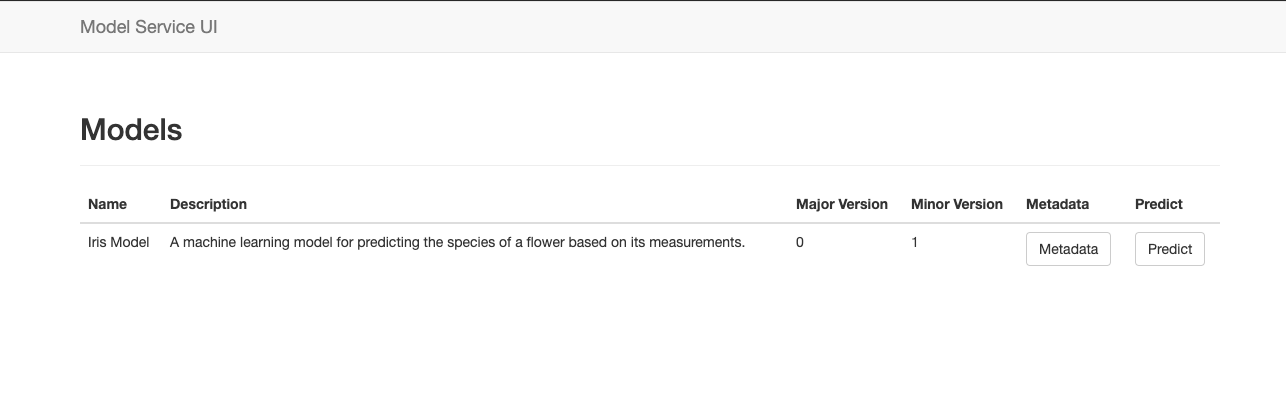
The index view function first registers itself with the Flask application's root URL so that it becomes the homepage. The ModelManager is then instantiated, but since it is a singleton that was first instantiated at application startup, the reference to the singleton object is returned with all of the model objects already loaded. Next, we use the singleton's get_models() method to get a list of models available. Lastly, we send the list of models returned to the template for rendering, and return the resulting webpage to the user. This view also renders links to a model's metadata and prediction views. These views are presented below. The index webpage looks like this:
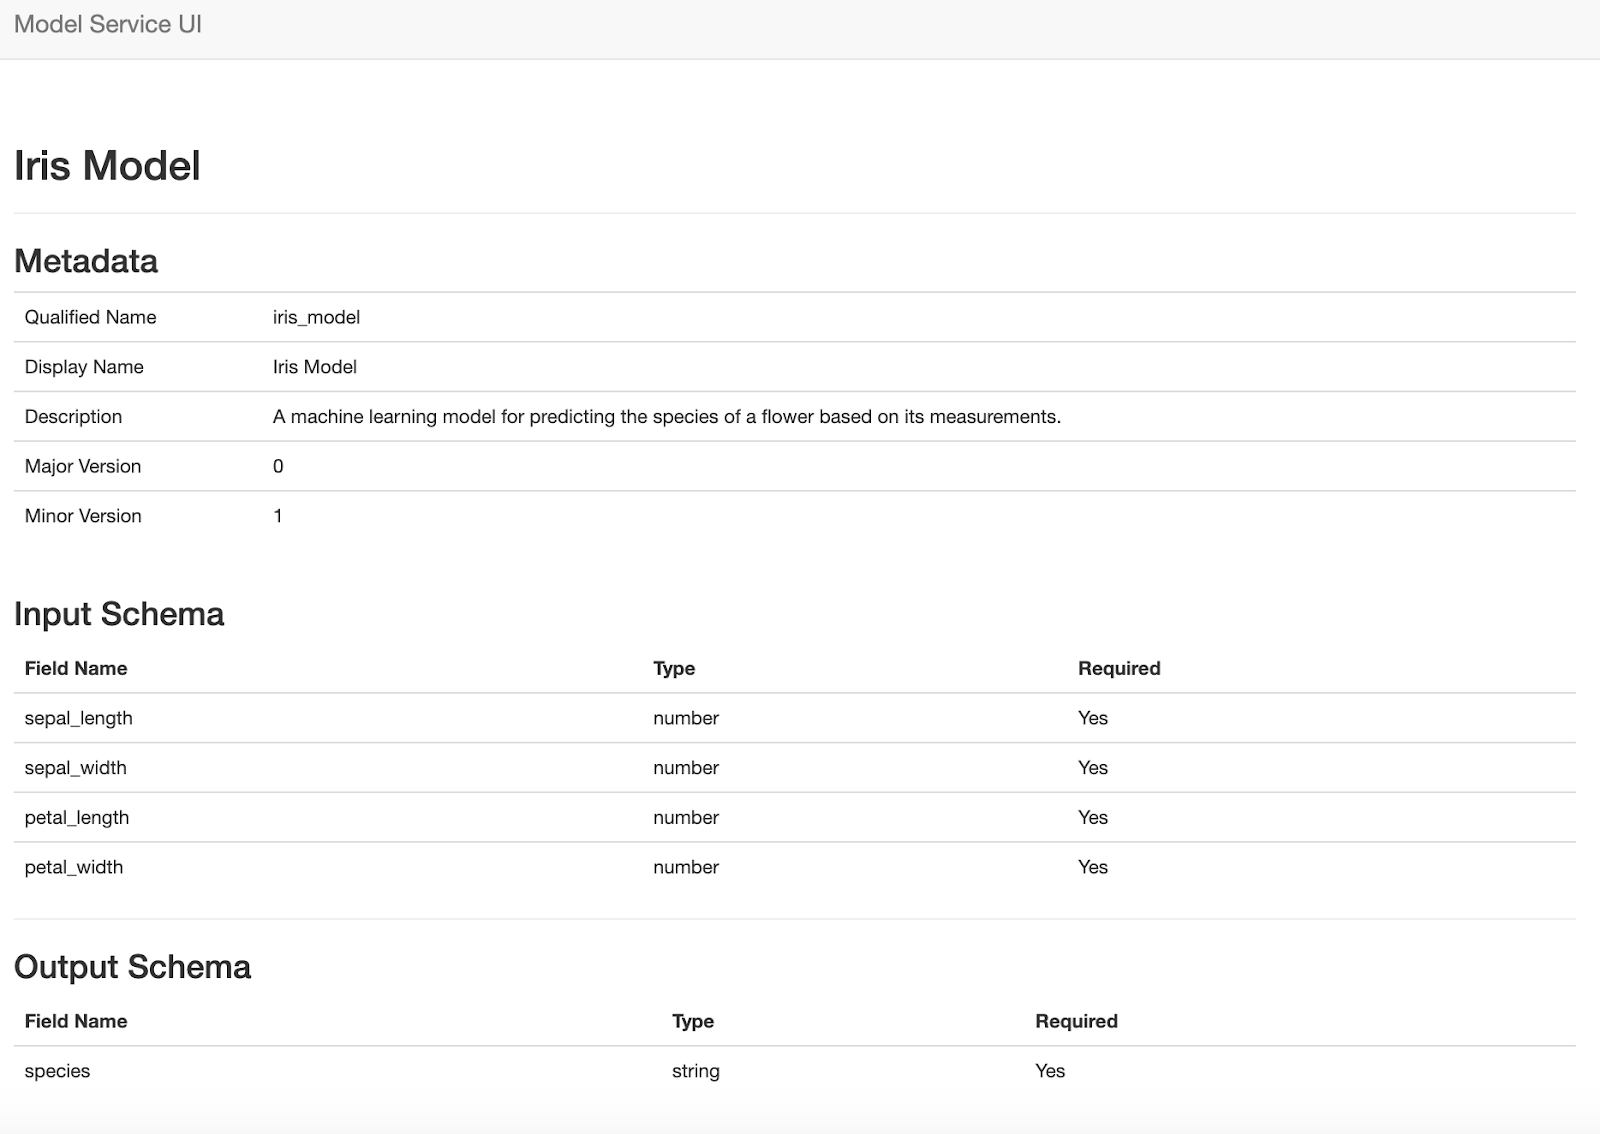
A similar approach is followed for the metadata view, which displays an individual model's metadata as well as the input and output schemas. The template for this view is here, and the view function is here. One difference between this view and the index view is that it accepts a path parameter that determines which model's metadata is rendered in the view. The metadata webpage looks like this:
Dynamic Web Form
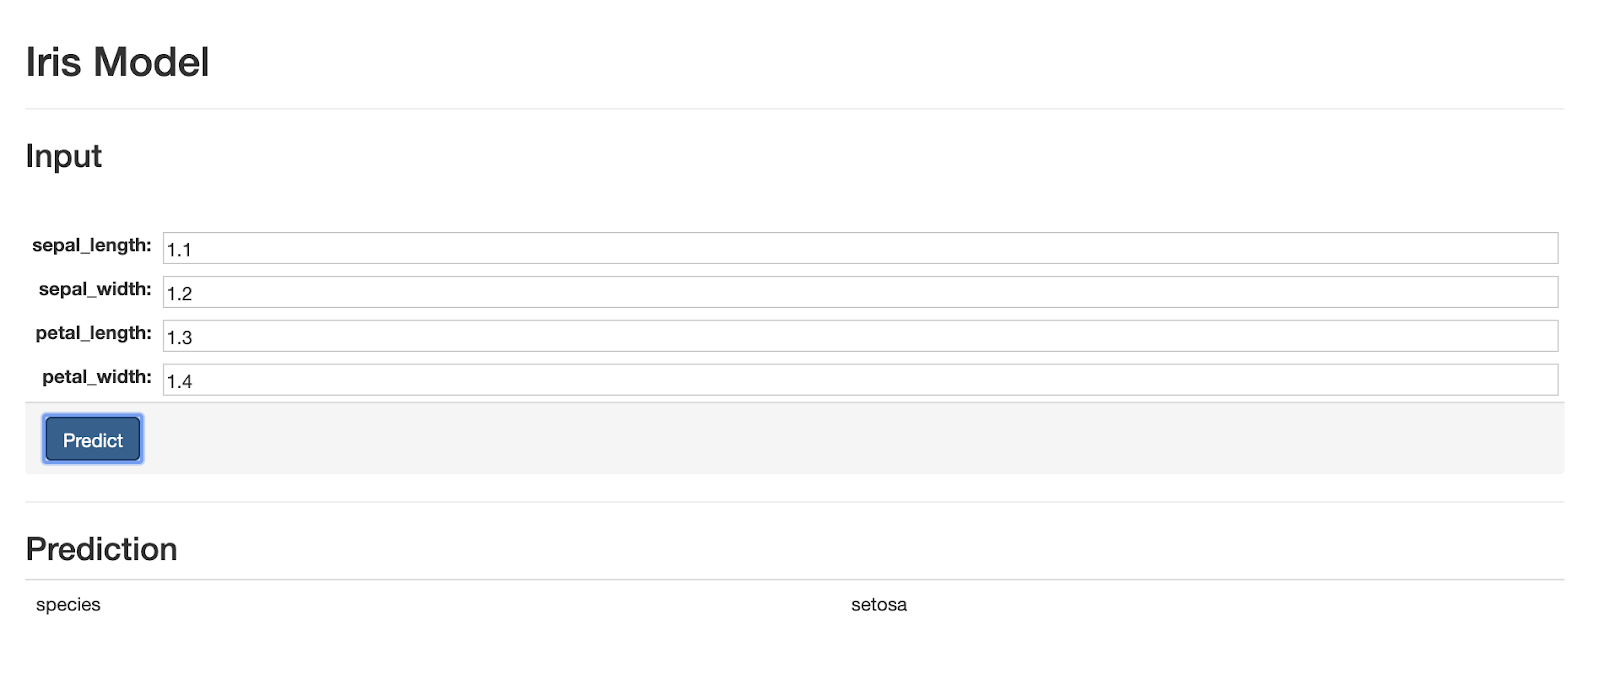
The last webpage of the application makes use of a view to render a webpage and the predict endpoint. The prediction web page for a model renders a dynamic form from the input json schema provided by the model, then accepts user input and sends it to the prediction REST endpoint when the user presses the "Predict" button, lastly it displays the prediction results from the model.
The prediction web page is rendered like the other views:
@app.route("/models/<qualified_name>/predict", methods=['GET'])
def display_form(qualified_name):
    model_manager = ModelManager()
    model_metadata = model_manager.get_model_metadata(qualified_name=qualified_name)
    return render_template('predict.html', model_metadata=model_metadata)
The code above can be found here.
The template, however is different because it uses JQuery to get the input schema of the model from the metadata endpoint:
$(document).ready(function() {
$.ajax({
    url: '/api/models/{{model_metadata.qualified_name}}/metadata',
The code above can be found here.
If the request returns successfully then we use the brutusin forms package to render a form from the model's input JSON schema. The webform created from the JSON schema is dynamic, which allows a custom form to be created for any model that is hosted by the application. Below is the code to render the form:
success: function(data) {
    var container = document.getElementById('prediction_form');
    var BrutusinForms = brutusin["json-forms"];
    bf = BrutusinForms.create(data.input_schema);
    bf.render(container);
}
The code above can be found here.
Lastly, there is a JQuery request to make the prediction when the user presses the "Predict" button, and a callback function that renders the prediction to the webpage.
Here is a screen shot of the prediction webpage:
Documentation
To make the REST API easier to use we will produce documentation for it. A common way to document RESTful interfaces is the OpenAPI specification. In order to automatically create an OpenAPI document for the RESTful API that the model service provides, I used the python apispec package. The apispec package is able to automatically extract schema information from marshmallow Schema classes, and is able to extract endpoint specifications from Flask \@app.route decorated functions.
To be able to automatically extract the OpenAPI specification document from the code, I created a python script called openapi.py. The script creates an object to describe the document:
spec = APISpec(
    openapi_version="3.0.2",
    title='Model Service',
    version='0.1.0',
    info=dict(description=__doc__),
    plugins=[FlaskPlugin(), MarshmallowPlugin()],
)
The code above can be found here.
Then we can add the marshmallow schema classes, which are imported from the schemas.py module:
spec.components.schema("ModelSchema", schema=ModelSchema)
spec.components.schema("ModelCollectionSchema", schema=ModelCollectionSchema)
spec.components.schema("JsonSchemaProperty", schema=JsonSchemaProperty)
spec.components.schema("JSONSchema", schema=JSONSchema)
spec.components.schema("ModelMetadataSchema", schema=ModelMetadataSchema)
spec.components.schema("ErrorSchema", schema=ErrorSchema)
The code above can be found here.
To document the paths of the API, the OpenAPI specification has to be added to the docstring of the controller functions that are registered with the Flask application, an example of how to do this can be found here. After this is done, we can add the paths to the OpenAPI document using the code below:
with app.test_request_context():
    spec.path(view=get_models)
    spec.path(view=get_metadata)
    spec.path(view=predict)
The code above can be found here.
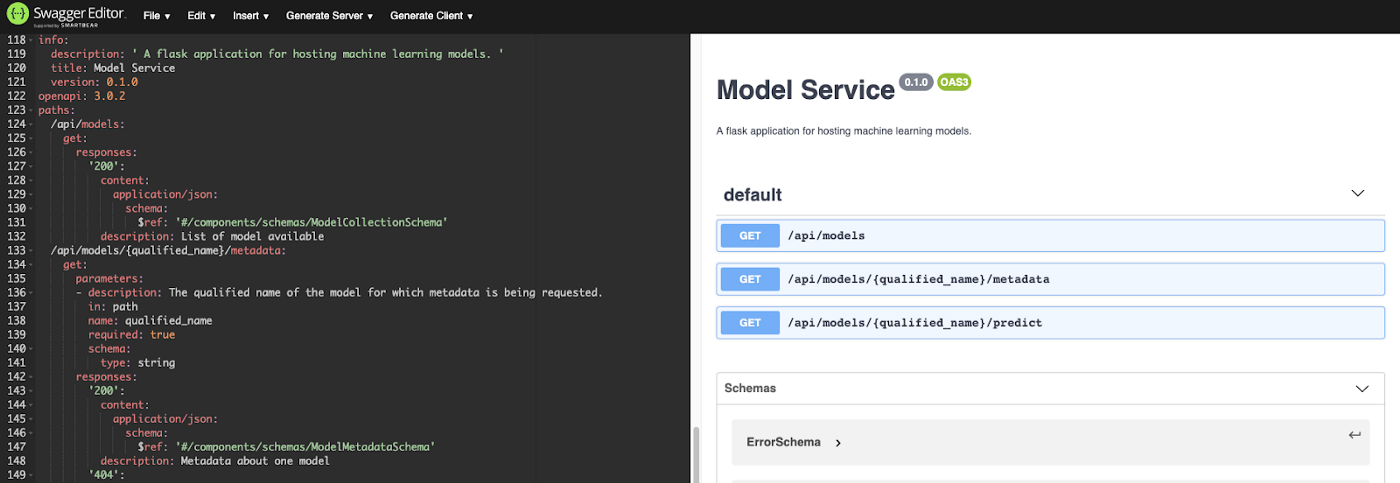
Once all the components are loaded from the codebase, the OpenAPI document can be saved to disk as a YAML file, using this code. The resulting file can be found here. There is also an open source viewer for OpenAPI documents which is able to do automatic code generation and renders a webpage for viewing the document:
Conclusion
In this blog post I showed how to create a web application that is able to host any model that inherits from and follows the standards of the MLModel base class. By using an abstraction to deal with machine learning model code, it becomes possible to write an application that can deploy any model, instead of building applications that can deploy only one ML model.
A drawback of this blog post's approach is that the types of the fields in objects given and returned from the model object's predict() method must be serializable to JSON and the schema package must be able to create a JSON schema for them. This is not always easy to do with more complicated data models. Since this is a web application, the use of JSON schema makes a lot of sense, but there are situations in which a JSON schema is not the best way to publish schema information.
A point I want to highlight is that I am purposefully maintaining separate codebases for the model code and the application code. In this approach, the model is a python package that is installed into the application codebase. By separating the model code from the application code, creating new versions of the model becomes simpler and more straightforward. It also enables Data Scientists and engineers to maintain separate codebases that better fit their needs, as well as making it possible to deploy the same model package in multiple applications and to deploy different versions of the same model.