This blog post builds on the ideas started in three previous blog posts.
In this blog post I'll show how to deploy the same ML model that l deployed as a batch job in this blog post, as a task queue in this blog post, inside an AWS Lambda in this blog post, as a Kafka streaming application in this blog post, and a gRPC service in this blog post, and as a MapReduce job in this blog post.
The code in this blog post can be found in this github repo.
Introduction
In the world of web applications, the ability to create responsive and interactive experiences is limited when we do normal request-response requests against a REST API. In the request-response programming paradigm, requests are always initiated by the client system and fulfilled by the server and continuously sending and receiving data is not supported. To fix this problem, the Websocket standard was created. Websockets allow a client and service to exchange data in a bidirectional, full-duplex connection which stays open for a long period of time. This approach offers much higher efficiency in the communication between the server and client. Just like a normal HTTP connection, Websockets work in ports 80 and 443 and support proxies and load balancers. Websockets also allow the server to send data to the client without having first received a request from the client which helps us to build more interactive applications.
Just like other web technologies, Websockets are useful for creating applications that run in a web browser. Websockets are useful for deploying machine learning models when the predictions made by the model need to be available to a user interface running in a web browser. One benefit of the Websocket protocol is that we are not limited to making a prediction when the client requests it, since the server is able to send a prediction from the model to the client at any time without waiting for the client to make a prediction request. In this blog post we will show how to build a Websocket service that works with machine learning models.
Package Structure
To begin, we set up the project structure for the websocket service:
-   model_websocket_service ( python package for websocket service )
    -   static (Javascript files)
    -   templates (HTML templates for UI)
    -   __init__.py
    -   config.py (configuration for the service)
    -   endpoints.py (Websocket handler)
    -   ml_model_manager.py (class for managing models)
    -   schemas.py (schemas for the API data objects)
    -   views.py (web views for the UI)
-   scripts (test script)
-   tests (unit tests)
-   Dockerfile
-   Makefle
-   README.md
-   requirements.txt
-   setup.py
-   test_requirements.txt
This structure can be seen here in the github repository.
Websockets
Websockets are fundamentally different from normal HTTP connections. They are full-duplex, which means that the client and server can exchange data in both directions. Websocket connections are also long-lived, which means that the connection stays open even when no messages are being exchanged. Lastly, websocket connections are event-based, which means that messages from the server are handled by the client in an "event handler" function that is registered to an event type. The same happens in the server code, which handles events from the client by registering handlers. There are four default events that are built into the Websocket protocol: open, message, error, and close. Apart from these event types, we are free to add our own event types and exchange messages through them.
Installing the Model
To begin working on a Websocket service that can host any ML model, we'll need a model to work with. For this, we'll use the same model that we've used in the previous blog posts, the iris_model package. The package can be installed directly from the git repository where it is hosted with this command:
pip install git+https://github.com/schmidtbri/ml-model-abc-improvements
This command should install the model code and parameters, along with all of its dependencies. To make sure everything is working correctly, we can make a prediction with the model in an interactive Python session:
>>> from iris_model.iris_predict import IrisModel
>>> model = IrisModel()
>>> model.predict({"sepal_length":1.1, "sepal_width": 1.2, "petal_width": 1.3, "petal_length": 1.4})
{'species': 'setosa'}
Now that we have a working model in the Python environment, we'll need to point the service to it. To do this, we'll add the IrisModel class to the configuration in the config.py file:
class Config(dict):
    models = [{
        "module_name": "iris_model.iris_predict",
        "class_name": "IrisModel"
    }]
The code above can be found here.
This configuration gives us flexibility when adding and removing models from the service. The service is able to host any number of models, as long as they are installed in the environment and added to the configuration. The module_name and class_name fields in the configuration point to a class that implements the MLModel interface, which allows the service to make predictions with the model.
As in previous blog posts, we\'ll use a singleton object to manage the ML model objects that will be used to make predictions. The class that the singleton object is instantiated from is called ModelManager. The class is responsible for instantiating MLModel objects, managing the instances, returning information about the MLModel objects, and returning references to the objects when needed. The code for the ModelManager class can be found here. A complete explanation of the ModelManager class can be found in this blog post.
Defining the Service
The websocket service is built around the Flask framework, which can be extended to support Websockets with the flask_socketio extension. The Flask application is initialized in the __init__.py file of the package like this:
app = Flask(__name__)
The code above can be found here.
Now that we have an application object, we can load the configuration into it:
if os.environ.get("APP_SETTINGS") is not None:
    app.config.from_object("model_websocket_service.config.{}".format(os.environ['APP_SETTINGS']))
The code above can be found here.
The configuration is loaded according to the value in the APP_SETTINGS environment variable. This allows us to change the setting based on the environment we are running in. Now that we have the app configured we can initialize the Flask extensions we'll be using:
bootstrap = Bootstrap(app)
socketio = SocketIO(app)
The code above can be found here.
The Bootstrap extensions will be used to build a user interface and the SocketIO extension will be used to handle the Websocket connections and events. With the extensions loaded, we can now import the code that handles the Websocket events, REST requests, and renders the views of the UI:
import model_websocket_service.endpoints
import model_websocket_service.views
The code above can be found here.
Lastly, we will instantiate the ModelManager singleton at application startup. This function is executed by the Flask framework before the application starts serving requests. The models that will be loaded are retrieved from the configuration object that we loaded above.
@app.before_first_request
def instantiate_model_manager():
    model_manager = ModelManager()
    model_manager.load_models(configuration=app.config["MODELS"])
The code above can be found here.
With this code, we set up the basic Flask application that will handle the Websocket events.
Websocket Event Handler
With the application set up, we can now work on the code that handles the Websocket events. This code is in the endpoints.py module. To begin, we'll import the Flask app object and the socketio extension object from the package:
from model_websocket_service import app, socketio
The code above can be found here.
A websocket handler is just a function that is decorated with the \@socketio.on() decorator. The decorator registers the function as a Websocket event handler with the Flask framework, which will call the function whenever an event of the type described in the decorator is received by the application. We'll use the decorator here to handle events of type "prediction_request", which will handle the prediction requests that clients send to the server.
@socketio.on('prediction_request')
def message(message):
    try:
        data = prediction_request_schema.load(message)
    except ValidationError as e:
        response_data = dict(type="DESERIALIZATION_ERROR", message=str(e))
        response = error_response_schema.load(response_data)
        emit('prediction_error', response)
        return
The code above can be found here.
The first thing we do when receiving a message from the client is to try to deserialize it with the PredictionRequest schema. This schema contains the inputs to the model predict() method and also the model's qualified name. If the deserialization fails, we'll respond to the client by emitting a prediction error message back to the client using the ErrorResponse schema. The emit() function is provided by the socketio extension and is used to send events to the client from the server.
Now that we have a deserialized prediction request from a client, we'll try to get a reference to the model from the model manager. The service will emit an ErrorResponse object back to the client system if it fails to find the model that is requested by the client.
model_manager = ModelManager()
model_object = model_manager.get_model(qualified_name=data["model_qualified_name"])

if model_object is None:
    response_data = dict(model_qualified_name=data["model_qualified_name"], type="ERROR", message="Model not found.")
    response = error_response_schema.load(response_data)
    emit('prediction_error', response)
The code above can be found here.
If the model is found, then this code will be executed:
else:
    try:
        prediction = model_object.predict(data["input_data"])
        response_data = dict(model_qualified_name=model_object.qualified_name, prediction=prediction)
        response = prediction_response_schema.load(response_data)
        emit('prediction_response', response)
    except MLModelSchemaValidationException as e:
        response_data = dict(model_qualified_name=model_object.qualified_name, type="SCHEMA_ERROR", message=str(e))
        response = error_response_schema.load(response_data)
        emit('prediction_error', response)
    except Exception as e:
        response_data = dict(model_qualified_name=model_object.qualified_name, type="ERROR", message="Could not make a prediction.")
        response = error_response_schema.load(response_data)
        emit('prediction_error', response)
The code above can be found here.
If the prediction is made successfully by the model, a PredictionResponse object is serialized and emitted back to the client through the 'prediction_response' event type. If the model raises an MLModelSchemaValidationException error, the error is serialized and sent back by emitting an ErrorResponse object back to the client. If any other type of exception is raised, a ErrorResponse object is created and sent back to the client.
The Websocket handler that we built in this section is the only one that we need to add to the service in order to expose any machine learning models to clients of the Websocket service. The handler is able to forward prediction requests to any model that is loaded in the ModelManager singleton. The handler is also able to handle any exceptions raised by the model and return the error back to the client.
REST Endpoints
In order to make the Websocket service easy to use, we will be adding two REST endpoints that expose data about the models that are being hosted by the service. Even though the models can be reached directly by connecting to the Websocket endpoint and sending prediction request events, knowing what models are available and data to send into each model is helpful for users of the service.
The first REST endpoint queries the ModelManager for information about all of the models in it and returns the information as a JSON data structure to the client.
@app.route("/api/models", methods=['GET'])
def get_models():
    model_manager = ModelManager()
    models = model_manager.get_models()
    response_data = model_collection_schema.dumps(dict(models=models))
    return response_data, 200
The code above can be found here.
The second REST endpoint is used to return metadata about a specific model hosted by the service. The metadata returned includes the input and output schemas that the model uses for it's prediction function.
@app.route("/api/models/<qualified_name>/metadata", methods=['GET'])
def get_metadata(qualified_name):
    model_manager = ModelManager()
    metadata = model_manager.get_model_metadata(qualified_name=qualified_name)

    if metadata is not None:
        response_data = model_metadata_schema.dumps(metadata)
        return Response(response_data, status=200, mimetype='application/json')
    else:
        response = dict(type="ERROR", message="Model not found.")
        response_data = error_response_schema.dumps(response)
        return Response(response_data, status=400, mimetype='application/json')
The code above can be found here.
Using the Service
In order to test the Websocket server we wrote a short python script that connects through a websocket, sends a prediction request, and receives and displays a prediction response. The script can be found in the scripts folder.
The script's main function connects to localhost on port 80 and sends a single message to the prediction_request channel:
sio = socketio.Client()

def main():
    sio.connect('http://0.0.0.0:80')
    data = {'model_qualified_name': 'iris_model', 'input_data': {'sepal_length': 1.1, 'sepal_width': 1.1, 'petal_length': 1.1, 'petal_width': 1.1}}
    sio.emit('prediction_request', data)
The code above can be found here.
To receive a prediction response from the server, we register a function that will be called on every message in the "prediction_response" channel:
@sio.on('prediction_response')
def on_message(data):
    print('Prediction response: {}'.format(str(data)))
The code above can be found here.
To use the script, we first start the server with these commands:
export PYTHONPATH=./
export APP_SETTINGS=ProdConfig
gunicorn --worker-class eventlet -w 1 -b 0.0.0.0:80 model_websocket_service:app
Then we can run the script with this command:
python scripts/test_prediction.py
The script will send the prediction request and then print the response from the server to the screen:
Prediction response: {'prediction': {'species': 'setosa'}, 'model_qualified_name': 'iris_model'}
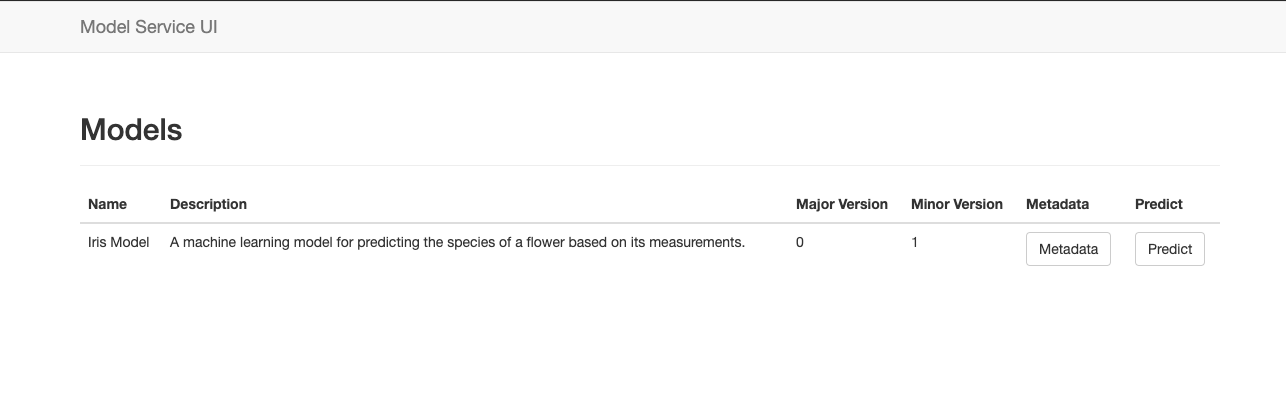
Building a User Interface
In order to show how to use the Websocket service in a real-world client application we built a simple website around the Websocket and REST endpoints that were described above. The user interface leverages the models and metadata REST endpoints to display information about the models being hosted by the service, and it uses the Websocket endpoint to make predictions with the models.
This user interface is similar to the one we built for this blog post, where we showed how to deploy models behind a Flask REST service. We are reusing a lot of the same code here.
Flask Views
The Flask framework supports rendering HTML web pages through the Jinja templating engine. We created an HTML template that displays the model available through the service. The view code uses the ModelManager object to get a list of the model being hosted, then renders the list to an HTML document that is returned to the client's web browser:
In order to show a model's metadata, we built a view that queries the model object directly and renders an HTML view with the information:
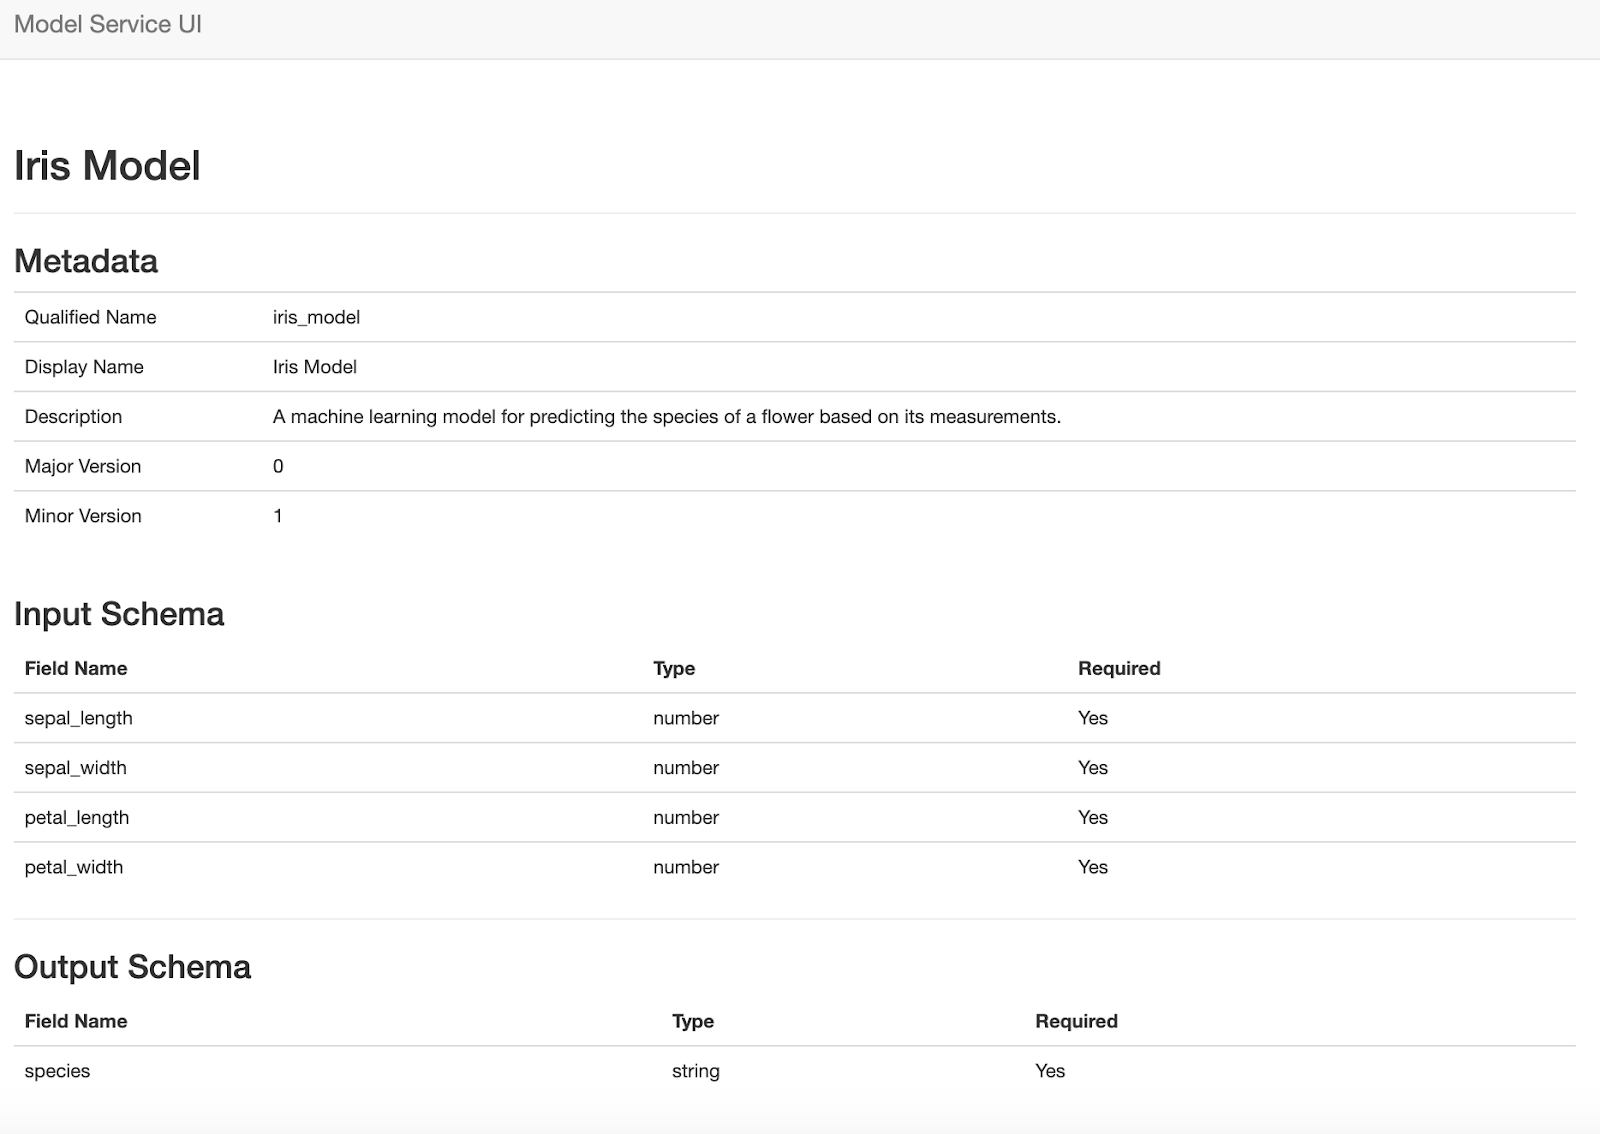
Both of these views are rendered in the service and do not use the REST endpoints to retrieve the information about the models.
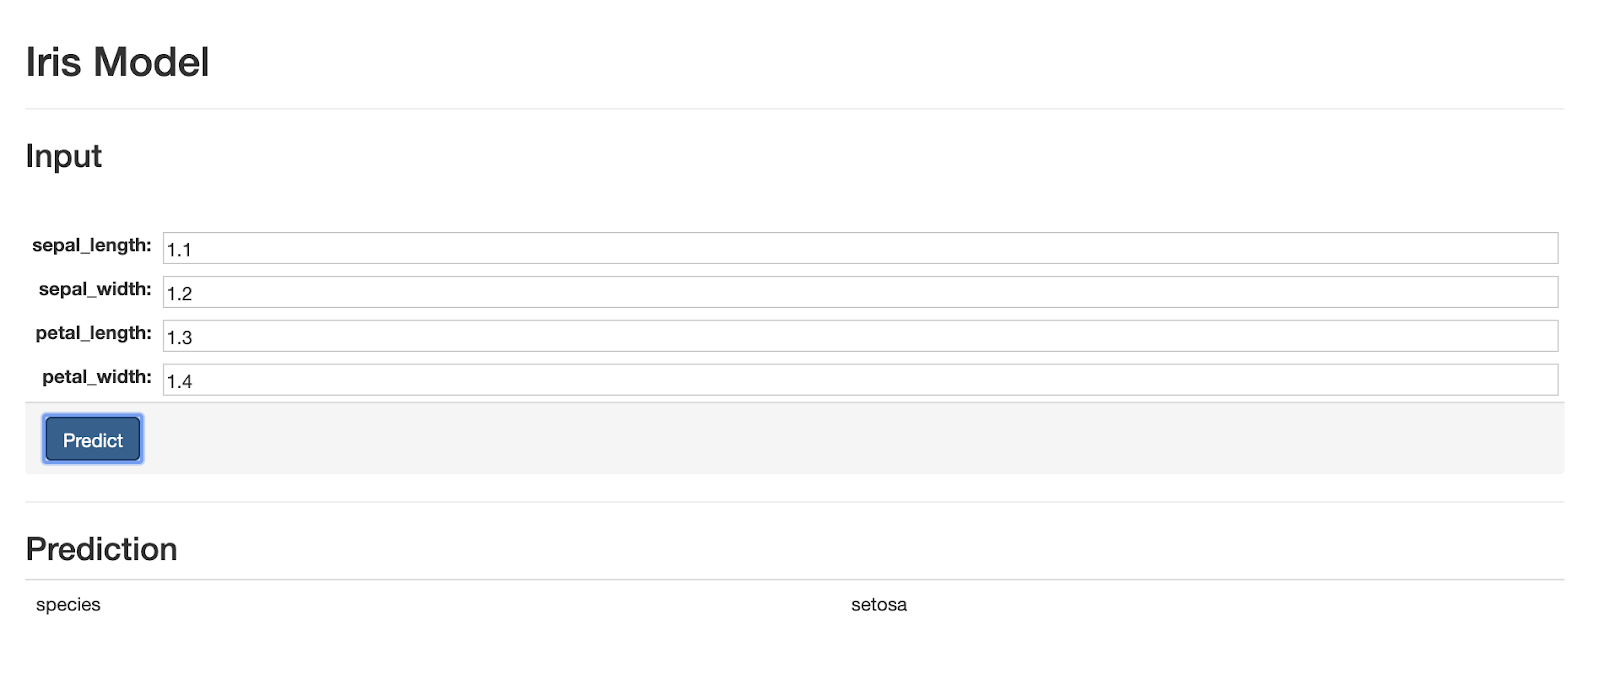
Dynamic Web Form
The last webpage we'll build for the application is special because it renders a dynamically -generated form that is created from the model's input schema. The webpage uses the model's metadata REST endpoint to get the input schema of the model and uses the brutusin forms package to render the form in the browser.
The form accepts input from the user and sends it to the server as a Websocket event of type 'prediction_request'. The webpage also has a Websocket event listener that is able to render all of the 'prediction_response' and 'prediction_error' Websocket events that the server emits back to the client. The code for this webpage can be found here.
Closing
The Websocket protocol is a simple way to build more interactive web pages that has wide support in modern browsers. By deploying ML models in a Websocket service, we're able to integrate predictions from the models into web applications quickly and easily. As in previous blog posts, the service is built so that it is able to host any ML model that implements the MLModel interface. Deploying a new ML model is as simple as installing the python package, and adding the model to the configuration of the service. Combining the Websocket protocol with machine learning models is quick and easy if the code is written in the right way.